The Shed Logo
Search
Close this search box.

How to steam bend wood

This project to make a stool was developed as a way of introducing students to a number of basic wood-bending and shaping techniques, whilst also giving experience in several useful applications of the router. The stool consists of two legs in the form of continuous steam-bent hoops or arches, which are housed into matching radiused slots at either end of a curved seat. The legs are stiffened by the addition of smaller arches that fit between them and the centre underside of the seat. For the purposes of this article, I am going to focus on the steam-bending aspect involving the legs as that is the technique that woodworkers seem the most reluctant to try.

Steam-bending legs for a stool
By David Haig

Prototype in locally grown black walnut by David Haig. Students in the course shown here used elm for the seat, ash for the legs, red oak for the hoop stretchers

This project to make a stool was developed as a way of introducing students to a number of basic
wood-bending and shaping techniques, whilst also giving experience in several useful applications of the router.
The stool consists of two legs in the form of continuous steam-bent hoops or arches, which are housed into matching radiused slots at either end of a curved seat. The legs are stiffened by the addition of smaller arches that fit between them and the centre underside of the seat. For the purposes of this article, I am going to focus on the steam-bending aspect involving the legs as that
is the technique that woodworkers seem the most reluctant to try.
There are actually a great number of possible ways for making the seat itself, including carving it from solid, as well as laminating and kerf-cutting as illustrated here. For the legs and under-stretchers though there is nothing as efficient, attractive, and economical as steam-bending them
from solid wood.
To understand the steam-bending process, it helps to think of wood as composed of bundles of long hollow rods, surrounded by lignins which act as a kind of thermo-plastic glue. The action of boiling steam happens to be just the right medium for temporarily softening the lignins, allowing
the hollow rods to be shifted and slid past each other, achieving bends way beyond the unheated wood’s natural flexibility.
It will then pretty much stay put in its new configuration if it’s held securely in place while the lignins cool down and reset. The moisture has some softening effect but it is principally the heat
that is involved, and steam at 100 degrees, not pressurised, has been found to be the best way to heat soften timber. There are chemical processes that can do the same job actually but they are far more expensive and technically challenging.

Where it begins, steam box with wood
The bend begins. Note clamp in centre

Source
So, what is required for a modest but efficient steam-bending set-up?
Firstly, you need a source of plentiful wet steam. I use a stainless steel tank (an ex-Agee preserving
jar steriliser) that holds about 25 litres with a 2 kW element, a lid welded on with a 13 mm outlet pipe, and a big screw-on filling cap.
It boils water at the rate of about a litre and a half per hour. If it is completely filled it takes nearly
two hours to come to the boil, so I only put in enough water to comfortably last the steaming time
I need. If it runs low, it can be replenished with boiling water (I use a gas burner).
There are also small commercial boilers around for wallpaper stripping and the like. These are very fast and efficient and allow you to refill via a cold-water holding tank. The steam needs to be directed through a connecting hose into a container that can be as simple as a length of pipe with rags stuffed in the ends if you have just one or two bends in mind. Be cautious about plastic spouting, though, as it needs to be the right sort of plastic to withstand the heat and not melt…
I speak from experience.

Bending leg
Leg clamped
Locked up
Veritas end-stop and strap system

Steam box
However, making a good steam box that will last years is very simple; it needs just one sheet
of exterior 18 mm ply and a length of half-inch (13 mm) copper pipe. The diagram shows a good basic pattern.
Note particularly that all screws and fittings must be of brass or stainless, and you should not try to seal or paint any part of the box. Paint or seal will simply not stay on, and the ply lasts much better if it can properly dry out between uses. Also, note, that there must be a small outlet for the steam…you don’t want to make a bomb.
Timber needs about one hour per inch (25 mm) of thickness to soften enough for a successful bend. In this case, the timber blank for the leg is 32 mm at its thickest. So, once the steam box is up to full temperature, an hour and a half will be needed. It’s good to have the timber blanks raised off the bottom of the steam box with a little space between every piece.

Steam box boiler
Steam box and drainage pipe

Compression, stretching
To see why you must have the next piece of equipment, it’s necessary to understand something of a little-known property of wood. Basically, wood is quite happy to be compressed but is very reluctant to be stretched. Some species can be compressed up to 30 percent of its initial length but wood will stretch no more than a maximum of one to two percent.
To get wood to bend around a tight curve without allowing the outer fibres to stretch and risk rupturing, you need to fit the straight length of the timber blank in between two tight-fitting wood (or steel) end-stops, connected together at exactly the right length by a nonstretching
metal strap the same width as the blank (see photo).
This strap is placed against what will become the outer face of the bend. When the bend occurs, the neutral axis of the wood is transferred to the outer face, and the strap and end-stops force all the rest of the fibres to go into compression. A surprising amount of shortening takes place as the inner fibres simply disappear into each other. Note that one of the end-stops is adjustable for length, so it is possible to snug up this stop and make small adjustments as the hot wood is set into the strap.

Bungy cord fastens around angled screws. Hinged door is reinforced with 25 or 50 mm-thick hardwood to prevent warping and buckling
Setting up second-stage setting or drying form

Good info source
The steam-bending end-stop and strap system made by the Canadian company Veritas, (familiar
to many woodworkers) is illustrated here. They also provide an excellent short booklet that gives
all the information you need to get started with wood-bending if this article hasn’t already done it.
For a pair of legs, you will need both a bending form and a setting (or drying) form and they should be identical in profile. You will need to attach the bending form firmly to a table surface and the table itself needs to be attached firmly to the floor. Otherwise, you will simply drag the table around your workshop when trying to do the bend.
The bending form needs to be the full width of the stool leg and should be either of ply or of solid wood. MDF won’t last with the heat and moisture of steamed wood. The setting form, which you transfer the bent piece onto after about half an hour when the outer fibres have cooled somewhat, can be made of MDF and can be a bit narrower than the full width of the bending form.
This then frees up the bending-strap setup for the next leg-blank which is ready in the steam box. A fan blowing across the bent blank can reduce this waiting time down to about 15 minutes. The pattern for these forms is shown in the photo.

Routing stool seat for legs

Extreme bend
This project involves quite an extreme bend (135 mm inner radius and 154 mm outer radius) so in
your choice of suitable wood you are limited by several factors; one is the species, and there are not too many that will do a bend like this, and the second is the need for the timber to have been air-dried.
This cuts out most commercially available wood, as the hot kilning schedules for commercial timber make the lignins much less responsive to any subsequent softening. Gentle bends, however, (like the back-legs of dining chairs) can be achieved quite readily with most timbers, even kiln-dried, especially if they are soaked for 24 hours before steaming. Species that bend to tight radii are mainly in the family of the temperate hardwoods—oak, ash, elm, sycamore, beech (English or European) and walnut are the best.
Softwoods, tropical hardwoods, and most eucalypts are much less responsive. However, it is worth being a bit adventurous here. For this project, I once steam-bent a pair of legs made of native lancewood, and they bent just fine. Kowhai is another native timber said to bend well and doubtless there are others.
Two other very important considerations are;
* firstly, to have as far as possible straight-grained and knot-free wood;
* secondly, to have wood that is recently air-dried to about 12 percent moisture content.
Although greener wood bends more easily, drier wood is less liable to change shape after the steam bent- blank has dried out and this is important for this particular project. Very old and dry wood is not so good.
Note that the wood for these leg blanks is oversized by not only 60 to 75 mm in length, but also by 3 mm to 5 mm in width and thickness. Also note the leg is thinner as it goes around the top curve, getting thicker at each end. Some of this thinning can be done on the leg blank itself using a bandsaw or a jig on the thicknesser, prior to bending. This makes the bend easier. Bends
of unvarying thickness generally look commercial and unattractive anyway, and I try to avoid them in what I design.

David Haig checks setting form

Fitting
Fitting the legs into the seat slots requires that the legs and slots are of exactly the same radius. The steam bending process deforms the wood too much to allow for such fine tolerances, and the bent blank as it dries will also change shape to some extent. The oversizing of the leg blanks, therefore, allows you some “wriggle-room.” It means you can fit an accurately radiused pattern onto the top of the steam-bent leg, machine off the excess wood, and achieve the tight fit into the seat slots
that you want.
Prior to this, the legs will need to be planed flat on their edges. This can be done with care over a jointer, feeding one end of the curve beneath the cutter-guard and once it is through, maintaining downward pressure on the out-feed side and so pulling the rest of the bend carefully over the cutter block, always with the cutter guard in place above.

Slots in seat end and plywood template
Fitting legs in seat slots

Hoop stretchers
The two little hoop stretchers can be bent side by side on the appropriate form. This means if you are making just one stool, you don’t need to bother about making a drying form. It is easier to cut them to width before they are bent; as they are tricky to cut in half long-wise when they are hoop-shaped. As they are only 13 mm thick, they are bent at the finished size and just need to be sanded or scraped to clean up afterward, prior to fitting.
They can be simply trued lightly with a sharp plane and glued and clamped directly onto the inner
face of the legs. Once the glue has set, you can drill a 6 mm hole and reinforce the joint with a wooden peg. The part that fits up to the underside of the seat will need to be scribed and have a flat planed onto it so that it’s a snug fit—excellent fine hand-planing practice.

Hoop stretchers bent at finished size
Legs machined to accurate dimension using ply template

Seat
The seat itself can be made in a number of ways, including being cut out from solid wood. I like to do it by cutting a series of laminates,(see diagram) with a central laminate at 18 mm.
This is subsequently tapered at each end down to about 12 mm, and then kerfed on a cross-cut
sledge on the table saw, leaving a 3 mm uncut layer. The tapering produces the thicker central section of the seat. This kerfed section is then as flexible as the rest of the laminates, and they can
all be glued up as a “sandwich” on a curved form, either with a matching male and female form and clamps or with just a male (convex) form and pressed in a vacuum-bag.
This way you can get a lovely book-matched pattern on the top of the seat. If you are careful, the end grain orientation on the seats can be matched closely enough to give the appearance of a single board. It also makes for a seat both light in weight and very strong, with no short-grain as there would be in a seat cut from solid.
This method does require the addition of edge-capping though. These edge-caps can be steam-bent and pressed between two moulds, but be aware that a great deal of clamping pressure is needed to form the re-curve shape. They can also be formed from narrow laminated strips glued up in sequence. In both cases, one wide one can later be split longwise to form the two you need.
Cutting the slots in the end of the seat requires some careful layout and cutting of the template. The slot itself is cut with a straight cutter, guided by the ring collar in the router base against a plywood template.
This is itself screwed to a stout block which can be angled to give about 2º of outward slant to the legs. The block is aligned and then clamped firmly to the seat-end (see photo).
The plywood template is set out using a compass to define the inner and outer radius of the slot that guides the ring collar. Their exact position to match the diameter of the leg will depend on the difference between the diameter of the ring collar and the diameter of the cutter you are using (you will want a long-reach cutter with a minimum 12 mm diameter).
A router attached to a finely adjustable trammel point is needed to cut out the template accurately. Trial and error with a scrap is advisable when making the slot template, using the leg template as a guide to a good final fit.

Edging strip pressed between formers. Glued-up seat behind.

WOOD-BENDING
Dave Pratt of Woodform Design knows a lot about bending wood and is aware when an article on
steam-bending wood appears the phones run hot at his production plant with people wanting an easy, one-off piece of wood bent.
He says there are many more ways of bending wood than just with steam. Sometimes steam bending wood is not the best or most economical way, particularly for the expense of setting up jigs for a one-off prototype for, say, a student exercise.
His plant is one of only seven stand-alone wood-bending operations in the world not associated
with furniture factories or the like.
Processes include steam, steam/chemical, chemical, and mechanical bending, and laminations, with operational steps like impregnation, roll-forming, and drying. Protected technology includes the plasticisation of MDF’s man-made and fibre construction products, allowing bending and extrusion of this common board. Perfection of the skills using pine have sustainably improved opportunities with New Zealand’s greatest resource.
His company’s technology allows for, among other things, door mouldings, architraves, chair arms and bar stool legs, 180 x 90 mm bent kwila for outdoor seating, and specialty machining of laminated large radius mouldings or production of curved dowels cut from solid 45 mm European beech. There’s even sculpture.
Peter Nicholls glowing red, curved wood and galvanized steel sculpture Tomo snakes through trees at Connell’s Sculpture Park on Waiheke Island, the sinuous form made possible courtesy of Dave Pratt and his team.
Dave Pratt has noted that all aspects of bending timber requires machining of some description and with bent timber, this is more difficult.

Share:

More Posts

A versatile set of drawers

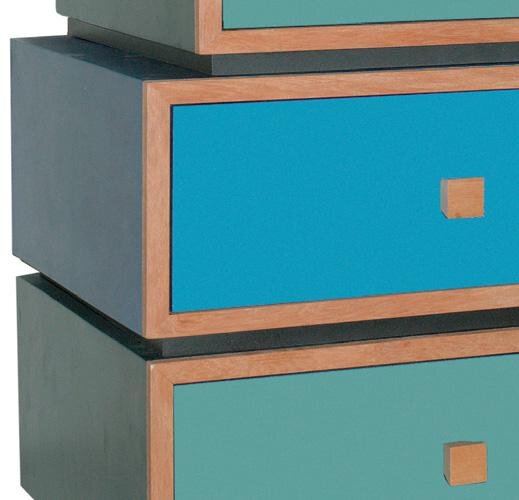
I have constructed this project to demonstrate the concept of modular design for a set of drawers.
A modular concept allows you to design drawer space to fit your needs. You can add on or change the layout to suit, or you could mix them with shelves to make up modules to fit an awkward space or just to express your creativity.

Out of the box

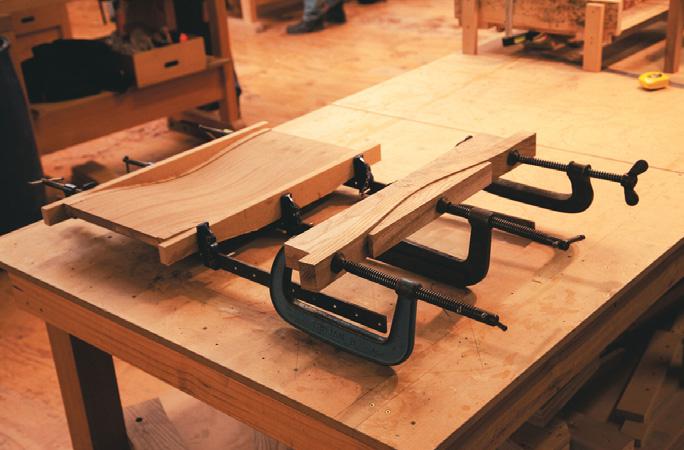
The modern incarnation of the chest is the blanket box which sometimes doubles as a seat so it needs to be strong enough to support weight as well. This project is no more than a box with a lid and base. Dowels are the primary jointing method throughout and the top and base use a floating panel within a frame. There is also a small sliding drawer which is also dowelled together.

Rolling stool build

My wife, Rosaleen, loves to cook, and will happily spend an afternoon in the kitchen cooking meals to be frozen and given to our daughters and their friends whenever the need arises or opportunity presents.
However, arthritis makes standing in one position for long periods difficult for her. She wanted a stool for the kitchen, but ours is a galley-style layout and quite narrow. It’s wide enough for one person to walk past another working in the space, but the presence of a stool would present a major obstacle. “Why don’t you invent something?” she said.
I love a challenge like that.