The Shed Logo
Search
Close this search box.

Rescue those versatile stepper motors

Magnetism is wonderful stuff. As a way of moving things it has no peer. It has no friction, excessive heat or other unwanted effects, and is easily harnessed in the shed in the guise of stepper motors. These versatile devices have an astonishing range of rotational speeds, from zero to tens of thousands of rpm. Thanks to the precision of digital control, they can accelerate, decelerate, turn a specific number of times or even minute fractions of a single rotation – all repeatedly and reliably.

Harness the power in your workshop with readily available stepper motors
By Richard Feltham

Stepper motors rescued from old printers, faxes or disk drives

Magnetism is wonderful stuff.
As a way of moving things it has no peer. It has no friction, excessive heat or other unwanted effects, and is easily harnessed in the shed in the guise of stepper motors. These versatile devices have an astonishing range of rotational speeds, from zero to tens of thousands of rpm.
Thanks to the precision of digital control, they can accelerate, decelerate, turn a specific number of times or even minute fractions of a single rotation – all repeatedly and reliably. Best of all, in keeping with the sheddies third law of parsimony, they can be scrounged out of almost any discarded computer peripheral. Printers, faxes, disk drives – anything that employs movement will have at least one stepper motor.
They come in a seemingly endless variety of shape, size and power so that almost any shed project can be enhanced by these amazing little prime movers.
What follows is a very brief overview of how stepper motors function, but there is absolutely no substitute for getting your hands on one and seeing what you can make it do. 

Attack the dot matrix printer, and liberate the stepper motor with as many wire leads intact as possible

Start stripping
To this end, attack the host device, in this case an old dot matrix printer, in the traditional manner by undoing all the visible screws and then levering at the joints between the plastic cover with a largish screwdriver.
Remove the carcase of the device and the stepper(s) will be visible, usually at one end or underneath. Liberate these with as many of the wire leads intact as possible. Printed on the back will be the all important motor specifications, with either four, six or eight multicoloured wires emerging from the end opposite the shaft. Note that there should be listings for the phase voltage and amperage.
The principle of operation is simplicity itself. Consider a basic arrangement of four coils at 90 degrees. It is apparent that if any single stator electromagnet is activated, the permanent magnet rotor will move to align North / South with it, as in the diagram. If the coils, or phases, are energised in quick succession the rotor follows: one pulse – one step. In reality, there are numerous stator windings and the rotor has many mini-poles, such that a vernier effect is achieved and the usual angle moved at each step is around 1.8˚.
The internal workings can be easily demonstrated by undoing the peripheral retaining machine screws and withdrawing the rotor assembly – but be warned that getting it back together can be a struggle, as the magnetic force from the rotor is significant.

Specifications printed on the motor

Know your rotors
They come in two flavours, unipolar and bipolar, reflecting subtle differences in the phase connections. The first, unipolar, is with two separate wires to each individual phase. The bipolar variety differs in having a common wire connecting each pair of phases, giving six wires in total, at least for the most common four-phase type.
If connection data is not available, the schematics can be deduced with an ohm-meter, bearing in mind that usually the common phase wires are the same colour. However, as the phases are pulsed during operation, identifying the correct sequence of windings is critically important. This can be determined by passing a momentary DC voltage of the supply value through each phase in turn and observing the effect. The rotor will move to align itself with the active phase and the correct sequence is therefore established.
Mark the shaft with a felt pen to make the rotation easily visible. As ever, remember that common sense safety with electrical components is paramount.
For the stepper motor to function correctly, there has to be a suitably rated DC power supply, usually in the 1-28v range, together with a digital driver circuit that turns the computer instructions into pulses that can be fed to the windings, or phases. Normally, the driver circuitry is part of the host motherboard and often difficult to salvage as a discreet module. But for those with basic soldering skills, the necessary circuit can easily be created from scratch, either via a commercial kitset, or, for the recidivist sheddie, from a reference text, or off the web.

The workings of a stepper motor
Create driver circuitry from a commercial kit or reference text
Arrangement of coils in a unipolar rotor assembly

Wiring instructions
Alternatively, dedicated driver units can be purchased, and although they are very simple to operate, robust and capable of driving a wide range of motors, they do tend to knock a bit of a dent in the shed account . A typical unit is illustrated and shown mounted. Note the wiring instructions are printed on the case, which takes most of the guesswork out of setting it up.
The actual conversion of software commands, such as “turn anti-clockwise 273 revolutions at 500 rpm, decreasing linearly to zero over the last 52 rotations,” into the requisite pulses usually takes place on a purpose-built computer board – although simpler instructions can be generated either by hardwired circuits, or by software.

A typical driver unit, mounted

Countless uses
Programmable microchips, such as the PIC 16F84 type, are eminently suited for this role, particularly if the end-use requires a limited range of movements. A series of NPN transistors on the PIC output lines act as switches and actually drive the phases. Alternatively an external stepper controller chip, such as the UCN 5804, can be used. A few hours spent playing with these fascinating little devices will inevitably spawn many ideas for projects, such as the conversion of your old lathe, or mill for that matter, into a computer numerical control (CNC) machine; automation of repetitive processes; robots; automatically opening the shed door when your arms are full of awkward bundles; sorting fruit; variable speed saws – to mention a scant few potential workshop  applications.
As with everything, exploration is the key to understanding, and with this in mind, we hope in the future to be able to take you through the stages of a typical stepper motor project in some detail – an overhead gantry crane for a G scale model railway – using salvaged components from the old dot matrix printer. And at least one piece of No 8 wire.

An overhead gantry crane for a model railway, to be driven by a stepper motor

Share:

More Posts

Top gears

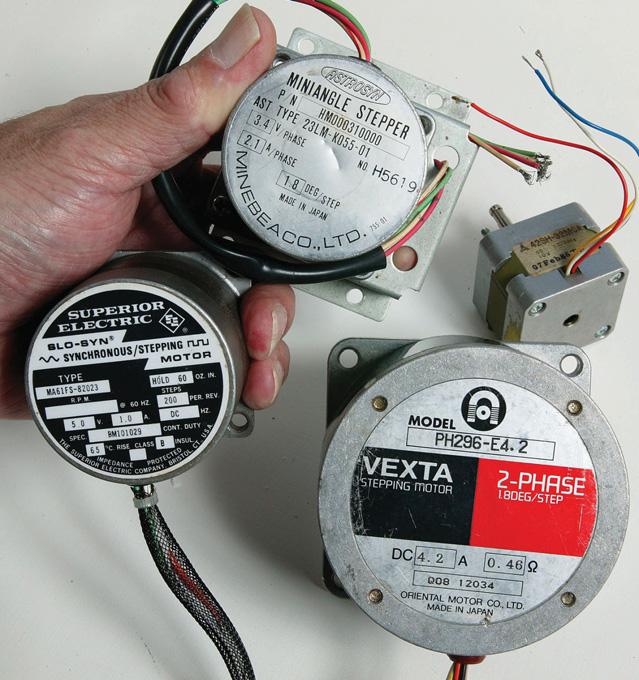
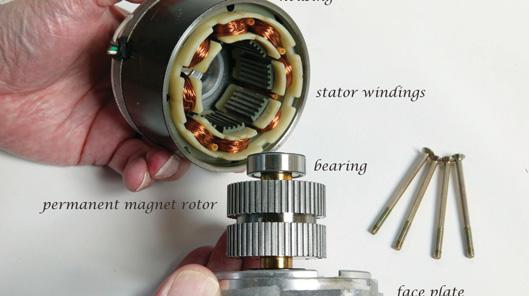
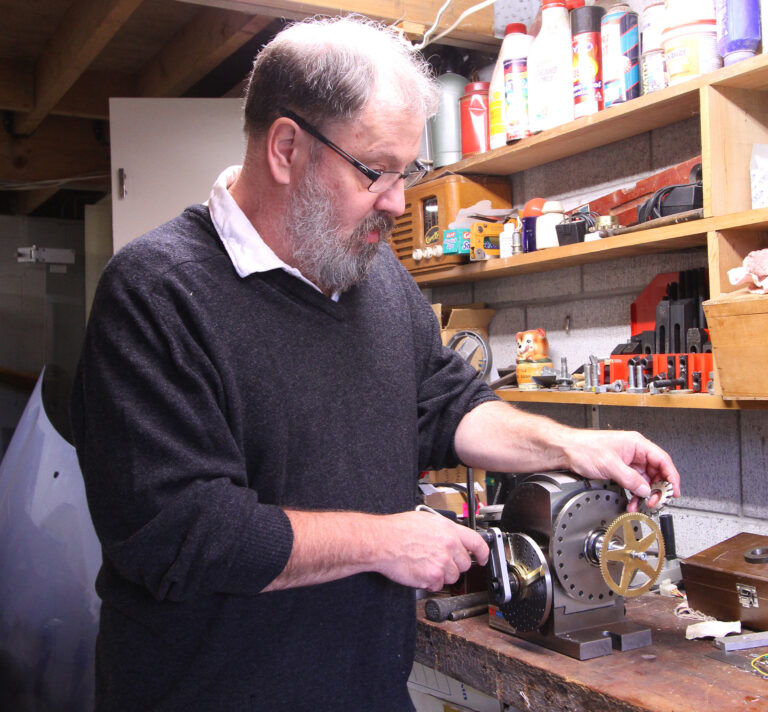
Contrary to what the poets say, its gears, not love, that make the world go round. The magic of an exquisitely constructed timepiece with its myriad whirring cogs is an eternal delight. Horology has always fascinated me, and it has long been an ambition of mine to build the mother of all clocks, an orrery. Named for the 4th Earl of Orrery who commissioned George Graham to make the first modern device in 1704, they mark not just the passing of the hours, but the exact movements of the planets as they beat out Kepler’s laws.