The Shed Logo
Search
Close this search box.

Making a classic chair

The Red Blue chair, designed in 1917 by Gerrit Rietveld, has become one of the most discussed chairs of all time. It's not too difficult to make this as a classic chair as it's all straight boards, but the dimensions and placement are critical.

In this straight-board chair, precision is all-important
By Pete Spring
Photographs: Pete Spring
Diagram: John Towse

Red Blue
The Red Blue Chair by Gerrit Rietveld, seen in versions and reproductions in museums and collections worldwide, was originally white when it was made in 1918. Rietveld later made dark-stain versions before, in 1923, he applied the well-known colours in the manner of the art movement De Stijl, influenced by painter Piet Mondrian. The Museum of Modern Art (MOMA) New York, which owns a 1923 version, notes Rietveld believed there was a greater goal for the furniture designer than just physical comfort: the well-being and comfort of the spirit. In answer to criticism that it was not possible to sit in his chair, Rietveld said: “Zitten is een werkwoord. Als je moe bent, ga je maar liggen.” (“Sitting is a verb. If you feel tired, just go and lie down.”) 

The catalogue MOMA Highlights says Rietveld and his colleagues in the de Stijl art and architecture movement sought to create a utopia based on a harmonic humanmade order, which they believed could renew Europe after the devastating turmoil of World War I.
New forms, in their view, were essential to this rebuilding. In 1971, the Italian furniture design company Cassina signed a licensing agreement with Rietveld’s daughter Elisabeth Eskes-Rietveld for rights to manufacture his furniture designs. But earlier versions sell for high prices at auction. In 2007, this white Rietveld chair (right) sold at Christie’s Amsterdam for €264,00 ($NZ552,000), five times the estimate. Red Blue chairs regularly fetch between $NZ3-7000.

Space legs with jig

I was in the local bookshop when my eye was caught by the front cover of The Shed magazine with a small inset photo of the Cape Cod chair.
It was at that point the slide down the slippery slope began, as I became keenly interested in making chairs. My now long-suffering wife has had to endure three years of me beavering away in my shed—which I had to build first. I had nowhere to put my newly acquired (but old) woodwork machinery which she was kind enough to buy for me in the first place.
When I wasn’t in the shed, I was commandeering her precious computer and scouring the net for information on Cape Cod chairs. Then by chance I came across a photo of the Westport Chair designed by Thomas Lee in 1904 and subsequently manufactured by Harry Bunnell. Originals of these chairs today are worth considerable money.
Using nothing more than cardboard, pencil, ruler, protractor etc as well as a good understanding of the Imperial system, I was able to think my way through the process of how the original chair may have been constructed. I set about making a real Westport chair but to make it repeatable, had to discover how to make a number of jigs.
These proved to be as challenging as trying to make the actual chair itself. But I persevered, did the usual, swore a lot, walked away from it numerous times, wife threatening me with divorce or worse, selling the equipment. Lucky for me I still have my equipment and wife (perhaps that should be the other way round) as well as my fingers.
From the Westport chair, came my interest in wide-board chairs. A lot of colonial and early American furniture was made of board 12-inches (304 mm) wide or part thereof. These are no longer made and plans don’t seem to exist, so I go out to the shed and make my own drawings. I use my instincts a lot and make a best-guess if need be.
Once I am happy with it, I make a prototype, assess it and make any changes that need to be made until I am satisfied. I then finalise the cardboard templates and make ply templates from these.

The two long pieces screwed together and the floating spacers
Marking top of front cross-rail
Marking top of middle cross-rail
Rails protrude 26 mm as marked on the jig
Nail through jig marks screw hole position

The Jig
The six metres of 100 x 50 mm (approximately the old 4 x 2”) includes an allowance for making the jig of 42 x 42 mm dressed timber.
Four pieces are required. The first piece is cut exactly 635 mm long, then it is marked out according to the plan provided. Use a sharp pencil when doing this. Drill the three marking holes then clearly mark a line 26 mm in from each end. Flip the piece over.
The second piece is cut exactly 305 mm long and fixed in section A by screws.
The third and fourth pieces are cut exactly 152 mm long (6”); these are called floating spacers.
Once the 305 mm piece has been screwed on, lie the jig on its side and mark 310 mm from the end and label this “middle leg mark.” Flip it over and from the same end mark 345 mm. Label this “front leg mark.”
These two marks transferred to the front and middle legs establish where the top of front cross-rail and the top of the middle cross-rail will sit. The different heights of the cross rails will determine the slope of the seat from one to the other.
Using the marks 26 mm from each end, you can establish the length that the posts and rails protrude. The three holes allow a nail or awl to leave a slight mark, which establishes where the screws and bolts go.

School woodwork
Before this, my last foray into woodwork was in Form One and Form Two, some 40 years ago.
In fact, pre-2006 one of my last woodworking projects was a fruit bowl with inlays that I made in Form 2 and which I still have. That was in the days of manual training in Eketahuna where I live.
My woodwork teacher in 1968 was Clary Leigh and he taught many boys in the Bush district (now the Tararua district).
I was not surrounded by woodwork skills in my upbringing so why the interest now? To cut a long story short, I guess my experience and interest in woodwork comes down to what’s in your nature versus what comes through nurture.
I have in recent years met my natural father, who trained as a carpenter; his father was a cabinetmaker and his father was a wheelwright and on it goes. So as the TV commercial has it, DIY must be in my DNA. I am self-taught with regards to just about every aspect of what I do. No other woodworker has visited my setup although they would be welcome. But then it’s a farming area where I am surrounded by sheep and cows who, like their owners, don’t show much interest in woodwork.
I get great satisfaction out of making these chairs as the old chaps made them originally. The idea of connecting with the past and understanding how the original designers formulated their design plans, appeals to me. As a qualified diagnostic radiographer, I also have a good understanding of the skeletal and muscular groups in the human body and how they are best accommodated within chair design.

Red Blue chair
The Red Blue chair, designed in 1917 by Gerrit Rietveld, has become one of the most discussed chairs of all time (see the beginning of this article,  Red Blue).
It’s not too difficult to make this as a classic chair as it’s all straight boards, but the dimensions and placement are critical. In making it, I looked at the all-important seat-to-back angle and its relationship with the horizontal and vertical axis.
For my first chair in this style, I worked in reverse order, assembling the seat to the back, then “locking it in” on the workbench with stays. I then offered up the six posts (legs). Once I was happy with their placement, they too were locked in. In determining the height of the posts and the overall width of the chair, I used my instincts.
I think these instincts build up over a lifetime, starting with the first time you slip off the bike pedals. bginning of this article,

Fore-and-aft side-rail screwed on. Note “spacers” top and bottom between middle and back legs
Legs and side rails assembled
Three-axis connection
Cross rails in place
How cross-rail bolts appear in finished chair
Countersink washers and nuts on cross-rail bolts
Hardwood dowel placed in end grain.

Precision is everything
To build subsequent chairs, a different approach is needed. All the rails and posts (legs) go together first. For this I have designed an assembly jig/story stick/marking gauge which is the first part to be built.
It is important to machine-gauge your timber exactly as per the instructions; precision is everything with this chair. I made this chair using imperial measurements although metric measurements are used as the norm. Both are recorded here. I like using imperial measurements as I find them good for estimating the size and proportion of things.
There are still a lot of New Zealand farmers who pace out “feet” using their feet for such things as gateways etc. I use macrocarpa exclusively as it’s readily available locally.
For years it has been used as shelter on farms and now a lot of farmers are milling it themselves or having it milled commercially. I purchase wide boards. This enables me to design and build these styles of chair that are the hallmark of an earlier era and are now consigned for the most part to history or found only in public museums or private ownership.

Clamp arm boards to back cross-rail
Mark ...
... and drill underside of arms
Screw arms into legs and back cross-rail

Cutting list
6 m of 100 x 50 mm (4 x 2”) macrocarpa
5 m of 200 x 25 mm ( 8 x 1”) macrocarpa
4 of 8 x 100 mm galv cup head bolts with nuts/flat washers
Surefix screws: 8 of 32 mm, 44 of 57 mm (chromate or stainless)
All the legs and rails are machined to 42 mm square.
The 200 x 25 mm (8 x 1”) boards are machined to 20-22 mm thick.

Construction
All the leg posts and cross rails are machined to 42 mm square. The 200 x 25 mm boards for the back and seat are machined to 20-22 mm thick.

Legs and rails
Mark out the two 635 mm side rails that run fore and aft using the three holes and 26 mm marks on the jig. Drill and countersink pilot holes on each rail. Using the jig, assemble the front, middle and rear legs and clamp them. Screw the first fore-and-aft side rail to the legs. It will make it easier if you rub soap or wax on the thread of the screws. Do the same with the other side.

Remove 20 mm from middle leg

Cross rails
Using the reference marks on the jig, mark the middle and front legs for the cross rails. Before fitting the seat cross-rails at the top of the front legs and in the middle of the middle legs, round over the edges where they meet the seat boards. Do the same with the back cross-rails.
Screw the 660 mm-long (26”) cross rails to the front and middle legs respectively. With the fore-and-aft side rails already in place, the three-axis x, y and z connection makes a very strong joint. These joints are called Rietveld joints or Cartesian nodes. I use bolts to hold the seat cross-rails in place. The washers and nuts are countersunk.

Use 15 mm spacer in back boards
Space back boards on aluminium fillet

Arms
The fixing for the arms needs some preparation. Because you are screwing the arms into the end grain in the top of the middle and rear legs, drill the centre and glue in a hardwood dowel (this is a wise precaution whenever you put screws into end grain). You will have to pre-drill down the centre of the hardwood dowels before screwing on the arms. Fit the top rail, clamp the arms and mark the underneath of the clamped arms. Drill the underside, then flip over and countersink the holes. Screw the arms into the pre-drilled dowels in the legs and into the back cross-rail at the top of the back legs.

Feet
Remove 20 mm from the two middle legs and round over. These feet do not actually sit on the ground. Mark the four feet on the front and back legs, round over, then drill a 6 mm hole in each end and fit a plastic foot—the Marley plastic foot is optional, but it will protect floors from damage.

Use 15 mm spacer for seat boards

Back-boards
Next, fit the two back-boards. It is easier to do this if you sit them on a wooden or aluminium fillet. Use another piece of aluminium to get 15 mm spaces between the boards. I used scrap pieces from a local aluminium joiner.

Seat boards
Place the two seat boards in position. Mark off the angle of the boards with the back (nominally at 15 degrees) then bevel-cut the ends of the seat boards to this angle. From the bevel end, measure up 482 mm, then cut the other end of the seat boards square. Use a 15 mm spacer and line it up with the back-boards before screwing them into place. Measure off and cut the back cleat to the length required. Screw it onto the back-boards 10 mm down from the top edge. Round off all the ends and arris all the edges to complete your chair.

Cleat cut to correct width

Macrocarpa
Macrocarpa has wonderful grain, and I find Danish oil or decking and furniture oil brings out the best in the grain pattern.
There are many other options available if in doubt check with your local paint or hardware merchant.
Of course, you could paint it red and blue.

Peter Spring and original woodwork

Share:

More Posts

Rimu Dining Chair

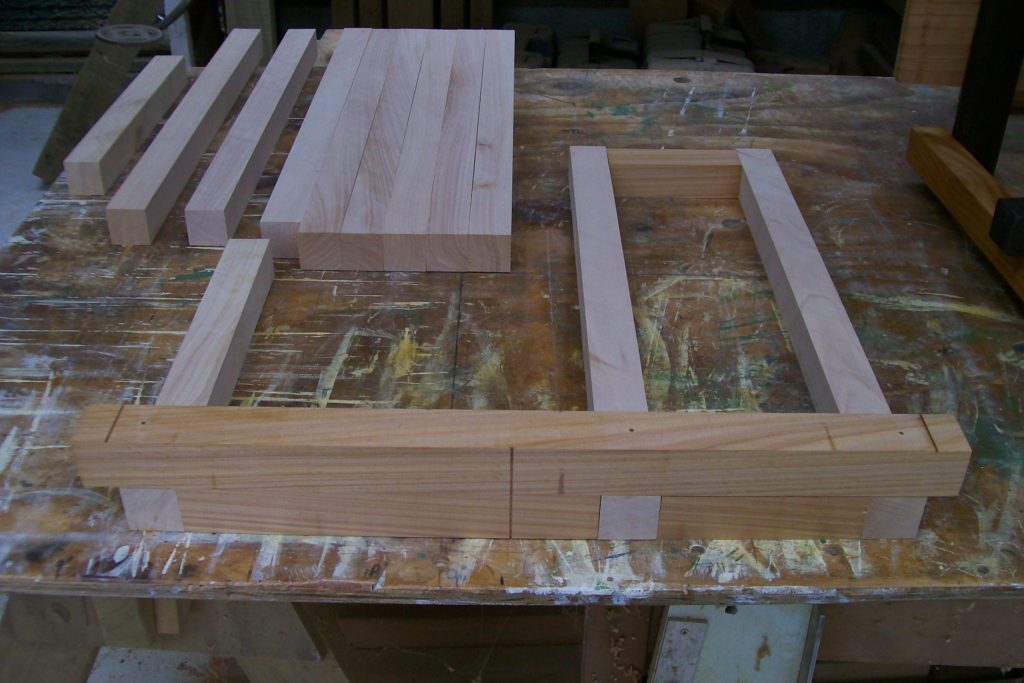
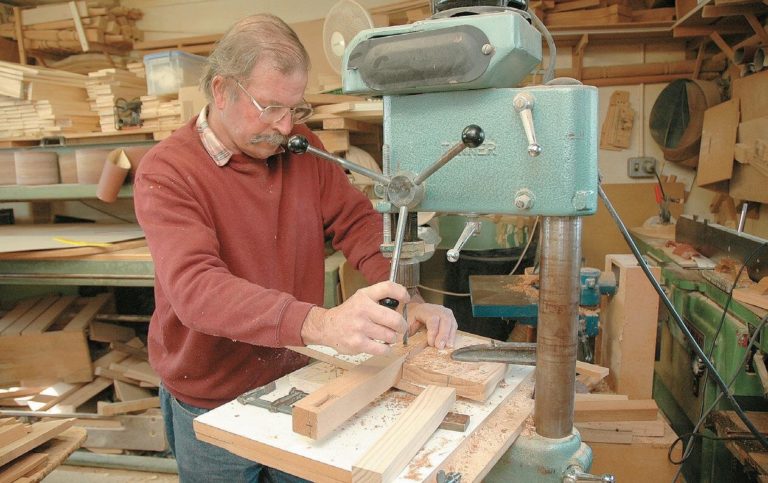
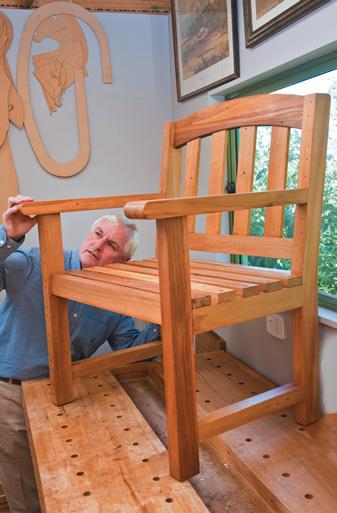
Start by drawing a full-size plan of side elevation and seat plan. You will probably want to make at least four chairs so it is easier to measure angles and sizes and maintain consistency in measuring from a full-size plan. Make a template from 12 or 16 mm MDF or plywood for forming chair back legs directly from the plan shape. I have found the easiest and most accurate method is to punch holes with an awl or sharp point and simply connect up the dots.

Make This Summer Cape Cod Chair

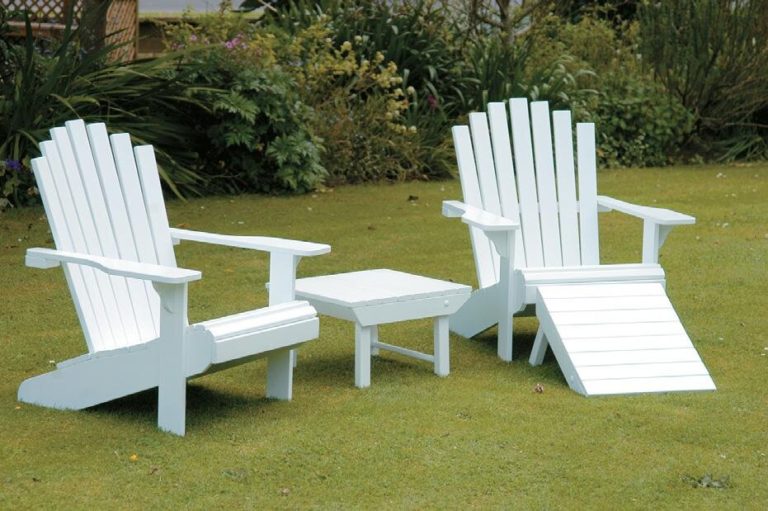
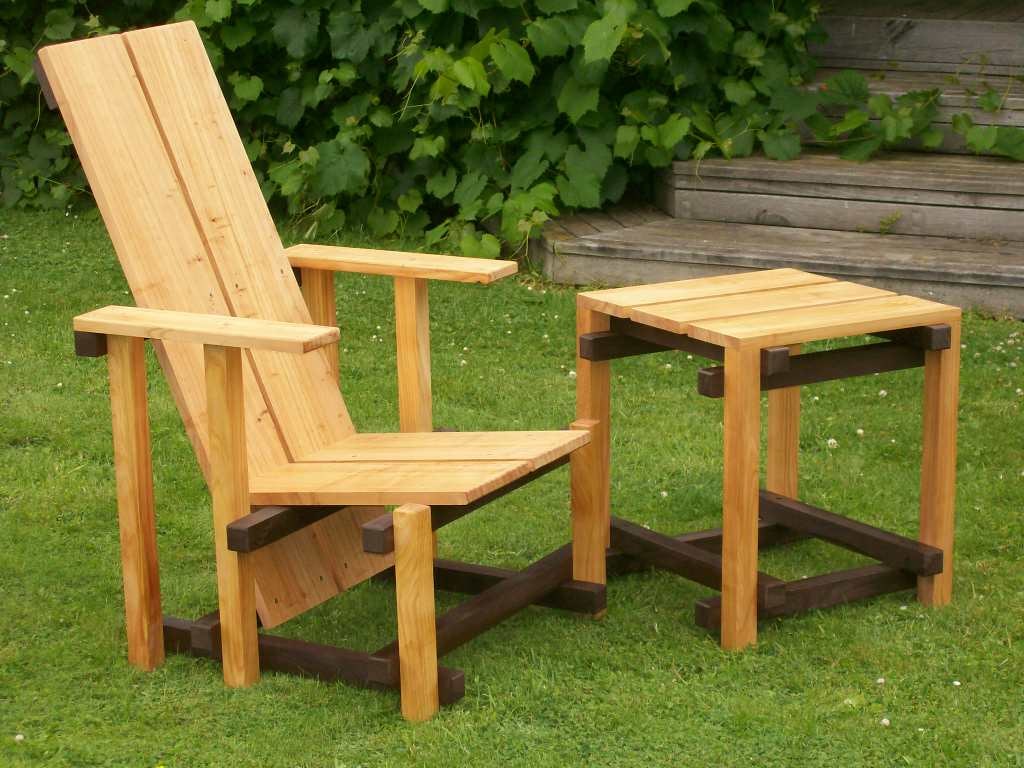
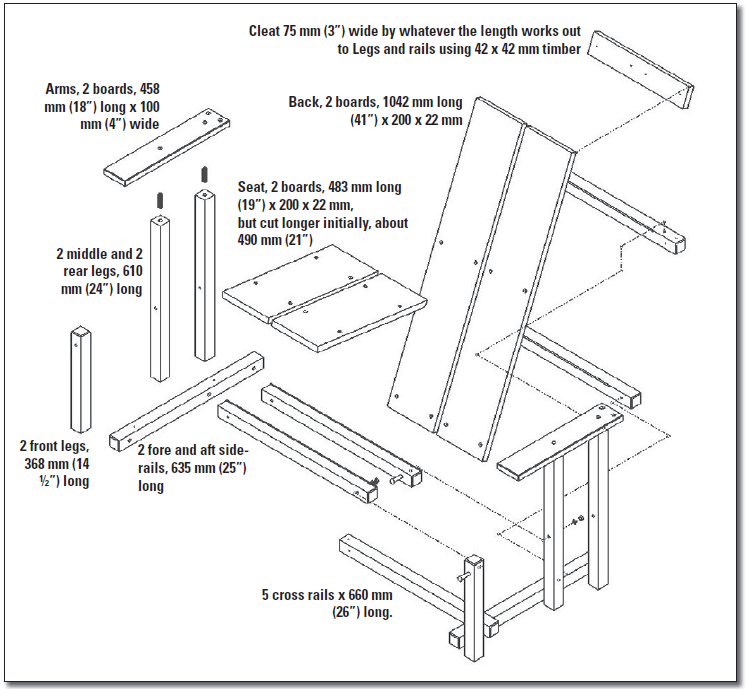
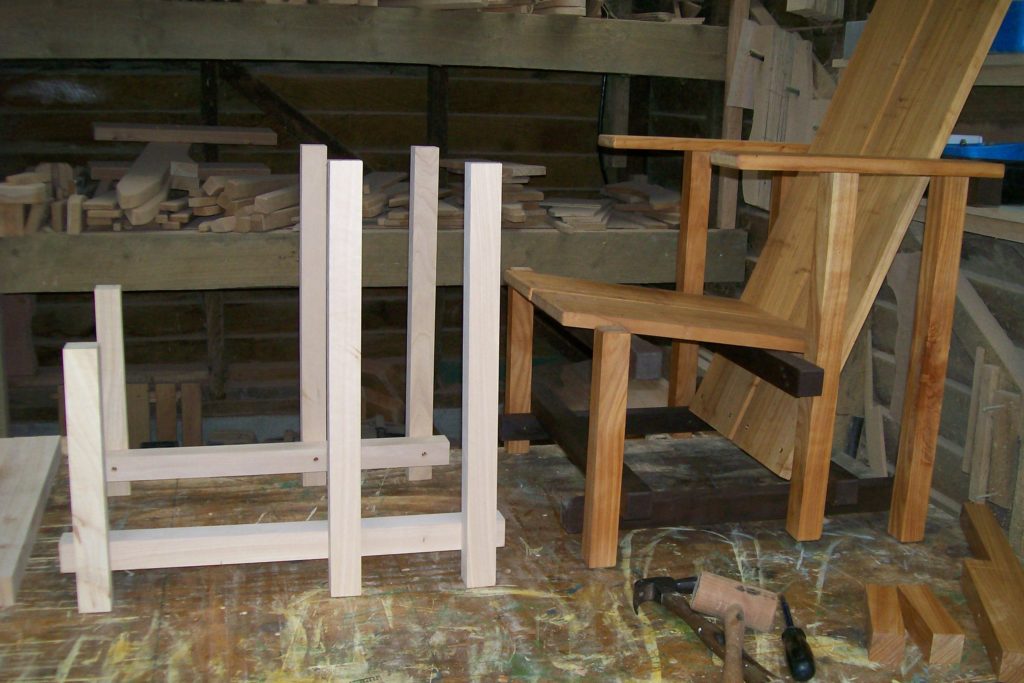
A chair with low-slung and raked back, and wide arms perfect for holding a drink seems to epitomise long, lazy afternoons. This design was created in the Adirondack Mountains of New York state where New Yorkers would take their respite from the hot humid summers of the city. It is also commonly called the Cape Cod chair

Recycled rimu outdoor chair

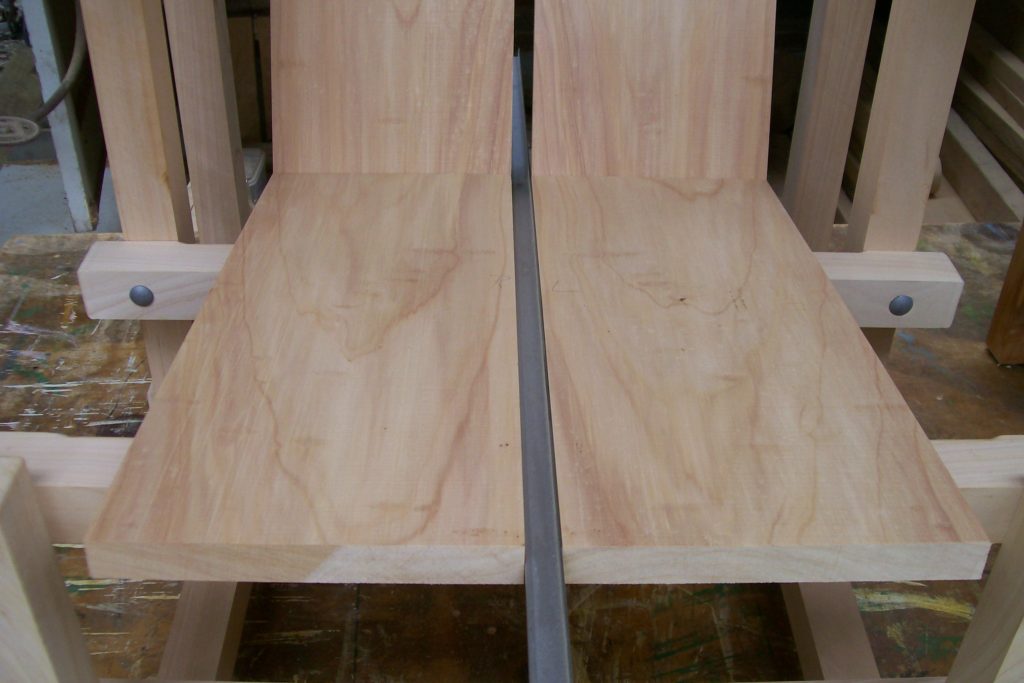
I have almost always used recycled rimu for my chairs as it is easy to obtain and relatively cheap to buy. It seems to last for ever and once the finish has weathered a little it has that rustic look.
Buying recycled rimu from second-hand building supply dealers has the advantage that you can get it when you want it, you can pick and choose the actual sticks you buy and it comes de-nailed.