Build an Almost Ready to Fly Warhawk

Then there is the relatively new kid on the block: the ARF (Almost Ready to Fly) model. These come all packaged up in a huge box, beautifully built and packed, with all the hardware. But you do need to assemble them which can take up to a week. It isn’t quite 'instant plane' but it does provide some building satisfaction and a sense of achievement, albeit a rather shallow one, a bit like a healthy walk down to the bakery to buy a pie or taking Viagra. To the supplied kit, you need to add various glues, an engine and electrical components (servos, relays, wires) to operate elevator, rudder, ailerons, throttle, flaps, undercarriage etc. The engine these days could be glow plug, 4-stroke or 2-stroke, electric or petrol. This part of the hobby is now huge and the range and quality of products is astounding. ARF aircraft kits are readily available from many hobby shops and certainly online from within New Zealand and from lands far away.

Enjoying the hobby of model aircraft
By Rod Kane
Photographs: Geoff Osborne, Rod Kane

It has been well noted that a man’s life at each end differs in very few ways. Money is no longer important; toys are. We become irresponsible, our eating habits and bathroom habits messily merge into one and caring people tend to pat us on the bald spot and call us sweetie. We also regress into childhood and play with model aeroplanes.
A lot of guys build real ones, and what a noble pursuit that is, a king’s hobby and we truly stand in awe of them. The recent local Mosquito and Anson builds, among many others, can only be described as incredible, not only on the ground, but also growling, alive and in the air.
But for the rest of us who don’t want to risk our mortal lot on something we can actually self-destruct in, then building model aircraft, radio-controlled in particular, is a satisfying and engrossing hobby. This, ladies and gentlemen, is fun, and non-corrosive to your well-being.
There is not the space in a year’s worth of articles to cover all the different aspects of the hobby, there is just so much of it, and more emerging every month. Electrics, foam planes and jets have made a huge splash on the scene as well as all the amazing technology building up around them.
This article follows a more traditional aircraft build which looks and flies just like the real thing, but takes a variable amount of input of your own to construct, from mere days to years in fact. These have been around for a very long time, and you can still buy plans for a “scratch build” of almost any plane you can name.
Or you can buy a kit with all the bulkheads, ribs etc pre-cut but still have to spend months over a plan meticulously building them. Both sorts of build are hugely satisfying, let me assure you, and more addictive than a crate of cold ones on a hot day.

“This is man’s territory. Savour it.”
Wings with retracting undercarriage installed

ARF
Then there is the relatively new kid on the block: the ARF (Almost Ready to Fly) model.
These come all packaged up in a huge box, beautifully built and packed, with all the hardware. But you do need to assemble them which can take up to a week. It isn’t quite “instant plane” but it does provide some building satisfaction and a sense of achievement, albeit a rather shallow one, a bit like a healthy walk down to the bakery to buy a pie or taking Viagra.
To the supplied kit, you need to add various glues, an engine and electrical components (servos, relays, wires) to operate elevator, rudder, ailerons, throttle, flaps, undercarriage etc. The engine these days could be glow plug, 4-stroke or 2-stroke, electric or petrol.
This part of the hobby is now huge and the range and quality of products is astounding. ARF aircraft kits are readily available from many hobby shops and certainly on-line from within New Zealand and from lands far away. No problem getting one and the price for the medium sizes range from $150 to $500. You can spend a lot more than that when the sizes start to climb. A high-wing trainer of about 1600 mm wingspan is an excellent first project to build and fly and prices are entry-level.

Test dry-fit wings…
…with wooden dihedral brace to join wings
Two-pot epoxy mixed on corflute base…
…to glue wings…
…and brace..
…for final fit

Advantages
The ARFs have some big advantages over the more detailed and lengthy project builds from plans. With ARFs:

  1. There is a huge time-saving. You can be in the air in a few days rather than months.
  2. They are a lot cheaper to build than a scratch-built project from plans.
  3. The fit and finish is fantastic. These planes look great and come well-detailed. You don’t have to fly them if you don’t want to, just build and hang them from the shed rafters (along with the salamis, in my case). It will look great and building them is fun.
  4. You are more likely to want to fly it because if something goes pear-shaped, you haven’t spent months/years building it. You don’t get very attached to them, like an unruly 12-year-old (unless that is Scotch whisky).

Disadvantages

However, there is no such thing as a free lunch, and the cons are:

  1. They are not a robust structure. They will not take the hard landings like a scratch build, but you can repair them. I could write an encyclopedia on that.
  2. The instruction booklets are usually written in finest Englese or Chinglish. Deciphering a prime example of this can take longer than the build. It is, however, hugely entertaining. I remember framing one example once.
  3. There is still a lot of expertise and care needed in the construction. This is not at all impossible for a newbie but you would be advised to have a source of advice if you need it. Model aircraft clubs are good for this.
  4. You need to have the basic tools needed and the glues. But this is usually explained in the instructions and you only buy them once, apart from consumables. It’s a great excuse to get down to the hardware store or go on-line and we all know how good that feels.
Clamp till dry
Hinges pre-fitted in this kit
Strip film off where you need to glue balsa to balsa
Insert elevators. Note cutout section

Curtiss P-40
This particular aircraft is a Curtiss P-40, also known as the Warhawk, Kittyhawk or Tomahawk in its various designations. It was one of the early fighters of World War Two and in China before that, American, with an Allison engine that was outclassed by the mighty Spit and Mustang. But it was still a very good fighter/ground attack aircraft and it served in many theatres of the war. They look good too, just like a mean and angry fighter should look. They don’t make them like this any more.
We start off by getting all excited by removing the lid of the box and drooling over all the neat and precise plastic-wrapped goodies therein. This is man’s territory, no doubt about that. It’s never going to get any better than this bit. Savour it.
It pays to have a read of the instruction book over a coffee which will be on the top somewhere, then remove the major parts and make sure they are all there. I will come back to this point later as there are still some lessons to be learned here, evident after this build.

Insert tail
Check vertical.
Wing to elevator measurement check

Wings
First, we start on the wings. You need a reasonable working surface like a table. Lay down a towel on it to protect the surface of the wings. Corflute as a base works, too, and you can stick pins into corflute to hold things together.
The wings are in two parts and need to be joined, but first, you fit things like the undercarriage, ailerons, flaps and servos, if it has all that in the wing.
This model very decently comes with retracting undercarriage and ailerons pre-installed, but it does require you to cut out the servo hatch and fit the servo and the horns it operates. A servo is a small electric actuator that pushes the control surfaces of your plane and they are controlled by your movements on the levers of the transmitter. You have to buy servos separately as they are not included in the kit.
Once you have set up both wings, you line them up and test-fit them together. Take your time. The angle of the dihedral (the angle between the two flat surfaces of the wings) has to be right. Dihedral is pre-built into the wing bases and it has to be glued properly to achieve the goal of—as the manuals have it—“please not to be crash with sadness.”
Once you have the wing lined up properly and blocks under the high end and you are sure it all fits, you apply glue and fit them together. For this job you would use a two-pot epoxy glue which comes in a variety of setting times from five minutes to five hours or more. I use five, 15 and 30 minutes for my basic heavy-duty gluing and for this job, 15 minutes gives me time to get it done without panic.
Wipe off any excess glue before it dries, under and over. Once the glue has set, turn the wings right side up and install the retractable undercarriage servos and hook them up to the undercarriage. Then pull the servo wires through the wing so they can be plugged into the receiver when you go flying. That’s that.

Tail wheel assembly…
…fixed
Push rods through the pre-set holes

Tail section
Remove the stabiliser section from the pack and glue in the hinges if they are not pre-glued like this one. For that, you would use an instant-setting CA (cyanoacrylate) glue, cut away any covering in the way and take extreme care while gluing. You only get one chance with this stuff. Make a mess of it and you are cutting new holes. Remember you glue balsa to balsa, not to film. Cut the film away to get that joint glued.
The hinges, once glued, should move freely without binding. There are all sorts of little tricks for lubrication, like using melted Vaseline on hinge sections, another use for that product apart from protecting your motorbike in the rain.
Now you have to cut away any film on the areas where the fuselage and tail section join up, then you dry-fit all the sections together. You have to spend some time on this, measuring from wingtip to stabiliser tip on both sides. In this case it was 675 mm from wing edge to the stabiliser.
Square? Check. It all has to be vertical and horizontal. It is not difficult but it is critical that it is all done properly and accurately. Sloppy work here and you will have a dog – or rather a cat; you can control a dog.
Once you have it all set up, take it apart, apply the epoxy glue carefully and put it back together. As the exotic instructions say, “Not to be with glue thin or planecraft at fly zero.” Now you have something that looks like an aircraft.
At this stage you would screw the control horns on the tail section and all the holes for this are usually pre-drilled. Hook up the push rods and screw in the tail wheel assembly. Sometimes this moves with the rudder direction to aid with taxiing, sometimes not.

Elevator and rudder attached to servo rods
Bend fuel pipes
Clunk attached

Fuel tank
Now we bolt the engine mounts to the forward bulkhead with all the hardware provided. Next comes the fuel tank and as this is not an item you want to remove unless necessary, I would be inclined to use a good-quality fuel suction line to the engine rather than the usual rubbish provided. If the suction line splits anywhere or if the fuel pick-up weight (the “clunk”) at the end of the fuel supply line comes off, you will be in kamikaze territory very quickly because the little turny-roundy thingy up the front will stop.
I had this problem with a plane where the engine worked on the ground but stopped in mid-air. The brass clunk which kept the supply line weighted at the bottom of the tank during turning flight had come off. Fuel flowed alright on the ground but in mid-air manoeuvres, without the clunk, the supply line floated to the top of the tank. On the ground, the clunk made a noise as if it was attached—it was still in the tank—but it was rolling around free. Took a long time to diagnose.
The tank usually has a block of wood glued to the airframe behind it so it doesn’t slip backwards and upset the delicate balance of the plane or dance around the interior while doing aerobatics and my sort of landings, which is much the same sort of thing.
Next comes screwing the servos into the heart of the fuselage. It’s an easy job and these will operate the throttle, elevator and rudder. You centre up the servo arms and the control surfaces and lock everything into place. Alignment of the surfaces comes later when you hook up the power to the servos and start a test transmission.

Fuel tank placed
Tank settled in frame
Loctite engine bolts

Engine
Now for the engine installation, and this is the last major component to go in. Take your time over this. The instructions will give you a good guide as to what goes where. But it is absolutely critical that you get the distance right from the propeller spigot to the bulkhead. This is so the cowl will fit correctly, and just as important, so that the balance is correct.
You can use a 2-stroke or 4-stroke petrol or electric engine. Electric is far easier, and they start every time, on time. But electric motors don’t emit smoke and oil and flame and noise so what on earth is the point, I hear you ask. Beats me.
A 2-stroke engine is more powerful and lighter for a given cc rating than a 4-stroke, but they are not as reliable, they use more fuel, and they don’t sound as good. A 4-stroke in an old bi-plane or light commercial plane like a Piper Cub sounds brilliant. We don’t have a lot of cowl room in this plane and, since it is a fighter, I want some scale power and speed so I opt for a 2-stroke.
The engine mounts are drilled in the right place, and the engine is bolted in with Loctite and spring washers. You really don’t want that engine rumbling itself loose and going on a little tu-tu somewhere all by itself along with the intestines of the plane. That is not a great look.
The throttle cable is hooked up and adjusted so that it moves freely, the fuel tubes are connected along with the filler and vent and the muffler is bolted on. You will notice that the entire engine/firewall is canted to the right. This is to offset the turning-moment forces imposed by the engine on the airframe.
The rudder is usually trimmed to the right as well as a default setting.

First servo for push rod attachment
Batteries in
Practice cowl locates…
..engine hole for cutting

Cowl
Now we get to the first of the fiddly jobs; you have to fit the cowl. This delightful kit comes with a dummy cowl to practise on. You can then fit it over the real one to transfer the cut-outs onto.
The engine cowl on the P-40 is arguably the most aggressive and striking cowl on any fighter ever made, even better than the Spitfire. No wonder they painted shark jaws on them. This one is beautifully built, hand-painted and detailed. You don’t want to wreck it.
Obviously, you have to remove these parts of the cowl so you can slide it over the entire engine without removing any of the engine parts apart from the prop. Things like mufflers need to stick out, and the head needs airflow around it.
The prop hub has to be dead-centre and you need to drill neat holes in the cowl for access to the needle valve, fuel filler tube and glow plug. The glow plug can have a remote device fitted to it, and I would recommend this for two first-rate reasons: convenience and safety.
Carefully fit the cowl. This can take hours. Then fit the propeller and the spinner. A nice job here is the difference between a mere model and a thing of beauty, pride and joy.
The final part of the assembly is the pilot’s canopy, any scoops and a pilot if you have one. A dashing, heroic, grim-jawed, Brylcreemed pilot with leather helmet and goggles at a jaunty angle would be a perfect retro choice, but today an academic, environmentally sensitive gay pilot is more politically correct.
Now we add the battery box and a battery switch accessed from the outside on the right-hand side of the plane. You will have to buy the switch separately.
Finally, you consult the book and check the centre of gravity after you have installed the batteries.
You may have to add weight to the front of the cowl or propeller to get a slightly nose-down attitude.

Cowl on
Wing slotted into fuselage
Wing servo attached to flaps
Twink prop tips for safe visibility

Fine-tuning
The rest is just fine-tuning. Again, you consult the instructions for control surface movement or “throw.” Undo all the bolts holding the pushrods to the servos, switch on the plane’s battery and the transmitter and adjust everything until you are happy the throttle works all right in the right directions and so do all the control surfaces and the undercarriage. You are going to need that. Adjustment takes time but it is easy and critical to the control of the plane.
Finally, you will want to start it up and taxi it at least, and most likely fly it off. You need fuel, glow starter, starter motor and battery plus a bit of advice from someone who has done this before.
Remember too, these awesome-looking low-wing fighters are not the planes to train on. They go like the clappers on steroids but there is little inherent stability. I know some people like that.
Rule number one is never never, not ever or even never, get your hands anywhere near that propeller. By a dint of bad luck and sheer stupidity, I did, and these things are NOT toys.
A 12-inch (300 mm), nylon-reinforced propeller spinning at 12,000 revs can do terrible damage. If you do go into surgery like I did, make sure you ask them for lashings of whatever that stuff is that knocks you out before surgery. It feels better than 8 oz of single malt in one shot and is way more powerful than Mum’s onion and cabbage soup.
I paint the tips of my props with Twink, then you can see the propeller arc and know exactly where to put your finger if you are stupid like me.
I strongly suggest if you wish to fly it, go out to a club nearby, introduce yourself and you will be welcomed with open arms. All the advice you need to get started will be yours.
As the instructions say, “On happiness be with plane flying and smiles in family.”

The electrics
Cover on
Decals on

Panel

Warhawk 39 0686
Rating the build
This was not a cheap ARF [Note: this article was first published in 2014].
For a wingspan of only 57” (1448 mm) and at $NZ340 retail online, it was quite expensive. But I have to give it a 9/10.
On the plus side, this kit was pure quality from one end to the other, quite the best I have come across, although I have not seen a dud yet. It came with a lot of the hard graft already done, particularly the tricky hinges and retractable landing gear pre-installed, and the detail for an ARF was outstanding.
On the negative side, sky blue on the undersides is a terrific colour if you want the plane to vanish before your very eyes. The tiny wheels, too, are going to make for some interesting watching on take-offs and landings. Mine are interesting enough without that.
The instruction book is probably an 8/10, and I would have given it a little more if I had taken the time to read it. But just a minute I hear you say, instruction books are for those that can take good advice without getting po-faced and also for people who habitually put the toilet seat back down. This is not our territory, I agree. However, I usually wind up with enough parts left over to start another plane, and this was no exception.
There were a couple of places where I had to rely on past experience because it was not referenced in the book and that makes it a bit tough for a first build. But it isn’t impossible to fathom out and the finished plane looks superb. In fact it looks so nice I have decided to give it a reprieve and not fly it.
I will take one of the portraits down off the lounge wall, and it can go up there instead. Women appreciate that. They don’t say a lot at first, but they just love warbirds up on their lounge walls. Trust me, as an ex-real estate agent that comes with a muck-metal guarantee. Don’t wait for her to beg.

Test taxi
Ready for flight

Share:

More Posts

This  is the nail

Merry Christmas to all our Shed magazine readers and website fans. The Shed is taking a few weeks’ break from posting content but we are hard at it prepping the next issue of the magazine whilst we grab a bit of summer R&R.
Have a great summer holiday and enjoy that extra time now available to you for your special projects. However, before you get stuck into any home maintenance projects, have a quick read of this poem by one of our Shed favourite writers, Rod Kane. You may just decide to have a beer instead.

This is the nail
..that sparked all my fears
Of maintenance imperative, painting, repairs
The portico leaked, just a rusty old nail
But it wasn’t just one, the whole roof was a fail
So up there I goes and a…

Size matters

Back in the carefree/careless days we took a drive up to the Hokianga harbour, mainly for a fish and chip meal at the legendary Omapere pub, and promptly fell in love with the place. It’s New Zealand 50 years ago: clean, uncluttered with houses and people and just plain beautiful on any given day.
The harbour simply sparkles on a sunny day and the dunes on the north head are nothing short of spectacular. The views coming over the ridge from Waimamaku and the Waipoua forest are breath-taking. We still stop and try to take it all in.
Everything moves at a leisurely pace up at the “Hoki”. It is still a hidden gem, but not for long I feel. We have a few celebs up there now and there are more and more serious homes going up, but it still has that laid back feel to it. Opo the dolphin is the only thing that has happened to the area and that was 60 years ago.

The world of model aircraft

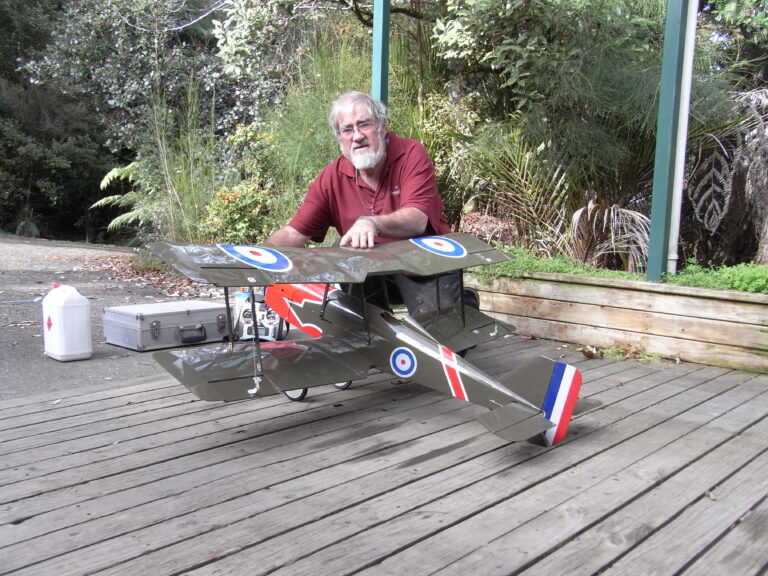
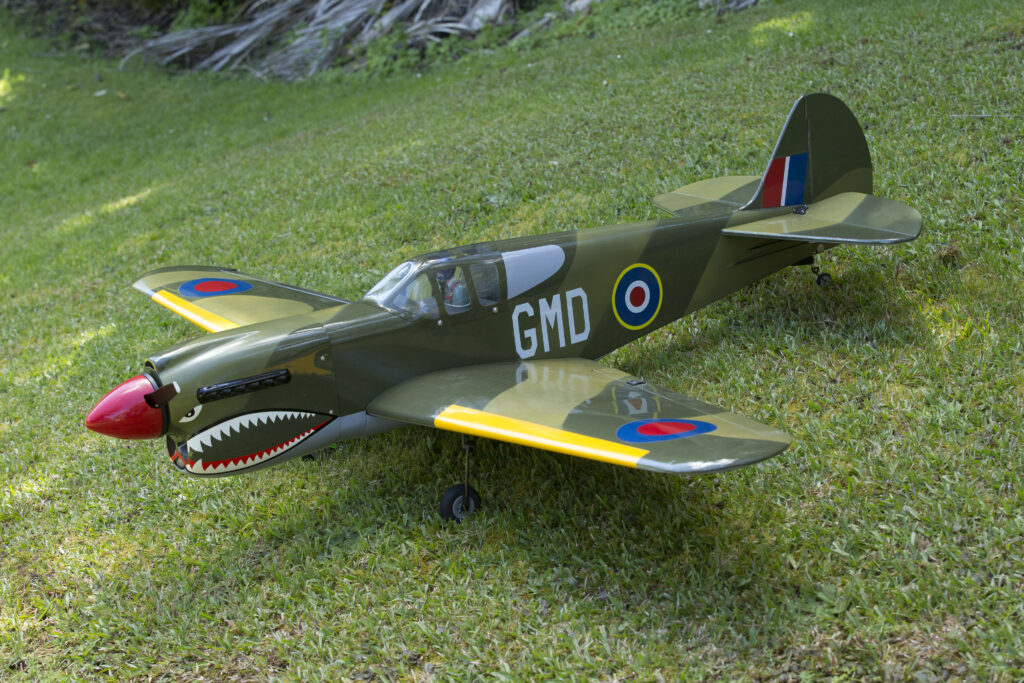
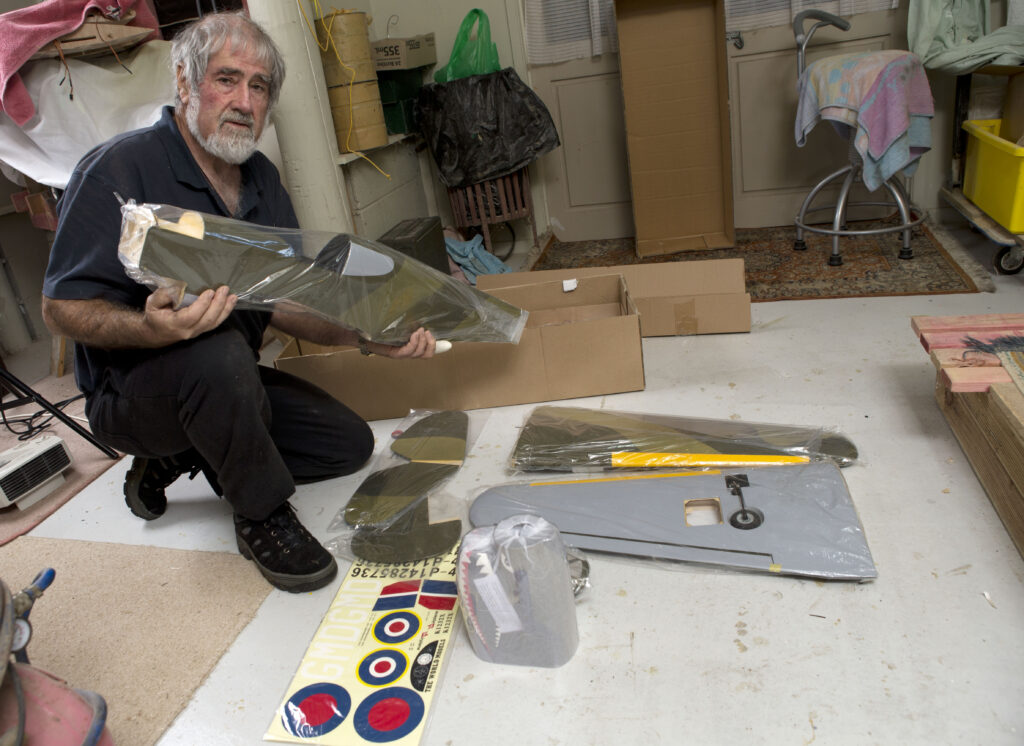
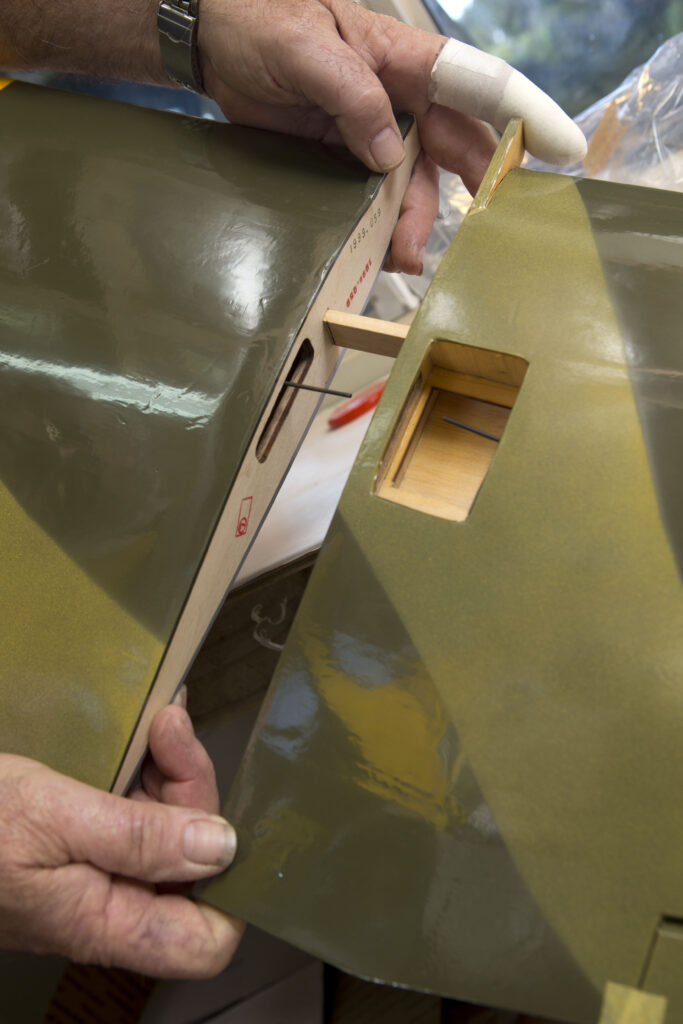
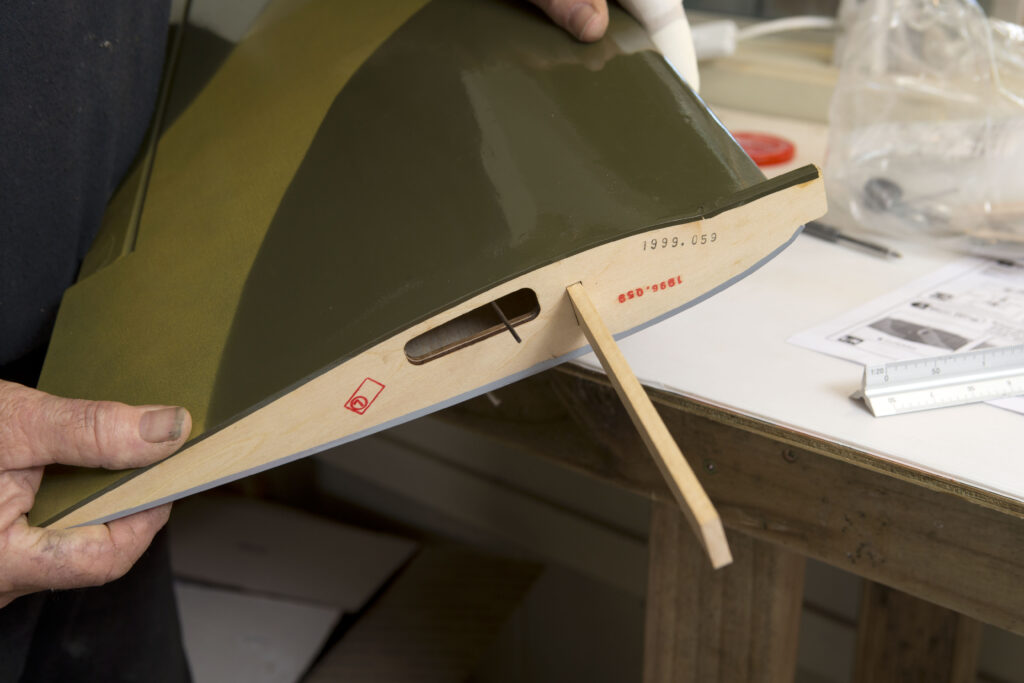
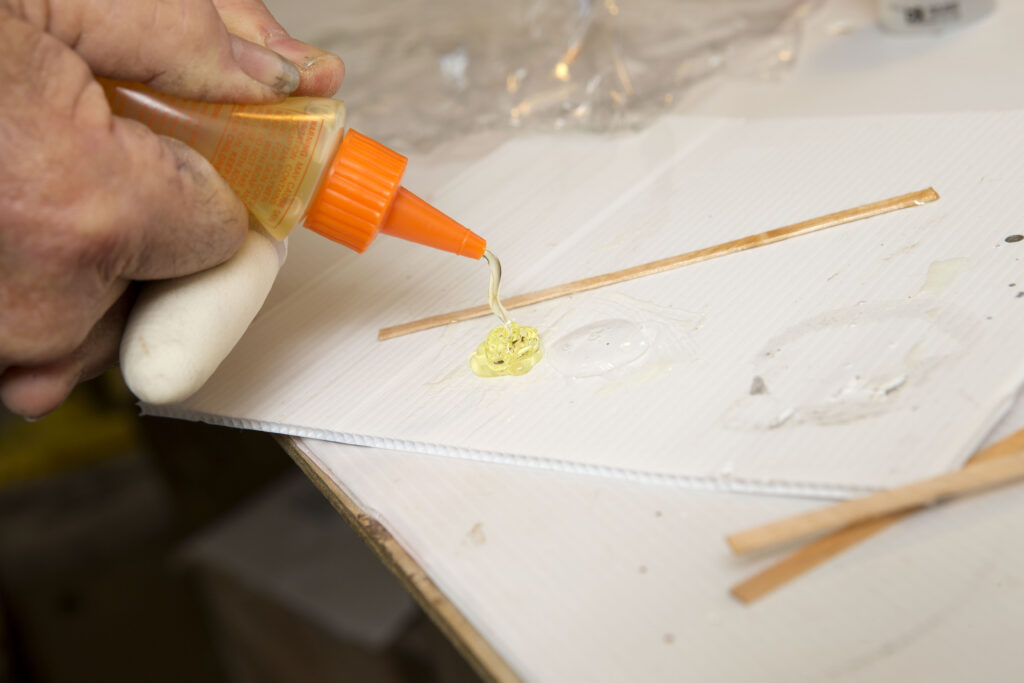
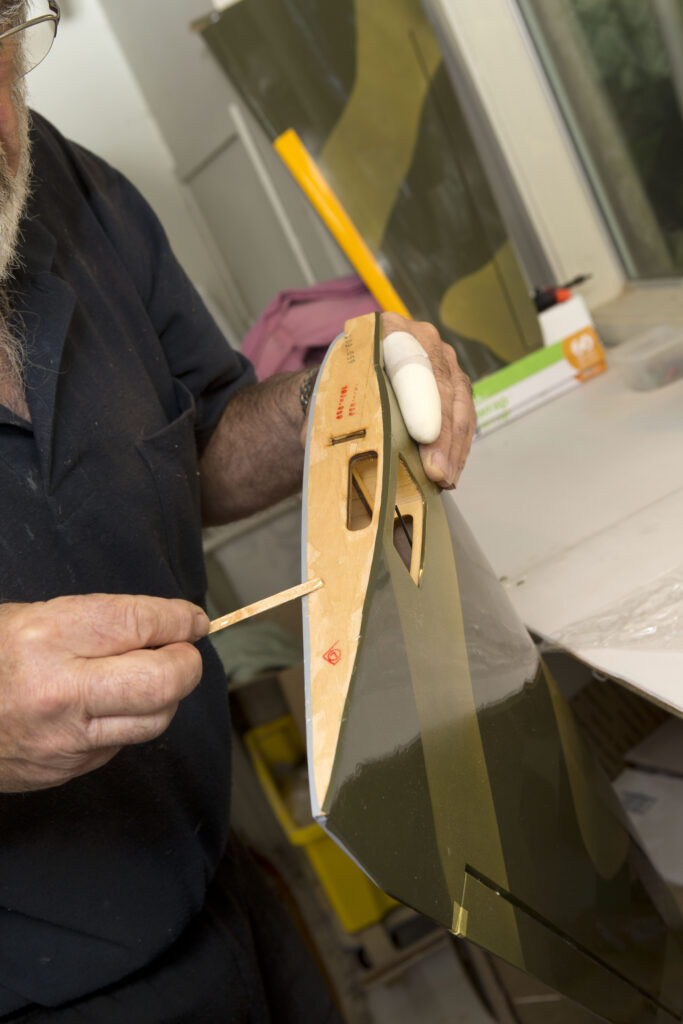
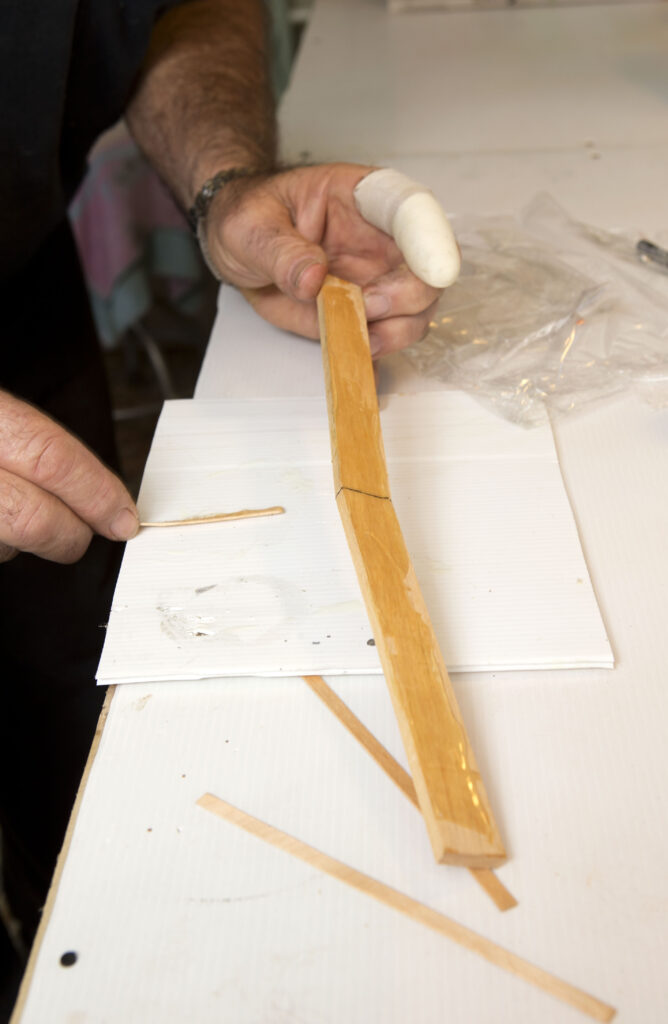
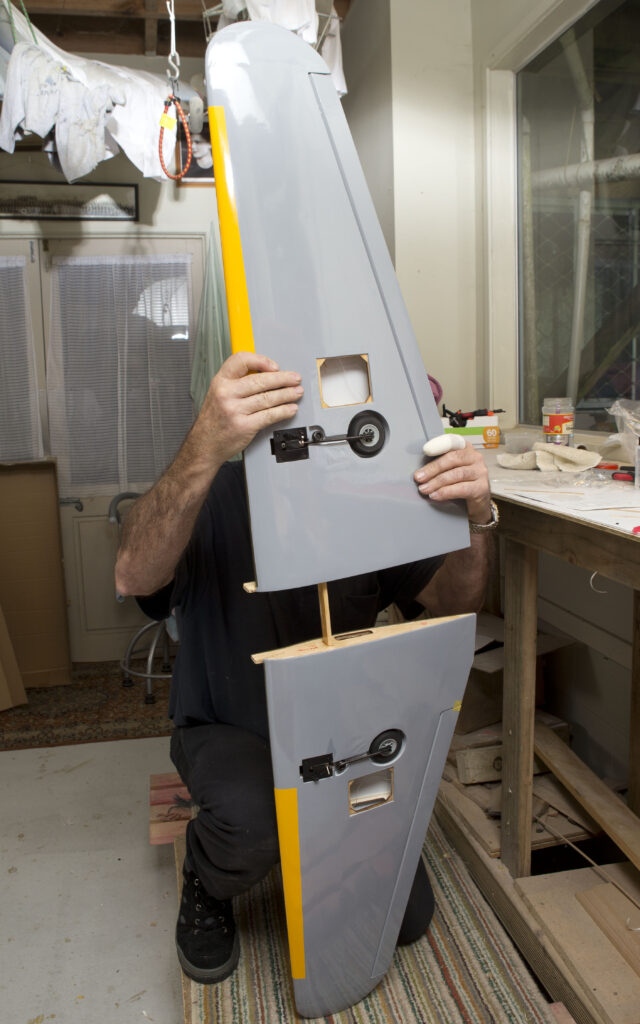
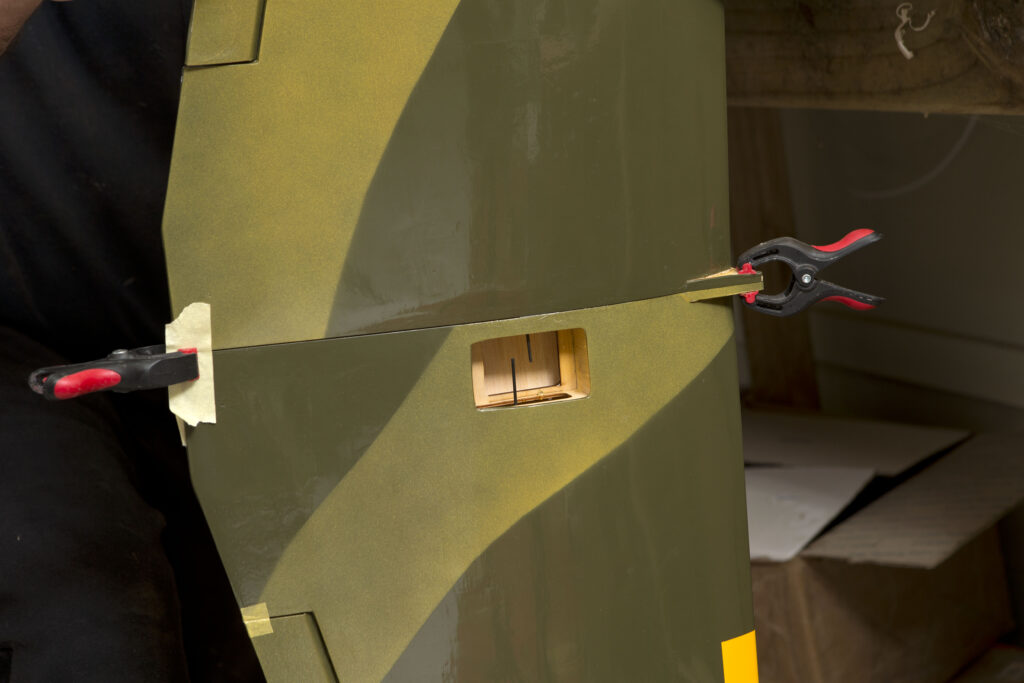
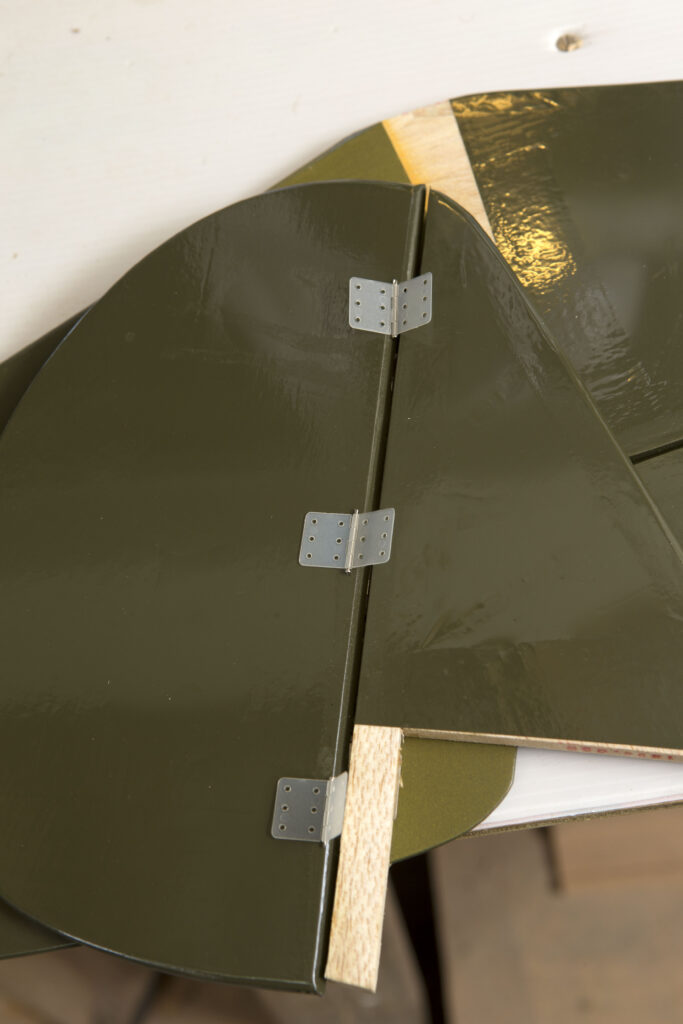
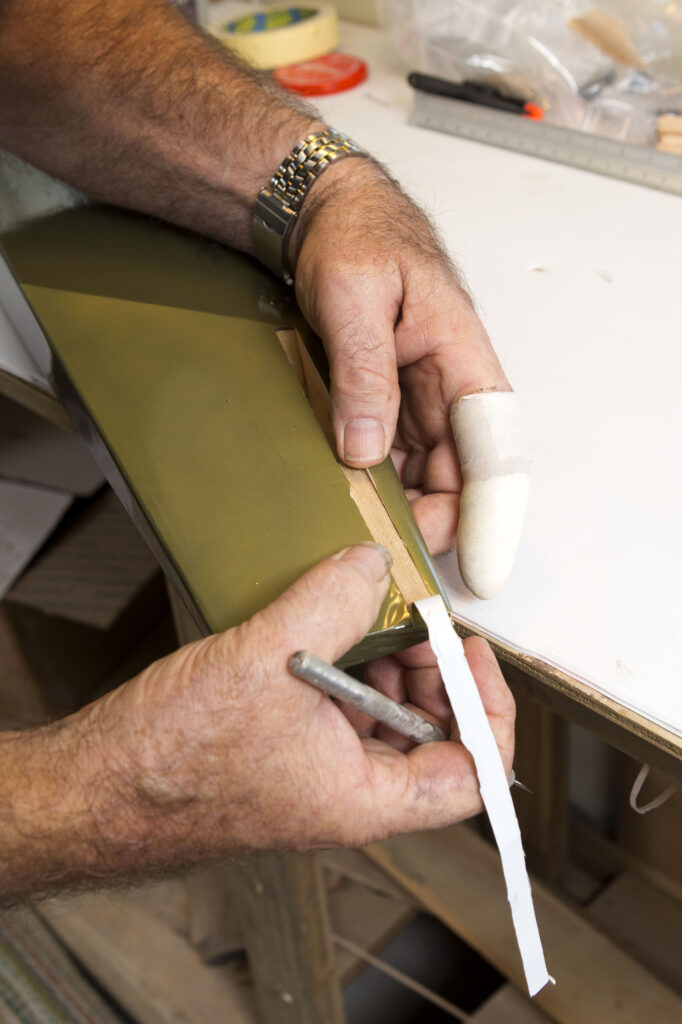
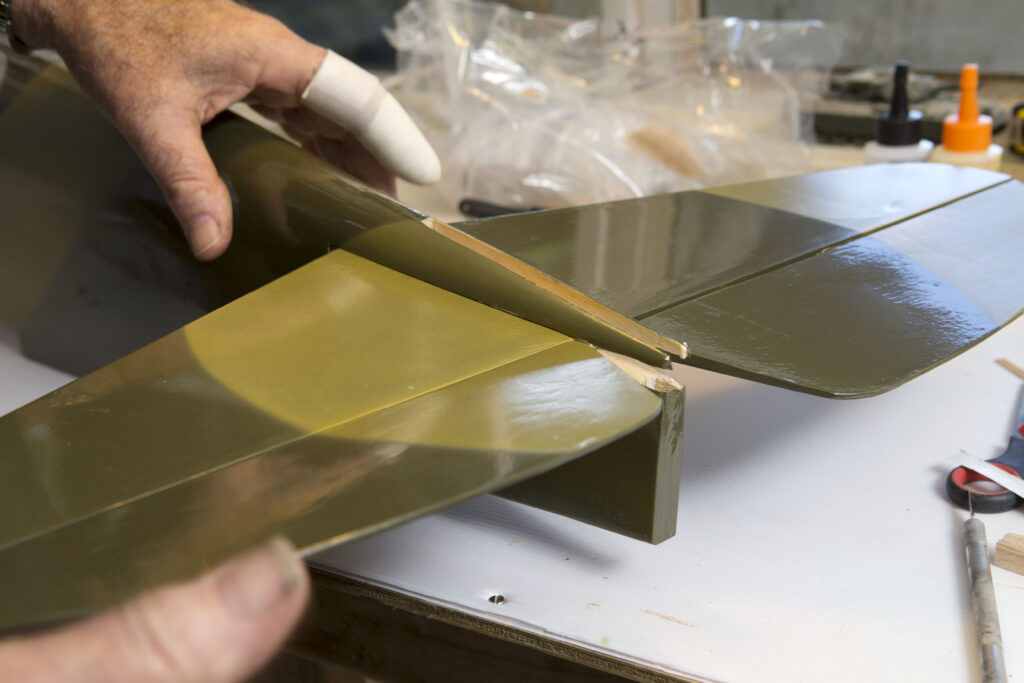
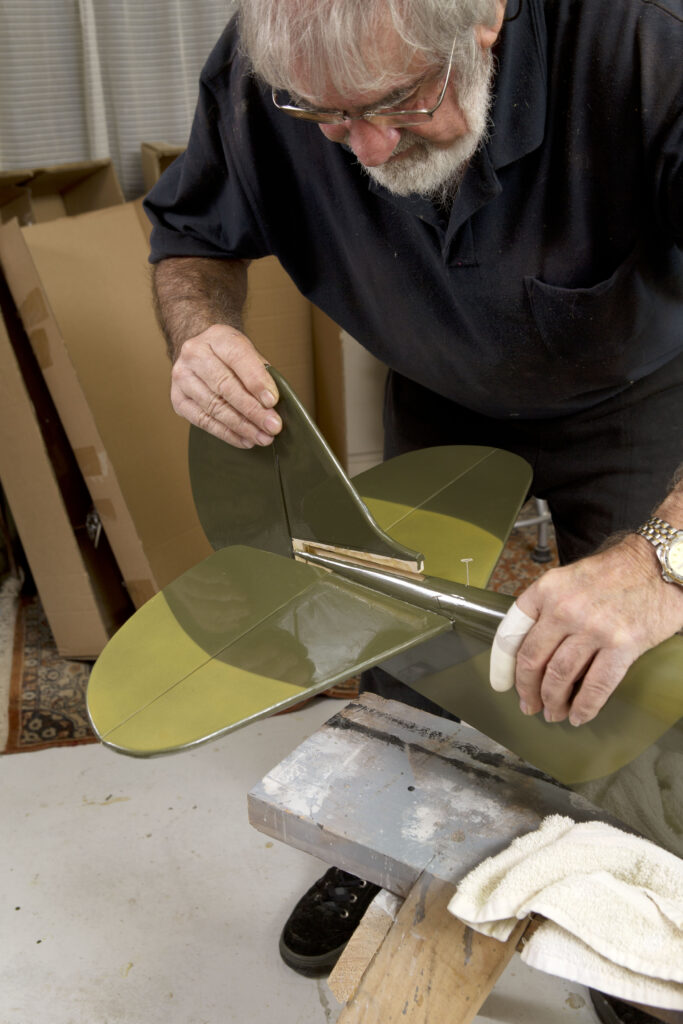
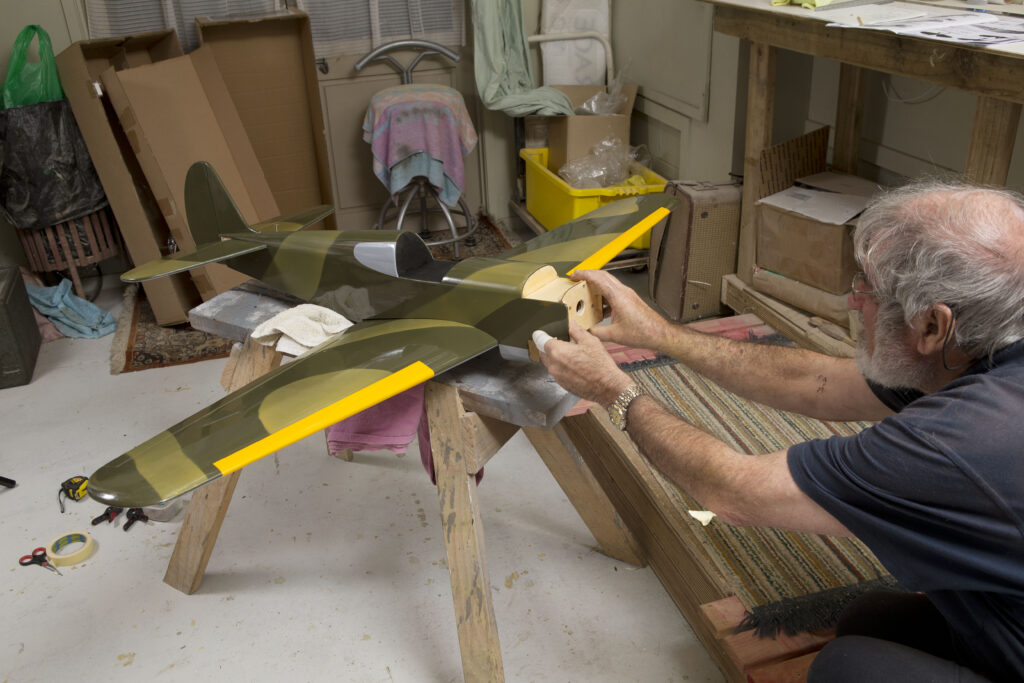
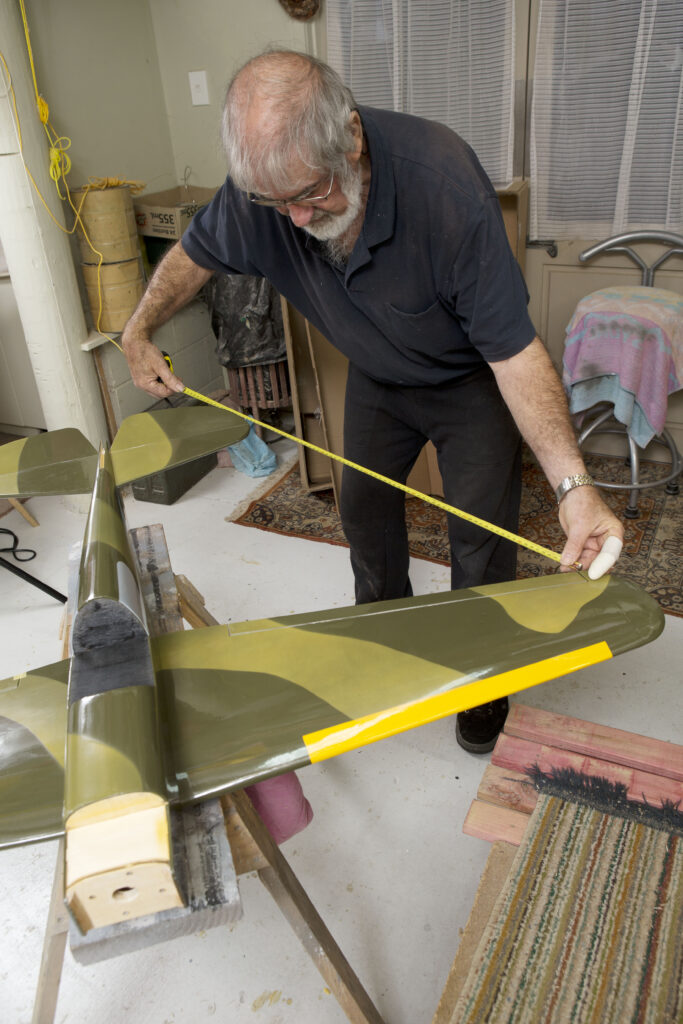
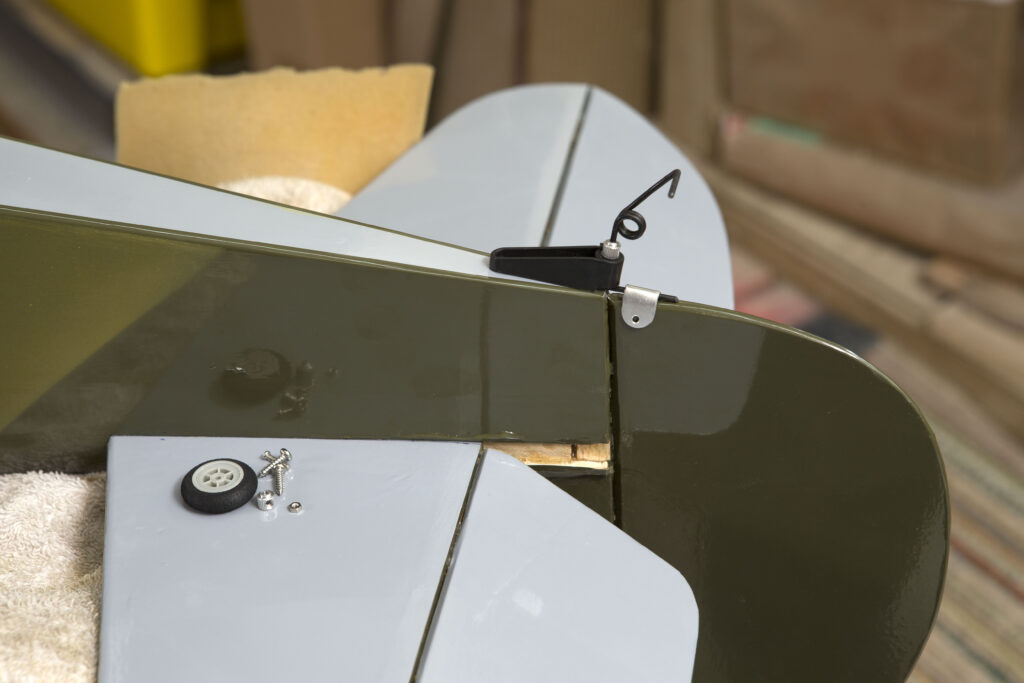
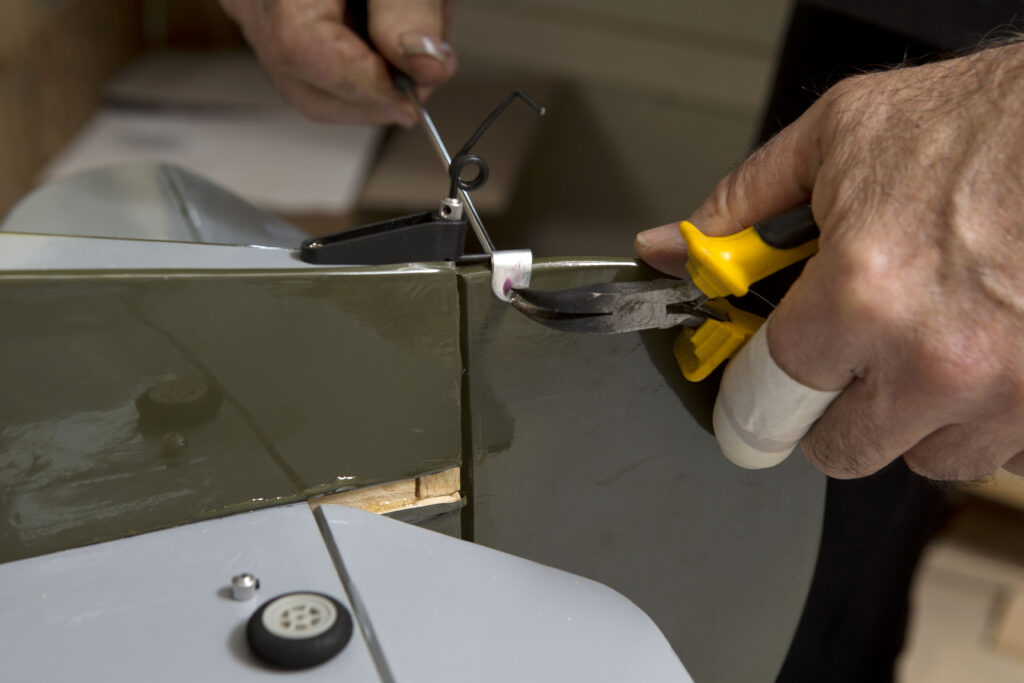
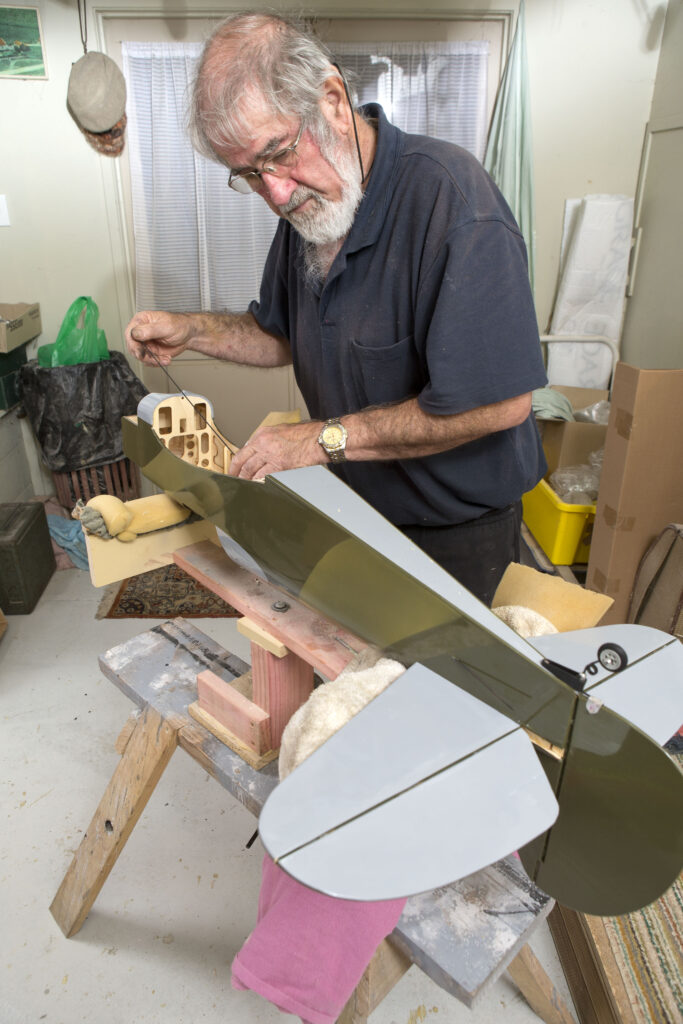
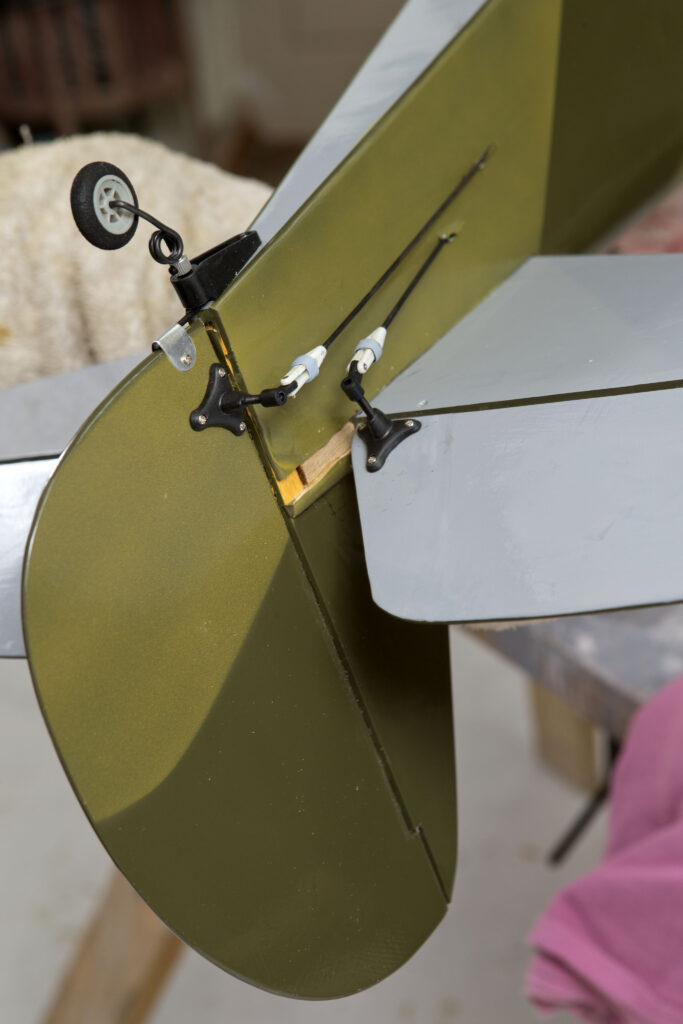
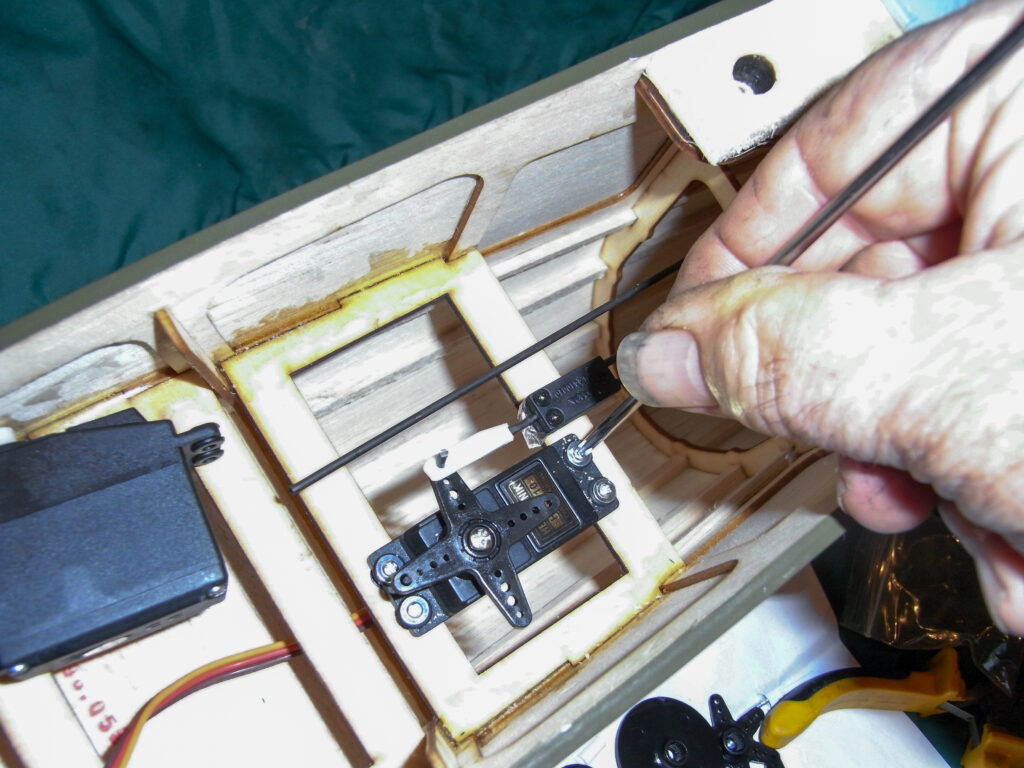
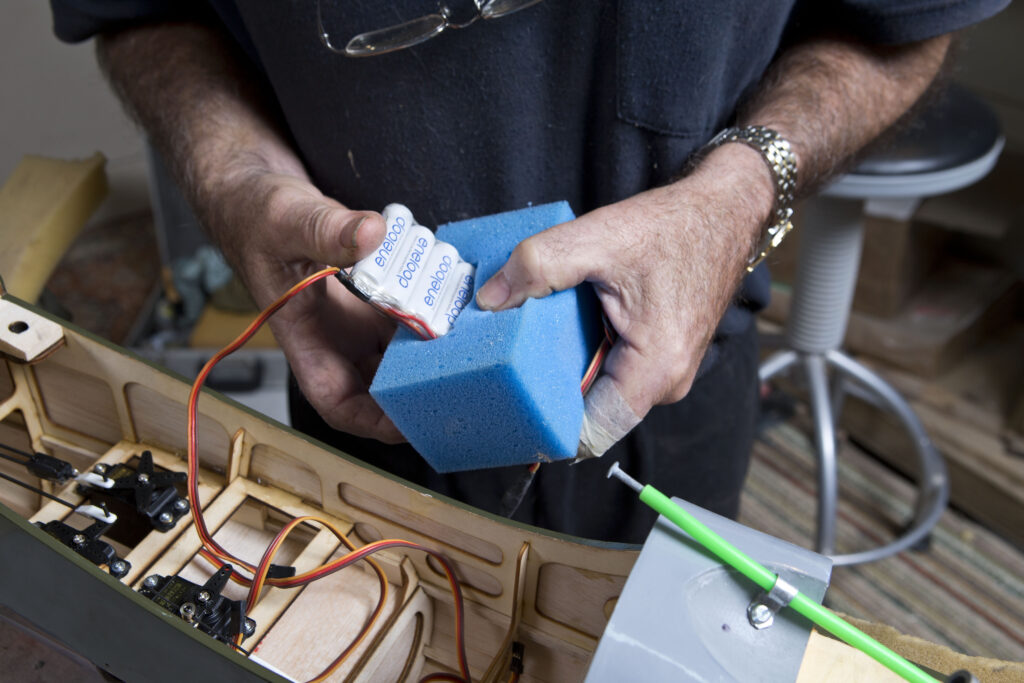
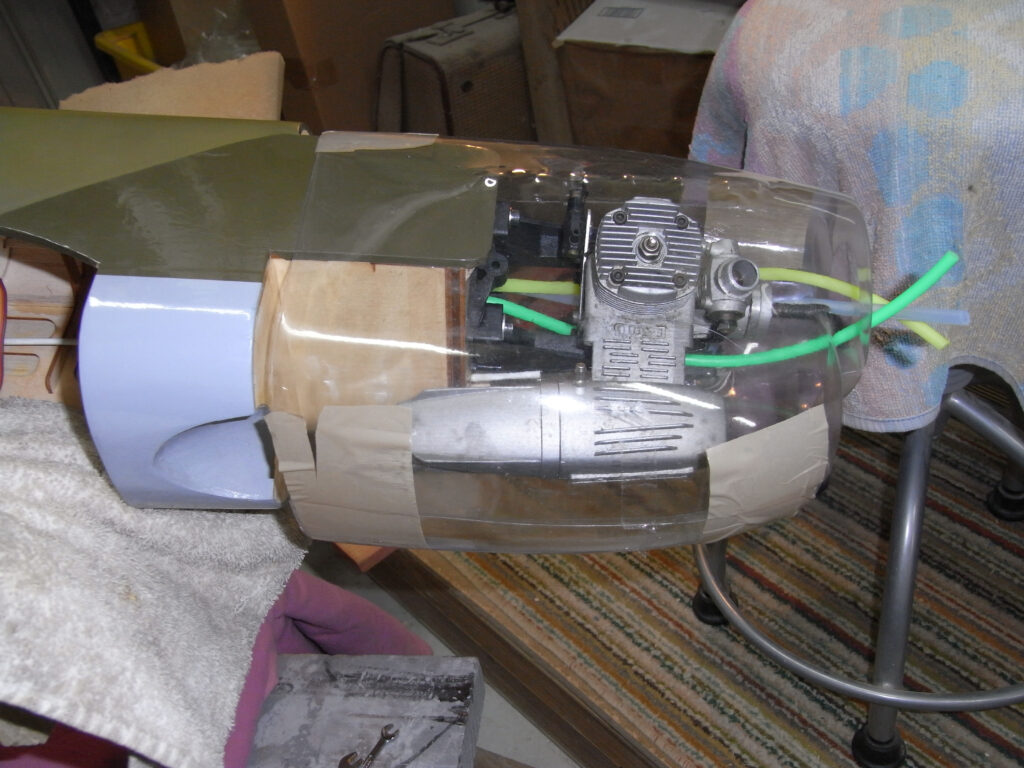
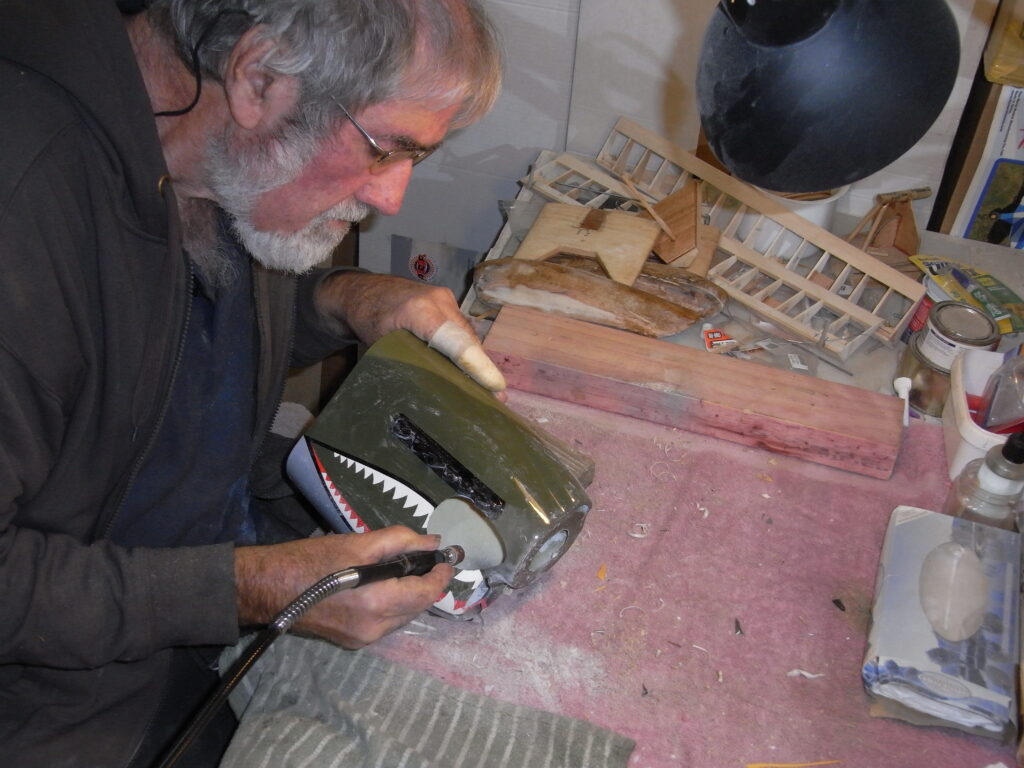
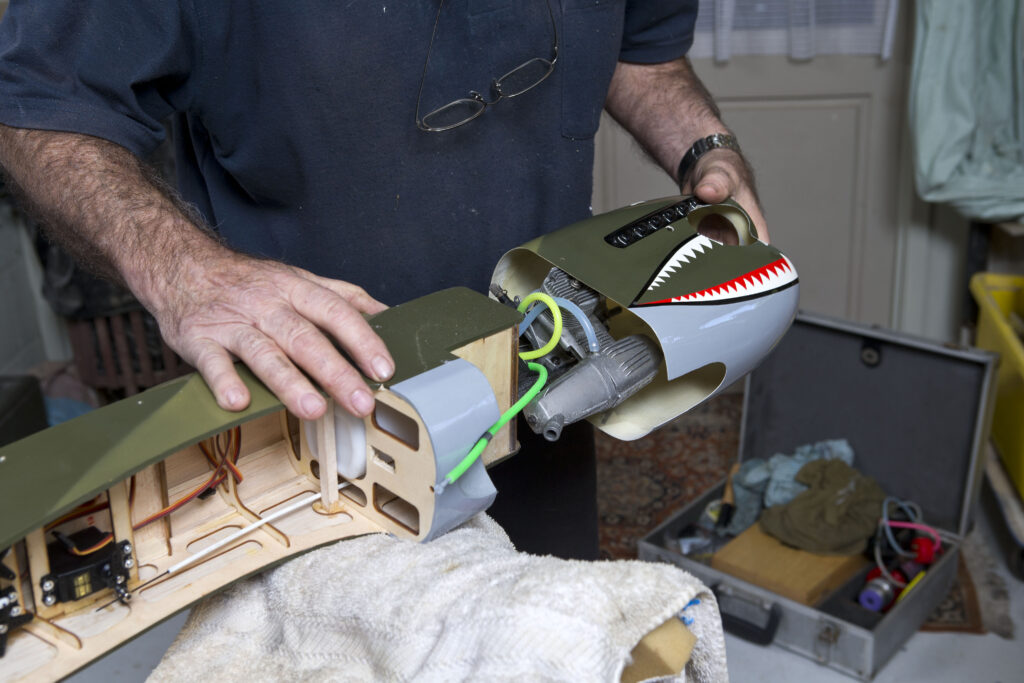
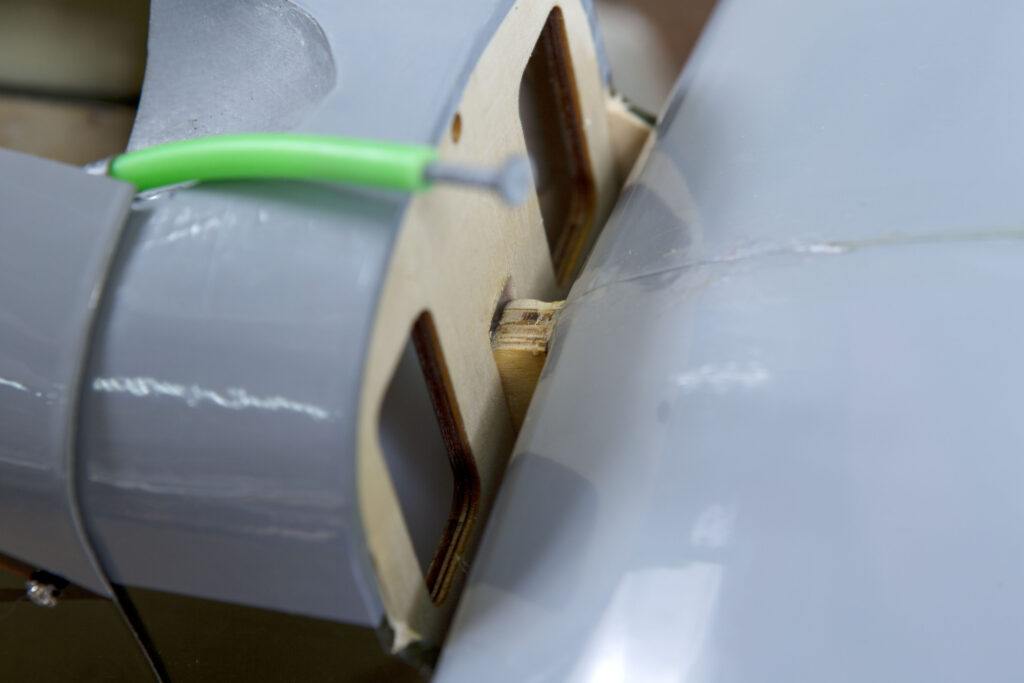
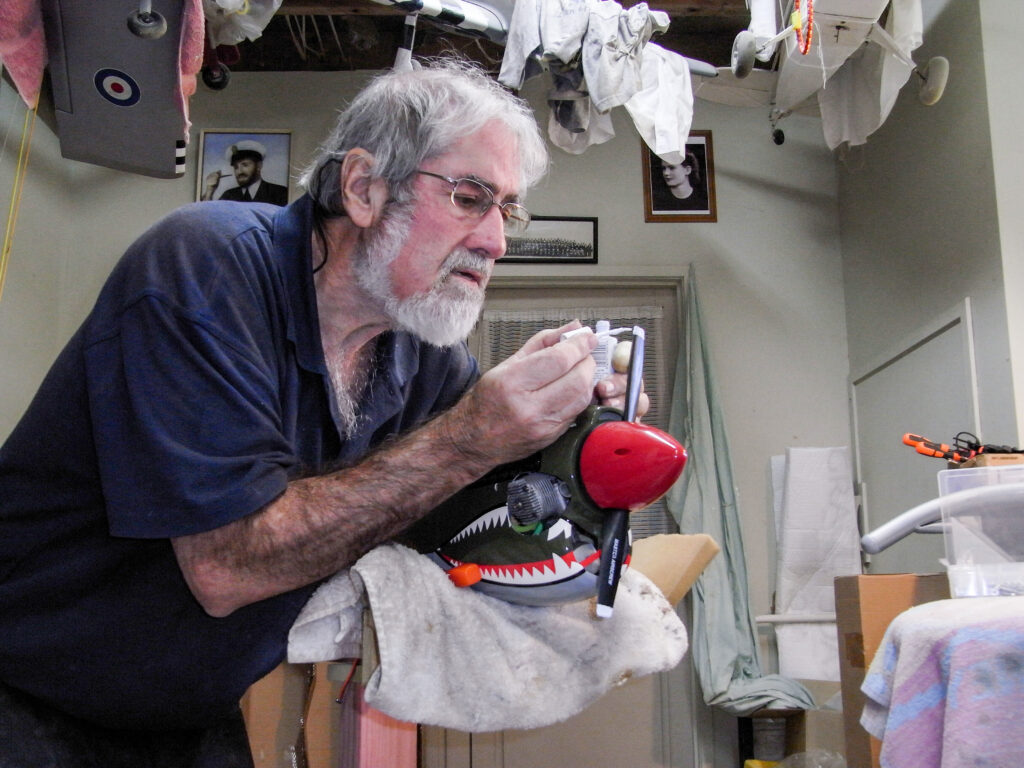
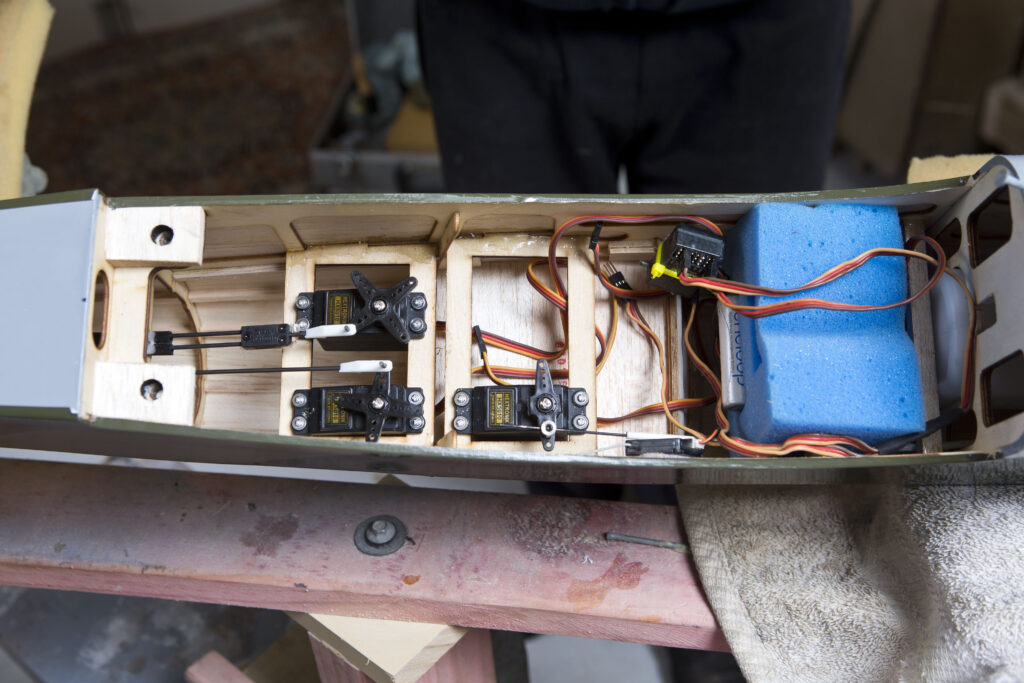
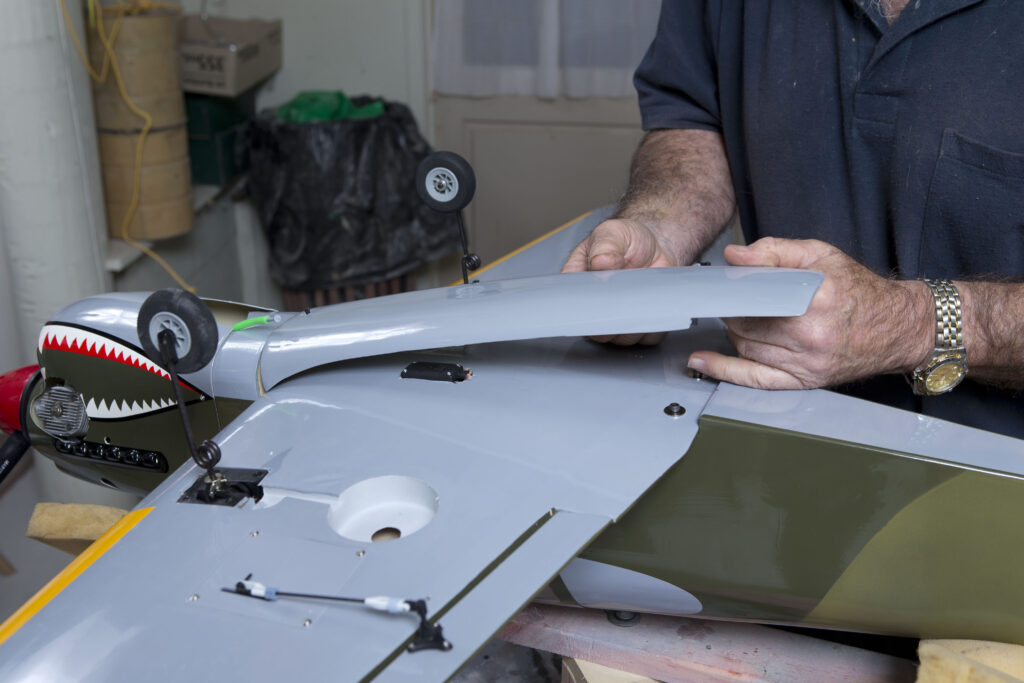
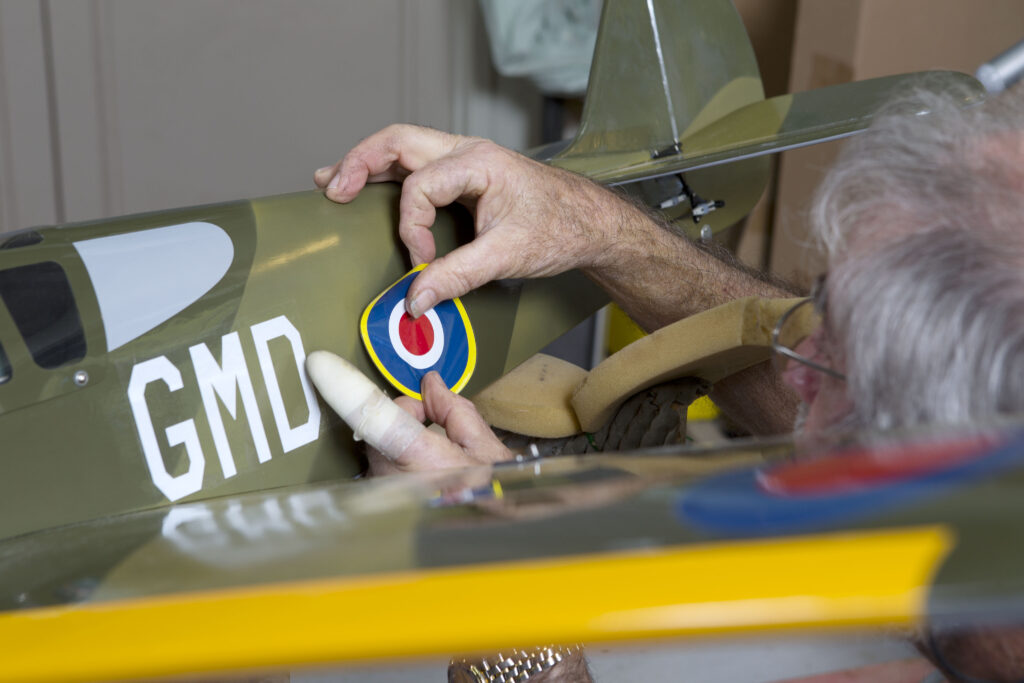
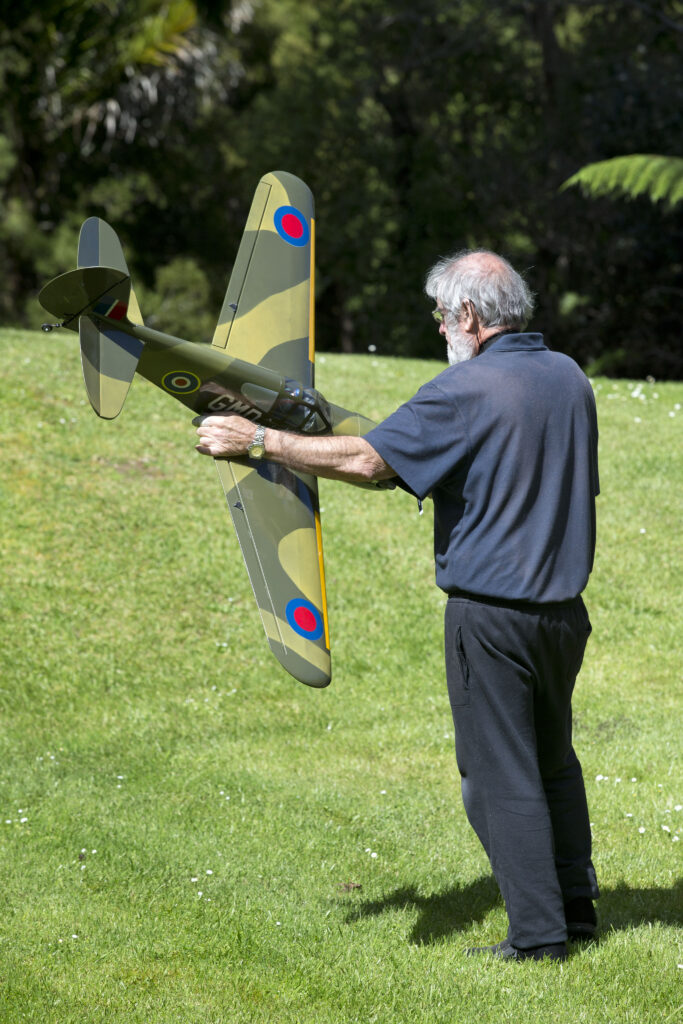
Over boats, cars, trains and everything else in scale-model construction, I have chosen aircraft. Flying is super-exciting and heart-stopping…for everyone. My flying skills move between non-existent and highly incompetent, but I manage to get by. I enjoy the winter days and summer nights in my workshop building them, either from a kit or from scratch from a plan. In summer, during the better flying months, I repair the ones that partly survive.
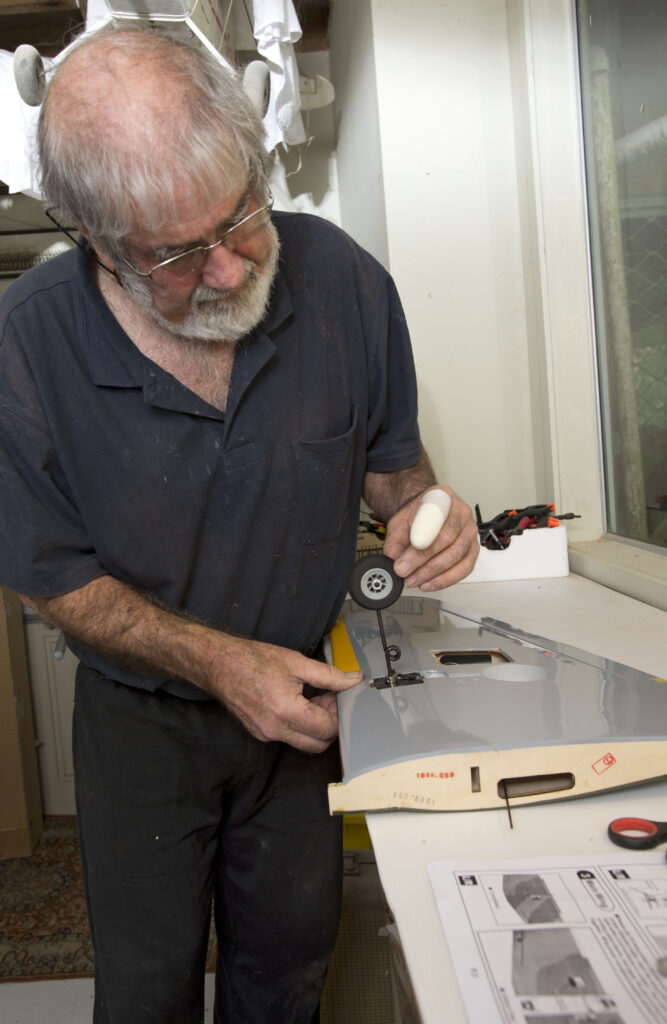
The first thing you need is a workshop, preferably with enough stud height to hang the planes up. You need plenty of light and you can’t have enough work benches. I have miles of small tools, all available from the big hardware stores, and I use a small drill press, bandsaw, coping saw, belt and disc combo sander, plus the various drills, rotary tools etc.