Keep small items tidy and handy in your workshop
By David Blackwell
We all acquire a good selection of screws, nails, and other bits and pieces over time and finding a place to keep them all, and remembering what you have, gradually starts to become an issue.issue
This easily made set of drawers may be just the answer in your home workshop and it can be made in a day. I have seen many versions of this set over the years and, because of its simplicity, it is easy to make the size and number of drawers to suit your particular requirements.
Before making this set I had previously made a 36-drawer set and two other sets using the same principles but for specific purposes, a coin collection and for all my taps and dies. This article is aimed at encouraging you to spend a day making a set of drawers for the screws/components you use regularly in your workshop but you can very easily amend the depth, width, and number of the drawers to suit your particular requirements.
An option to have the drawer base longer than the drawer
Sliding MDF
I have used MDF for all the components which is readily available and very easy to work with. Some people may question the wearability of MDF sliding on MDF but my larger set of 36 drawers must be close to ten years old and there is no sign of wear.
I am aware of several sets in the workshops at the Christchurch Polytechnic that have been there for more than ten years and they also appear fine. If they were being used in a commercial environment where each drawer was opened and shut hundreds of times a day you may wish to consider using plywood for the base of the drawers but I find it hard to imagine such a use. To smarten them up you could consider a wooden frame on the front and also use the same wood for the drawer fronts.
Cutting rebate for a cabinet partition
Cabinet ends and partitions
Partitions
The design of the drawers can also be made to suit the intended use. I have made provision for removable partitions that can be placed to split the drawers in half or to divide them into thirds. It is very simple to put the division rebates in during construction which gives you much more flexibility in the years to come. For my previous set, I made the drawers about two-thirds of the depth of the cabinet but made the drawer base go the full width.
This allowed for the drawer to be opened with full access to the contents while the end of the base was still in the cabinet. The downside to this convenience is that you are only effectively using two-thirds of the available storage space in the cabinet.
In a home workshop like mine, where storage space is at a premium, I feel I cannot continue with this luxury. I find that when I am using screws for a particular purpose I tend to remove the whole drawer to where I am working in my workshop.
Fitting partitions in the cabinet
Cutting rebates on the drawer fronts on the router table
Cabinet
The cabinet, including the dividers, is very simple to make but like any smaller cabinetry, it is very important to ensure everything is cut square.
Five or ten minutes ensuring your saw is square may pay dividends later in the construction process. Often it is difficult in a small home workshop to handle full sheets of MDF and if this is a problem you may consider buying part-sheets from your large barn hardware store.
I used 18 mm MDF for the cabinet parts, excluding the back, mainly because it is the size I generally have plenty of in my workshop and it also makes for a very solid construction. For the back, I used 4.75 mm MDF, the same as the drawer bases.
There are several ways to cut the rebates in the sides for the drawer runners. I used a 6 mm cutter in my router table which worked very well. You could do them by using a hand-held router running against a straight edge or you could even do it by removing the riving knife on your saw bench. But this may require two or more cuts as the saw blade is likely to be less than the required width.
The standard saw blade does not usually cut a square edge. This can easily be tidied up with a chisel later. Remember the two ends require the rebates only on the inside. Screw the two ends onto the base and top being careful to ensure everything remains nice and square.
The back is not rebated to set it in. I did think about this but was keen to keep it as simple as possible.
When assembling the cabinet, I always find it best to clamp the parts to be joined and then drill pilot holes to avoid the screws splitting the end grain of the MDF. I also like to cut spacers to place between the dividers while I screw them in place to ensure I continue to keep everything square and parallel.
The whole cabinet should remain square once the ends and partitions are screwed into place but it pays to check before you screw the back on. You can now cut all the drawer components and have them ready for further machining.
The drawer fronts are cut from 18 mm MDF, the sides from 9 mm MDF and the drawer bottoms/runners from 4.75 mm MDF. Sometimes not all sizes of MDF may be available in your area but it is easy to modify the sizes of the drawers to suit what you can readily purchase. While the drawer bottoms/runners are made exactly the depth of the cabinet less the front up-stand, I made the rest of the drawer 3 mm shorter than the base. If you fit the drawers and find they are sitting slightly proud of the front of the cabinet, you can easily plane or sand the end of the drawer bottom/runner to ensure a perfect fitting.
The drawer fronts need a rebate (rabbet) on three sides—on the bottom to allow for the 4.75 mm base/runner and on the two sides for the 9 mm drawer sides.
I did these very easily on my router table and used an offcut to ensure I had the depth and width of the rebate correct before commencing.
Cutting the rebate in the drawer sides. Note the 18 mm MDF square push-block.
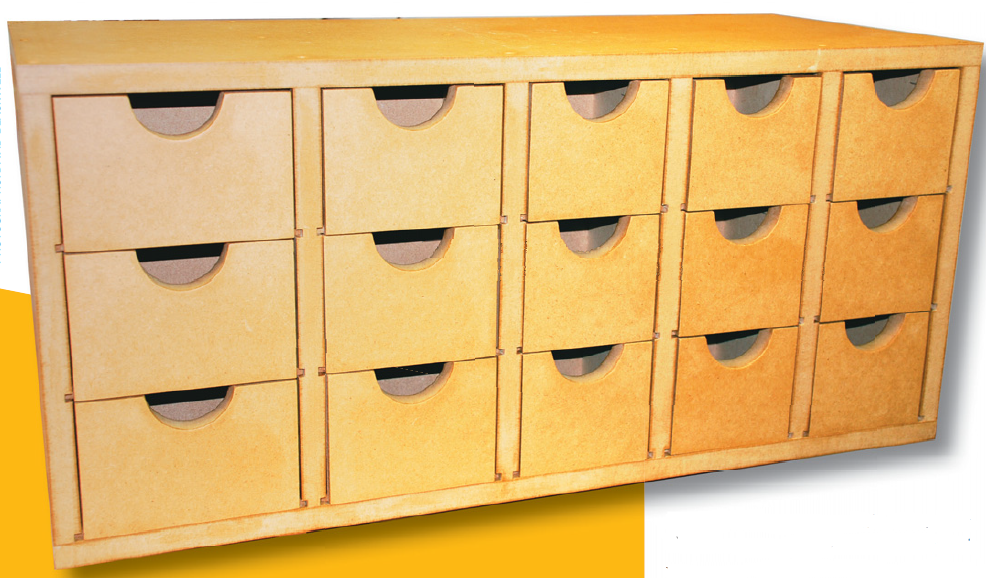
Drawer components in front of the assembled cabinet
Drawer pull
You now need to decide on the type of drawer pull you would like for your set of drawers. I have used a half-round cut-out which easily lets me put my finger in to pull the drawer out; I marked this out using the lid from a container of screws.
I then cut the half-round out on the band saw and finished it on a bobbin sander. I have mocked up some other options for your consideration as drawer pulls. The slots in the drawer sides also need to be cut before assembly takes place.
I decided for this set of drawers I would give myself the luxury of being able to split the drawers in half or thirds by having removable partitions. I cut these 6 mm wide to take the 4.75 mm MDF but you could make them even thinner as long as you had a suitable router cutter to make the slot and of course thinner MDF. Use a larger offcut of MDF cut square to push the sides through the cutter to ensure they remain square.
Assembly progress
Gluing and nailing the drawers
Options for drawer pulls
Assembly
You can now assemble the drawers which I decided to glue and nail together. Again be sure to keep everything square.
The number of drawer dividers you have decided to use now need to be cut. Cut a few extra dividers and store them at the bottom of one of the drawers to save time later should you then decide to add more dividers to the drawers.
I finished my drawers with two coats of Danish oil which gives them a reasonable look and stops stains from dirty fingers becoming an eyesore on the drawers.
Drawers showing dividers
Saving fingers
When you are machining small components on the router table, you should always use push-sticks or blocks to make sure your hands and fingers are well away from the cutter.
The project becomes very insignificant if you finish it with one less finger than when you started. Many years ago I was carelessly rushing to set up a cut on a small component. It grabbed and took off, hitting me on the forehead. The incident necessitated a trip to the A&E department at Christchurch Hospital and eight stitches in my forehead, not to mention the two black eyes that came out a day or two later.
I now always use push-sticks or push-blocks and other safety equipment on all such machining procedures.