It’s a simple process to convert your bike into an e-bike. Here’s how.
By Rex Thorley
Photographs: The Shed
The days are getting longer and the temperature is rising. You look at your bike in the shed which has been gathering dust all winter and contemplate getting fit for the summer and enjoying some of the great trails New Zealand has to offer.
Your neighbours have just bought electric bikes and have been telling you how much fun they are and how they can now ride up any hill and reach that popular café in only half an hour as well as getting home with energy to spare.
The thought of having an electric bike is very tempting and makes the idea of reaching that café far more appealing but the cost of replacing your bike has you thinking twice about making the jump.
Besides being a bit dusty you have a good bike that cost a few dollars in its day and it seems a shame to banish it to the corner of the shed forever.
What if you could turn your bike into an electric bike without breaking the bank?
Stocktake complete
You should already have most of these tools
It’s a project most can tackle
Well you can and as you are a Shed magazine reader, you probably already have the skills and basic tools to turn your trusty two-wheeled steed into an electric bike that will be the envy of your friends and neighbours.
This article is focused on converting a standard bike to a mid-drive electric bike.
There’s a lot of debate around hub drive verses mid-drive motors. Mid-drive systems make a more versatile bike as you get to use the bike’s rear gear system to give more low-speed torque and a higher top speed.
The weight is more evenly distributed and the motors are more efficient, giving greater range. A converted mid-drive bike will usually be lighter than a similar high-spec new bike.
All electric bikes need a controller or brain and this is enclosed within the motor which eliminates the need for an ugly controller box on the frame or to have to fit it within the battery box. Fixing a rear puncture is also a lot easier.
The other big advantage of fitting a mid-drive system to your bike is that it will be cheaper than buying a brand new hub drive bike.
Time to get striping
Removing the left-hand shifter
Will my bike take a kit?
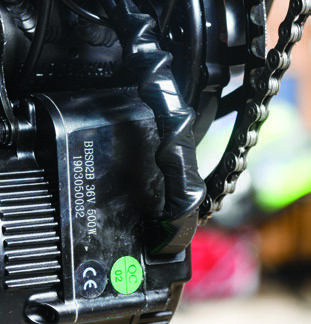
The kit used in this article is made by the Chinese company Bafang who is the world’s biggest manufacturer of electric bike products and supply a lot of mainstream brands with motors and control systems.
The Bafang BBS range of conversion kits has been in production for a few years now and has a reputation for being very reliable and rugged if used correctly.
They are designed to fit bikes with standard English threaded bottom brackets which is what most aluminum and steel-framed bikes have. A standard kit will fit a bottom bracket width of 68-73mm. Other widths are available and bottom bracket adaptors are available for some other frame types.
Parts are readily available and there are service agents in New Zealand.
The kit will fit most frame sizes XS-XXL. The main thing to consider on smaller frames is whether there is room to fit the battery inside the frame. This is the ideal position but batteries can be mounted on rear carriers or under the down tube in front of the motor.
IMPORTANT TO NOTE: Spacers needed here

How much power do I need?
The BBS range of motors come in 250w through to 1000w. The legal limit for an e-bike in New Zealand is 300w. This is enough power for anyone in most situations.
The benefit of buying a more powerful kit is that it can be reprogrammed to a lower wattage if desired which puts a lot less stress on the controller and motor internals and creates an even more reliable system. The motor controllers can be reprogrammed to adjust how the motor performs but this should only be done by a competent reseller with a lot of experience in this field. Out of the box, these kits go okay but when reprogrammed correctly they come to life and perform so much better even in the lower power settings. There is potential to do serious damage if standard settings are altered incorrectly and of course, any warranty would be void.
Leftovers anyone?
What size battery?
Batteries are measured in watt-hours (whrs) which is battery voltage x ahrs.
The higher the whrs the more range you will get for the same effort.
Battery whrs typically range from 360-720whr.
The battery used in this conversion is 36v 17ahr which gives you 612whr.
This combination will give you approx 60-90km depending on rider weight, speed, hills, tyre pressures, etc. This is a popular battery choice.
Be wary of someone that claims exaggerated ranges for their products. Unless they have some magic new battery technology their bike will not go any further than yours under the same conditions.
Plenty of room for the battery here
Popular 17Ahr 612Whr battery showing off its USB and charging ports
Fitting the kit
The key to obtaining the best result with these kits is to take your time. None of the steps are overly technical but everything needs to be done correctly to ensure you get a reliable system that should give years of trouble-free service.
Allow three to five hours to make a nice job depending on the type of bike and your experience. If you want to do the complete job yourself you will probably need to invest in a crank removal tool and a bottom bracket tool. These are available from any good bike shop and also online. All other tools should be in your basic hand tool collection.
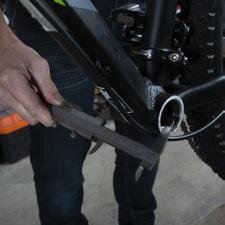
The first thing to do is to strip the bike down to accept the kit. This should be straightforward with the correct tools.
Removing the bottom bracket can be a little frustrating for some people. If the bike is a few years old and seen some weather then the threads can seize in the frame and resist coming loose. The right-hand side is a left-hand thread, and the left side is a right-hand thread. Don’t forget this otherwise, it will be a long day!

Reprogramming the motor for better performance and to suit the rider
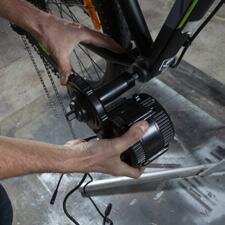
One of the most critical steps
Getting the motor fitted correctly is the most important part of the conversion process. Make sure the motor slides through the bottom bracket shell freely and that all parts are clean and dry. Bikes that have the gear cables running under the bottom bracket will have a cable guide that can be too tall and stop the motor from sliding in, so you may have to modify the guide. You shouldn’t have to force the motor into place. The right-hand motor casing needs to clear the chainstay of the frame. Spacers are available to move the motor over so there is some clearance.
If you tighten the motor and the casing is rubbing against the frame then you will probably crack the casing so make sure there is some clearance.
If the bottom bracket shell is 68mm wide then you can use all the fittings from the kit.
Apply a good thick grease to the motor and inside of the bottom bracket shell and install motor.
If you don’t grease everything now the motor will start creaking inside the bottom bracket and you’ll have to pull it out and grease it anyway, so it is a no-brainer to do it now.
If your bottom bracket is 73mm you will need to make up some spacers to go between the motor and the mounting plate. Push the motor up to touch the bottom of the frame and do up the main mounting nut good and tight.
The mounting plate has teeth on one side which go against the bottom bracket. These teeth create small dents in the frame which help to locate the motor and stop it from coming loose. Measure the gap between motor and plate and make spacers to suit. You will need to use longer mounting bolts through the plate to allow for the spacers.
Don’t over tighten these bolts, they can strip. You can use polygrips to tighten the main mounting nuts if you have to but Bafang provide a cheap tool to do this. It’s worth buying as you will need to retighten these nuts occasionally as things settle.
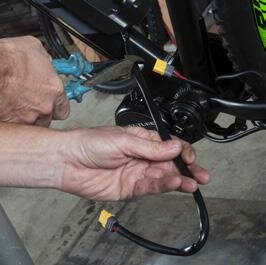
Take your time getting the speed sensor right
Straightforward job
When fitting the speed sensor make sure the magnet is within 2mm and that the rear wheel can be removed without upsetting the sensor.
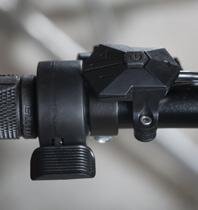
Where you fit the throttle and the control switch is personal preference. I usually fit them on the left-hand side which leaves your right hand for changing gear.
There are several types of battery cases out there and some are definitely better than others. The case and cradle being fitted here is a proven design with an internal aluminum spine and three slotted mounting holes that allow easy fitting to most bikes.
Occasionally you may need to add an extra rivet nut to the frame but most bike’s drink bottle mounts are in the right place to mount this battery.
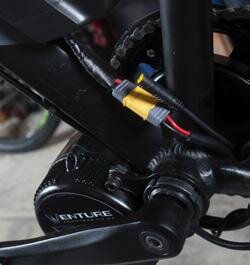
If the wiring from the battery is too long you will have to shorten it if you want a nice, tidy job. This battery has the proven XT60 connector which can be easily unsoldered and rejoined. Make sure you remove the battery from the cradle when cutting the wires!
I have not fitted brake cutoff sensors on this bike as the motor has been programmed to stop immediately when you stop pedaling. If you have cable- operated brakes then you could fit the levers that come with the kit but they aren’t that flash to be honest and you shouldn’t need them with the correct programming. This also means less wires hanging around and therefore a tidier, safer bike.
You may have noticed that the main wiring loom only has two connections which go to the throttle and speedo. This is a custom-made loom and a lot more professional looking when not using brake sensors. Standard looms are available if needed.
Make sure that the handlebars can turn full lock in both directions without pulling at any wiring. You need to allow a little slack in the wiring to achieve this, just like the gear cable.
Time to get turned on
Before you spark up your new bike it pays to go through the gears and make sure that the chain is long enough to go into the big gears at the back. Depending on the size of the front chainring used, the chain can sometimes end up too short to use the big hill-climbing gears.
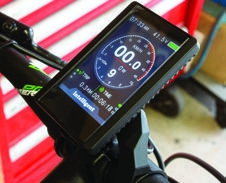
Make sure the battery is turned on. There are a few different speedo options available for these kits and this one comes with a nice center-mounted colour screen that has lots of functions, and the pedal assist control mounted on the side for easy access.
The speedo was preset for this bike so no need to worry about setting things up.
Presuming you have fitted everything correctly the bike should go and be ready for a few years of enjoyment.
All speedos will automatically start on pedal assist level one so that there are no surprises. You can adjust assistance levels before starting or while riding.
The throttle can be programmed to give you any power setting you want but most people want full power when required. It doesn’t take long to get the hang of these kits. The power will engage fully after a couple of pedal strokes and you’re away!
Two-and-a-half hours later, I have myself an e-bike
Periodic maintenance
It pays to check the two main crank bolts after a few rides and then every 1000km as they tend to settle and can loosen. You may also need to remove the left-hand crank and retighten the motor mounting nut periodically. The motor mounting plate also settles over time and the bike can develop a creaking noise when pedaling. This is just normal bike maintenance for these kits and is easy to do with the correct tools.
So there you have it. One high-performance, lightweight electric bike, with large capacity battery and genuine long-range, and tuned to suit you. It will outperform most other electric bikes on the market for less than half the cost and, even better, it’s been made by you in your shed.
All ready to hit road or trail
The main points
Build your own high-performance e-bike for a lot less money than buying new.
The ideal bike has an aluminum or steel frame with a standard threaded bottom bracket.
This motor will fit new or used bikes.
It’s versatile and can be refitted to another bike if needed.
It can be installed with standard hand tools and takes about four hours.
Professional fitting services are available.
A range of different motor and battery sizes are available to suit your needs and budget
Custom motor programming is available to suit you and your bike.
The bike can be ridden with throttle only.
Full parts range and repair service is available in New Zealand.
How to make your kit last
Make sure you charge the battery every time you use it. Lithium-ion batteries will last longer if they are subjected to lots of smaller charges rather than running the battery flat every time. Performance is always better and you will get maximum range with a fully charged battery. The motor will pull harder with the extra voltage too.
Let the motor rev!
All mid-drive motors like to rev so avoid taking off in high gear and using too much throttle unless pedaling normally. If you subject the controller to high or maximum amps and the motor isn’t revving sufficiently then a lot of heat is generated internally which can destroy the controller. This is why a lot of brands don’t fit throttles to their bikes, they are dumbed down to try to avoid problems from misuse.
However, these motors will go for many thousands of kilometres if they are used properly. You wouldn’t take off in top gear in a manual car so why treat your bike motor any differently?
Suppliers
These quality conversion kits are available from Venture Scooters. www.venturescooters.co.nz
Venture Scooters are based just out of Matamata and import these kits directly so pricing is extremely competitive and all kits come with a full 12-month warranty.
A complete range of spare parts is carried in stock and a full workshop repair service is available.
There is a range of kits available with motors from 300w to 1000w and batteries from 10ahr to 24ahr but there is also a professional while you wait fitting service available from $150.
Pricing starts from $1299 for the 300w 13ahr DIY kit delivered free to your door with full guidance given to help you achieve the best result.
For more info call 021 111 5400
The kit as supplied