The Shed Logo
Search
Close this search box.

Making a classic claw setting

This classic ring is called a six-claw, Tiffany-style single-stone setting and is the simplest of our school’s solitaire-diamond ring designs with a claw setting. The “Tiffany” label comes from the famed American jewellery house which boasted that its diamonds were of such quality that they did not need to place them in fancy settings. As a design for round gems, this is just about as basic as one can get.

A simple “Tiffany” ring enhances the stone
by Peter Minturn
Photographs: Jude Woodside

Bare “Tiffany setting...
..sets off the stone

This classic ring is called a six-claw, Tiffany-style single-stone setting and is the simplest of our school’s solitaire-diamond ring designs with a claw setting. The “Tiffany” label comes from the famed American jewellery house which boasted that its diamonds were of such quality that they did not need to place them in fancy settings.
As a design for round gems, this is just about as basic as one can get. It is minimalism in its most extreme form. The ring is made from just two elements—a round, tapered setting and a half-round shank. The claw setting is constructed by bending a length of 7 mm x 0.9 mm silver strip sufficiently long enough to surround the diamond’s circumference.
In practice, most goldsmiths will pull down enough metal at one time to make several of these standard settings. After the strip is annealed, it is turned into the shape of a semicircle about the same diameter as an old penny (30 mm). It is then annealed to cherry red once again.

Silver strip turned into a circle for ring
Collet cut to shape.
Strip turned for the collet...
... the coneshaped sleeve for the stone.

Collet
Now, with round pointed pliers you grasp the end of this semi-circular strip and turn it up into a collet or cone-shaped sleeve or tube, to an extent that it just allows the gemstone to fit inside it. This collet is then cut away from the strip with a jeweller’s piercing saw and placed into a 25-degree round collet block and tapped down into it—at the school, we use an old car or motorcycle valve stem which has a flat surface.
The stone is then placed into the top of the collet again and to judge if the collet size is correct (it should overlap the inside edge by 1/3). Look to see if the join in the collet wall is lightproof. If the collet size is too large, you can cut it down. If it is too small but the join is fine, it can be soldered up with hard solder and then stretched in the collet block until it is the correct size to fit the stone (that is, the stone is 1/3 over the top of the inside wall.)
When the collet is the correct size, pickle it and clean it up. Then you either:
• draw a fine line down the line of the solder join; or (as most mounters would do)
• take your saw, turn the blade at an angle and cut a very fine line with the saw down the wall of the collet
directly over the join.

Place silver in 25-degree round collet block, using old car valve

Marking claws
From here the tops of the claws are marked out. Over the years of repeating this simple job, I have found what I believe is the most accurate, yet quickest way to achieve this critical job. If the claws are not marked out with 100 percent accuracy, this simple ring will never look straight especially
once the stone is set in claws where the distance between claw tips is not 100 percent accurate.
When you have six, perfectly distanced lines cut across the top wall of the setting, you take your dividers and open them until they just sit over the collet wall.
Then you place the divider on one of your cut lines and mark another line to its right side. This will
become the other side of the claw. This is repeated to mark the other five claws. You now have twelve marks made at an exact equal distance on top of your collet wall. Now, using your saw—once again, turned on an angle so only one edge of your blade marks down the collet wall—drop a line down from each top mark to the base of the setting. But make this only just sufficiently deep to guide your saw cut.
Your claws should taper down the wall of the collet at the same angle as the outside of the collet.

Marking out the six-claw setting
This work must be carried out with the utmost accuracy. The finished setting will only look good if all the claws and scallops between are the same width as the others.
1. Mark the join. One of the six claws will have the join running down its side.
2. Find the point opposite the join with dividers. Set the compass gap close to the radius of the outer walls.
3. Put a saw cut through the join and its opposite position. Then find the positions that divide each side into three by the same method of just overlapping the compass marks.
4. Put a shallow saw cut through these positions. Remove the compass marks.
5. Set the divider gap so the points overlap the rim of the collet. Then mark each of the six divisions with the thickness of each claw.
6. Cut down through the lines to separate each claw. As you do this, align the saw towards the same position on the opposite claw. This will give your claw a tapered shape when viewed from the top.

Cutting down
Your setting now needs to be mounted on a shellac dob stick. If the setting is small this may need to be a piece of brass sprue wire or, for a larger setting, a wooden peg with shellac melted on it. (An old paintbrush handle or a taped-down piece of bamboo chopstick will do the job.)
With the setting now held by its base on your dob stick, you mark a line approximately 2/3 of the way down the setting from the top. This is where the extreme edge of the claws will be cut down to.
Taking your saw, you cut right down through the lines on your collet wall, and as you close to about halfway down the setting, you begin to turn the saw blade until it cuts at an angle curved towards the 2/3 line. If you repeat this with care, the amount of work that you need to do to clean
these scallops up with a rat-tail needle file should be minimal.

Hammer silver in the collet block then...
...punch to shape.
Shaped collet
Annealing
Pickling the collet

Shank
The shank is the part of the ring that encircles the finger, in this case, the whole thing. In rings, with a gemstone setting as its main feature, the shank is the part that encircles the finger and holds the head in place.
The shank here is made by taking 3 mm x 3 mm square wire down in the square rollers to 2 mm x 2 mm, then after annealing either taking this through half-round rollers or swaging it in a swage block. To calculate the length you require you could use a shank gauge—one made with a strip of silver or copper will last you a lifetime as I still have the one I made as an apprentice more than 60 years ago.
Or you can take a piece of binding wire and wrap it round your ring-size stick. This will give you the size required, less the distance across the base of the setting. I always stamp my shanks if possible when they are still in this half-round stage and before I turn them up into a ring shape. It’s much easier to get the marks exactly straight when the ring is like this and before it has been formed.
After you anneal the ring to a cherry-red colour once again, use the half-round ring-making pliers to turn your half-round wire into a ring. Anneal once again, place the shank on a flat iron and flatten it with a hammer and the valve spring punch. Now try your ring on the size-stick and see if it needs to be cut down to achieve the desired finger size. If it is too small, just go ahead and fit it to the collet and we can stretch it up to its required size once it is soldered to the setting.

Calipers check
Alternatively, parrot beak pliers hold collet at correct angle for cutting
Turning saw blade at angled curve

Fitting the shank
The method for fitting the shank comes from several schools of thought.
• The first method is to cut a hollow curve the same shape as the base of the collet so that the shank sits against the collet wall.
• The second method is to make a small saw cut into the base of the setting and file an angled bevel.
Then you match this bevel with the angle of your shank ends and once it is fitted, it should look the same as the first method. The advantage of method two is that the shank will sit exactly on the setting wall and should not be able to move when being soldered. With method one, the way the binding wire secures the setting to the shank should hold them sufficiently. Solder the shank with hard or medium solder, pickle the ring, and rinse it.
Then file the base of the setting so it matches the curve of the shank and hammer it with a mallet until it is perfectly round. (Use a mallet, as this will not mark your shank.)
Check the finger size. If the ring is below the required size, you can either pull it up a size or two on the ring stretcher or you can take a half-round sizing punch and gently push up its finger size.
The next step is to smoothly file the sides of the shank down by hand until a nice even shank line is produced. Then sand it all over with emery paper down to 1200 grit. The inside of the shank can be sanded with a piece of emery paper held in a split mandrel— you can make this from an old beading tool or a piece of brass sprue wire.
All that remains before the stone is set is to polish your ring with Tripoli, a grease-based compound that contains a microscopic abrasive, and jeweller’s rouge, a concentrated polish
normally applied with a buffing wheel. To ensure that your collet claws stay nice and sharp when being polished, use a stiff brush rather than a mop on the claws.
Peter Minturn is the Director of the Peter Minturn Goldsmith School in Auckland.

Rat tail file cleans up scallops
Claws cut in collet setting
Finished setting

Share:

More Posts

A silver butterfly takes wing

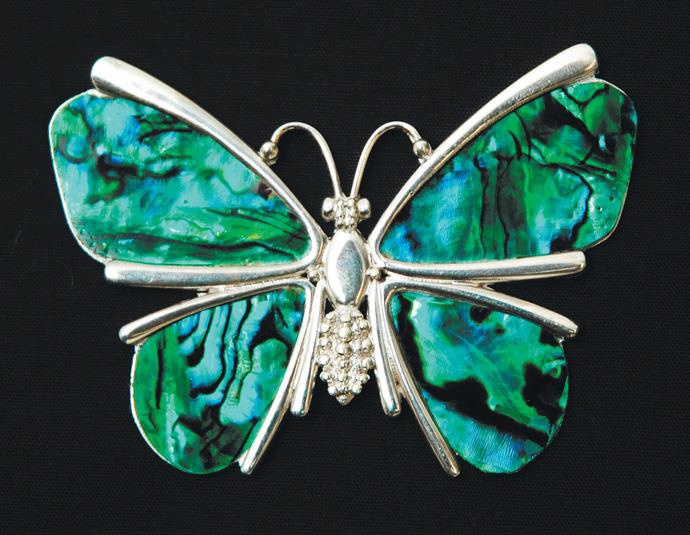
If this design was being made in an art school, it would be stuck to a sheet of silver and the basic shapes cut from there. If a design was made this way in, say, 18 carat gold and the wing outlines (as here) made from 2.5mm thick metal, the outlay and waste material would be considerable from a 2.5mm-thick sheet of 18 carat gold plate. But we will make it like a professional craftsman who has to live in the real world where costs matter.