A Wellington group meets to participate in a sport Sherlock Holmes would have enjoyed
By Louise Thomas
A selection of the locks put out for LockSport Wellington’s meeting. Note the clear-pin tumbler locks, the see-through outer casing offers the novice lock pick a clear view of the pins inside
What the long arm of the law says
Under the Crimes Act 1961 it is illegal to have in your possession “any instrument capable of being used for burglary with intent to use it for such a purpose”. Most countries have similar laws. In summary, it isn’t illegal to own a lock-pick kit, as long as you don’t intend to use it for burglary. And, as Derek points out, there are much easier and quicker ways of breaking into houses, including bricks and, for the high-tech crim, lock guns, as used by locksmiths. [http://www.legislation.govt.nz/act/public/1961/0043/latest/DLM330247.html]
Lock picker extraordinaire Derek Robson, aka D. Roc, outlines the basics of lock picking
In a sash-windowed meeting room in the upper reaches of the historic Thistle Inn in Wellington, an unusual band of people is preparing for their monthly meeting. Master lock picker and meeting organiser Derek Robson, aka D.Roc, is assembling an array of locks; dozens of them—mortise locks, pin tumbler locks, tubular locks, various padlocks, combination locks, wafer locks, even a selection of handcuffs, to challenge tonight’s group.
They are LockSport Wellington, and they get together to well pick locks for fun. It’s the sort of pastime Conan Doyle’s
Sherlock Holmes might have indulged in. “It’s like doing a Rubik’s Cube in the dark,” quotes Derek from a well-known (in lock-picking circles) international lock picker—Josh Nekrep.
“We come from all walks of life,” claims Derek, but there’s no tattooed ex- cons here and more computer security specialists than you would find in any random sample of the population. They’re a group that finds weaknesses in security for work and fun. “We have a very strong code of conduct and we discuss the legal aspects of lock picking with new members. Basically, our code says that locks put out for meetings aside; you do not pick a lock that you do not own. You do not pick locks for other people. For example, someone might say, ‘Can you help me, I’ve locked myself out of my flat?’, but, is it their flat? Do you really know this person? There are all sorts of legal and moral issues, so you only pick locks that you own.
“We haven’t had any shady, criminal characters turn up for lock picking meetings, but when you think about it from a criminal’s perspective, no criminal is going to spend days, weeks, or even months learning how to lock pick. If they want to break into your house, they are going to use a brick… through your window…it’s nice and quick. No, lock picking really is just an intellectual challenge. You are solving a puzzle where you can’t see all the pieces.”
A Wellington LockSport member tries his hand at picking a padlock. Note the tension applied on the wrench with his left hand as he uses his right to pick and lift the pins
Handcuffs
To warm up the gathering crowd Derek gives a Houdini-like demonstration of freeing himself from various handcuffs using a simple pick tool. He releases the cuffs in less than 30 seconds.
“It’s surprisingly easy to pick your way out of handcuffs,” says Derek. “Handcuffs are a restraint, they are not a security device. If you have a tool, you can get yourself out of most handcuffs in less than a minute repeatedly with a bit of practice.
“Many lock pickers start off with handcuffs as they are easier than most door locks and padlocks.
“Handcuffs use a ratchet system. All you have to do is insert a pick and depress the lever away from the teeth and the cuffs will spring open—it’s as simple as that.” Some handcuffs have double locks, with a lock spring that stops the cuff from ratcheting tighter when they are being worn. Tightening handcuffs can be done intentionally by the wearer, or more likely, unintentionally when struggling. Double-locked cuffs are harder to pick than the simple ratchet ones.
It takes Derek less than 30 seconds to pick open most handcuffs
Using a single tool to open a ratchet- system handcuff
Like minds
When Derek became interested in lock picking as a sport, he thought the most likely place to find like-minded souls would be at Kiwicon—New Zealand’s annual computer security conference. “Kiwicon’s been going on for eight years now. When I went to the very first Kiwicon I asked around if anyone did lock picking because I really wanted to learn about it. I had a few tools, but no knowledge of how to use them. I met a guy at the conference who had a few tools and a little bit of knowledge of how to use them, so we got together and compared notes.
“Then, by the second Kiwicon I had enough knowledge that I was teaching four or five others how to pick various locks at lunchtime and showing off a few ideas and it built from there. And then two years ago on the final day of Kiwicon, lots of people said, ‘This lock-picking stuff we do at Kiwicon is awesome, but it’s only one day of the year. We should do this more regularly.’
“So, before the weekend was out our group had a name and an E-mail address and it went from there. I guess they made me the ringleader as I run the physical security and lock-picking classes at Kiwicon. At the moment we just have a Wellington chapter, but there is some interest in forming an Auckland chapter. Same with Christchurch or Dunedin—if someone says they want to set up a local chapter, we’d love them to get in touch. We’re calling ourselves LockSport New Zealand as we have this vision that the sport will eventually be New Zealand wide—and why not?
“Our Wellington group has been meeting monthly for about 18 months now, since January 2014. Every month we have a presentation about something to do with locks: new locks, new techniques, new tools, things relating to physical security. And we also do general lock picking throughout the meeting.”
Tonight’s talk is covering basic lock picking for the chapter’s new members; also on offer is a presentation by long- time member Stephen Shkardoon, also known as ss23, about elevator security (or the lack thereof) and how easily overcome swipe-card-restricted floor access is by picking override locks, or using fire security override keys (schematics of which are often publicly available on the internet), and various other techniques.
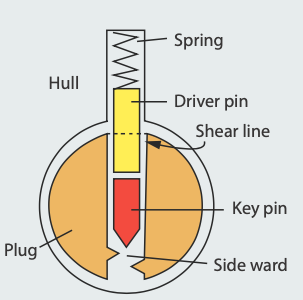
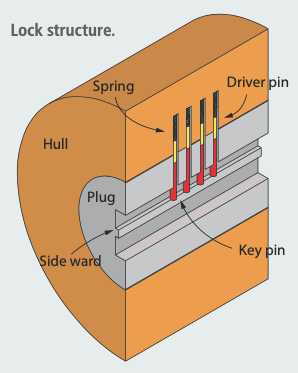
The broken down insides of a pin tumbler lock, showing, from left to right, the hull, the plug, the key pins, the driver pins, the springs and other sundry pieces.
The Lock Pick Kit
Derek says it’s reasonably easy to make your own lock picking kit if you have access to a bench grinder.
“If you get very cheap hacksaw blades from The Warehouse, they might be rubbish as hacksaw blades but they make ideal blanks. If you grind off the teeth and snap them in half, you are left with a nice blank and you can get templates off the internet for the different shapes you need. Don’t use good-quality blades though as they are made from tool steel and they shatter and bits of metal go flying around the work shed—make sure you are wearing safety goggles.
So, they must be cheap blades made of soft steel that you can grind easily.”
If you can’t be bothered going to the effort of making your own, ready-made lock picking kits are available on the internet, with prices starting from around $NZ30 for a basic kit. “You can get a nice kit from Australia or the US which will do most locks for around $NZ50. Don’t be tempted to buy the big fancy kits; there’s stuff in there you’ll probably never use,” says Derek.
A basic kit contains around five or six tools, including a tension tool or wrench for turning the lock and tools for lifting the pins. The other tools generally fall into two categories: rakes with wavy ends and different numbers of ridges for raising several pins at once and picks with shapes such as half diamonds, diamonds, balls, and hooks for picking individual pins. “That basic set is sufficient for opening most of the door locks you will come across,” says Derek. “Practice is what you need, rather than more tools.”
Further reading
LockSport NZ: http://locksport.org.nz/ The MIT Guide to Lock Picking: http:// www.capricorn.org/~akira/home/ lockpick/mitlg-a4.pdf
CIA Lock Picking Field Operative Training Manual: http://asset-3.soup.io/ asset/0749/8349_ 360c.pdf
A lock pick kit can be as simple as, from left to right, a half diamond pick, a tension wrench and two different rakes
How to pick a pin-tumbler lock
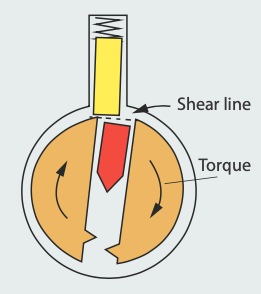
The most common home locks are pin- tumbler locks. The bit in the middle that turns and where the key is inserted is called the plug and the bit that doesn’t move around the outside is called the shell or the hull. Inside the lock, there are usually five parallel pin stacks, housed in vertical tubes, with two pin parts to each pin stack. The top part, the driver pin, is stacked on the other, the key pin. A small spring, like you’d find in a tiny pen, pushes down onto the driver pin, so the pin stack can return back down when the key is removed. Each of the five-pin stacks with both parts, the key, and the driver pins, is the same length; however, each of the individual key and driver pins are different lengths—that is, the break occurs at different points on each complete pin stack.
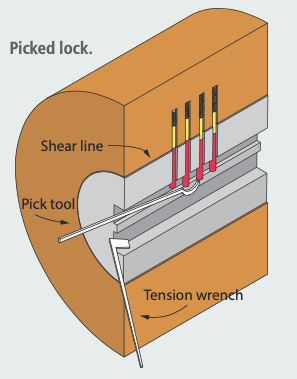
When the correct key is inserted into the lock, this raises the key pins and aligns the break between the pins with where the outside of the plug meets the shell. With all five driver pins wholly inside the shell and the key pins wholly inside the plug, this forms what is called the shear line. With the pins aligned, the plug can now be turned to release the lock. When you pick a lock, you generally use two tools—a tension tool for turning the plug and a pick tool of some sort for lifting up the pins to the correct height.
To begin:
-
Insert the tension tool, also called a tension wrench, then turn the plug slightly using a small amount of tension. This should create tension against one or more of the pins, creating a binding pin—a pin that is resistant to being pushed upward.
-
Insert a pick tool, such as a half diamond, to feel for the binding pin. Lever up this pin until it is “set”, that is, the driver part of the pin gets stuck up in the hull and sits on the lip of the slightly misaligned plug. You look for a binding pin as the plug will be able to rotate slightly once the driver pin passes the shear line, providing a small lip on the plug for any binding-raised driver pins to sit on—Derek says you should hear or feel a small click when the pin has set.
3. Keeping the tension constant on the wrench, repeat the pick process with the next binding pin, and so on, until all the pins are set and the tension wench can be turned fully to unlock the lock.
4. If you are using a rake tool rather than a pick, again apply slight pressure on your tension wrench and slide the rake all the way to the back. You then scrub or rake the rake forward and upward towards you, slide it down and to the back again, and repeat until all the pins are raised and set and the wrench can be turned. This can be a very quick method of unlocking a lock, but it doesn’t require the same finesse as picking individual pins and doesn’t work on all locks.
If neither of these methods is successful, it could be that you are applying too much pressure on your wrench, or not enough. It does take practice to get a feel for different locks.