Dirt, dust, blunt cutters and clogged filters are just some of the things to fix if you want your chainsaw to work at its best.
By Paul Downes
Removing the top cover
Pulling the choke on to prevent dirt entering the carburettor
Blowing out the air filter
Maintaining your chainsaw is essential if you want to have a good, efficient machine that is safe.
I live in Tokoroa, and here we have to maintain the big saws used by the tree fellers and bushmen working hard in the forests. But the same principles of cleaning, maintaining, repairing and safety requirements apply to the chainsaw stored in the shed at home. By law, chainsaw shops have to tell people how to use a chainsaw they have bought. Husqvarna pushes us to promote safety issues with the pre-delivery check we
have to do.
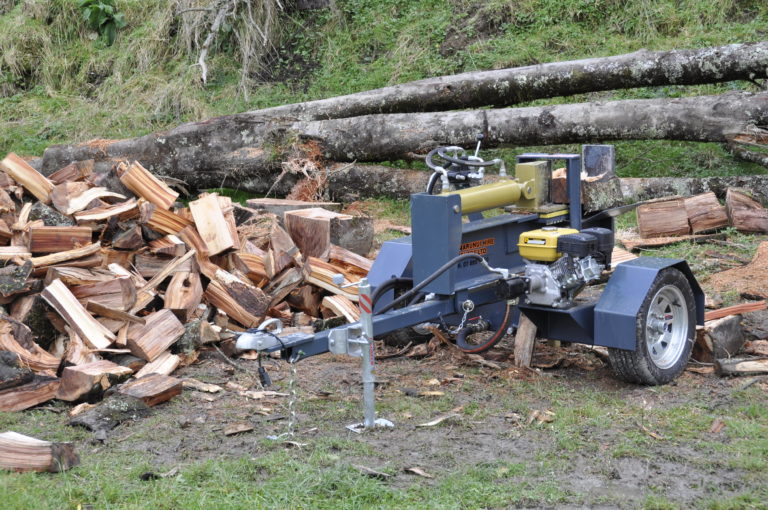
It’s just like another tool. Your chainsaw should have a basic service by a professional shop six-monthly or yearly. But you can do several things to keep your chainsaw up to scratch at home. To show how to dismantle and check a chainsaw, we are using one of the big, forest 95cc machines. A home machine would usually around 30-60cc, but the principle of maintenance is the same.
Usually, when it comes to servicing a chainsaw, we find filth and dirt is the biggest problem. Dirt is the biggest killer of chainsaw efficiency because it wears everything out. With matter like dirt and mud a clogging hazard, you create worse problems if the chain gets a little bit blunt – it kicks up dust because it just chews at the wood.
Checking between the cooling fins for dirt and debris
The fuel filter – this one is clean
The spark plug should be coffee-coloured
Before you dismantle the chainsaw, pull the choke lever on as this closes the intake tube so that no dirt can get in.
The air filter is like a lung in a human, essential for the machine to breathe. If it’s full of dirt and clogged up then the chainsaw just dies. Take the top cover off. Take the filter off and start by blowing the filter inside out.
You should put safety glasses on as dirt and muck come blowing out. Start from the inside and then go to the outside. There’s a heavy-duty filter on this machine, but the smaller home chainsaw might use a nylon filter. You can put it in water and give it a clean. But, WARNING, it must be bone-dry before you start the chainsaw. One drop of water sucked into the carburetor and the chainsaw will crash.
There are models that will not work properly unless you clean the air filter every day. The next thing is to look for dirt and leaves around the fins. When professional chainsaw users such as loggers take the top cover off, they can find pine needles, dirt and leaves caked around the cooling fins. A similar kind of thing can happen to the home chainsaw.
You must get rid of the rubbish that accumulates around these fins otherwise it will overheat the piston. Take off the spark plug lead next. It’s always tight so give it a twist and it will come off easily. Check the spark plug. The gap is usually 0.5mm in just about every standard model of chainsaw. We change the plugs regularly for the professional foresters and find we can use the old plugs as pretty handy sinkers for fishing. The plug should be coffee-coloured which shows that the fuel mixture is right.
Check that the fuel filters are fine – they are ceramic. They are uncleanable, so if they are broken or dirty replace them. They are only small. If the filter is blocked, the engine will over-rev and lean out. Next, take the starter cover off. Check on the flywheel, that all the fins there are clean. If one fin is missing or broken, the flywheel becomes unbalanced, causing the main bearings to disintegrate and blow.
The flywheel is where the chainsaw sucks in the cooling air.
Clean out the area around the flywheel. The flywheel houses the magnets for the magneto that creates the power for the coil. You don’t want dirt between the magnets and the coil.
Removing the side cover to expose the flywheel and coil
High tension lead and cutoff wire
Clean the gap between the flywheel magnets and the coil
The gap between the magnets and the coil is important.
A 0.3mm gap is the general rule of thumb. A rough-and-ready gauge is the cover of a cigarette paper packet which produces about the right gap. A lot of people have a Zig-Zag cigarette paper packet but not everyone has a feeler gauge. Also check the main wires for the ignition, the stop wire, and the high tension wire. Chainsaws today are all electronic with some having rev limiters. Also, check that there are no loose nuts and bolts. If there’s a problem with the chainsaw’s performance and there’s no spark,
check the spark plug first,
then check the wires to the plug,
then check the high tension lead.
Work your way back.
While the cover is off, always check the decompression button to make sure it is working. The button ensures modern chainsaws have less strain on the gears and pulleys and are easier to start. Check the head bolts, head screws and then move to the muffler screws to ensure they are tight. Vibration can loosen all these fasteners.
To put back the spark plug, screw it in finger-tight and then give it only a quarter-turn with the spark plug spanner. If you tighten the spark plug too far you can strip the thread and have to take the barrel off to fix it.
So the main problems with chainsaws are:
dirt,
broken fins,
coil magneto problems.
Checking the gap in the time-honoured way
Decompression button
Removing the chain brake cover
The bar and chain
The bar and chain must be cold when you check them for the final tensioning to be accurate.
Most modern chainsaws have an anti-vibration mounting system and this is the last thing you check. Earlier chainsaws don’t have this mounting and the old bushmen used to get a condition called “white finger” – their hands in retirement were taut and pale from 20 years of working with vibrating saws. When working on the saw side of the machine, be careful not to swipe your arm across the saw as you move. Many a chainsaw user has received nasty cuts by leaning over the chain, or from the spikes which sit on the clutch cover.
Take the bar and chain off.
Mark the bar with an arrow so you know which side is up.
Sprocket, clutch and chain assembly
Removing the bar
The chain sprocket
Sprocket
Check the sprocket is intact and true.
The rule of thumb if you buy a new bar and new chain is that you should also replace the sprocket. A new sprocket could retail for around $16. A rim sprocket is replaceable. But on the small saws, the rim sprocket is not removable by itself and the whole assembly needs to be replaced.
The sprocket drives the oiler too. To test that the oil is flowing properly, do the start test. With the chain and bar off, but with the sprocket on, start the chainsaw. Hold it near to the side of a bench to prevent the sprocket flying off into the workshop.
Make sure that oil is moving through the oil gulley and flowing out.
Method of checking the oil pump. Hold the machine close to the bench in case the sprocket flies off
Lubricating oil port
Lubricating oil port in the bar. Check that these are clear.
Bar
Check that the oil holes in the bar are clear.
One piece of sawdust could block these important lubricating outlets. If you are using the chainsaw regularly, rotate the bar every day. In the old days, this was not done with the banana-shaped bars but today’s symmetrical bars can be turned either way.
Look down the bar to check that the rails in which the chain runs are even, that one is not higher than the other. To fix this problem in the bar you should take it to the local workshop for it to be planed expertly to even up the offending rails.
Chain
Look at the drive links to show there are no burrs. If the sprocket is worn, it will start wearing your drive links out.
A tell-tale sign of wear when you are running a loose chain is wear on the tie straps, the small metal bridge between the rivets which should be at across the edge. Also, if one side of the cutter is longer than the other side, the chain will pull to one side when you are using it. Keep old chains to cut stumps.
Use an old bar, and old chain but remember that one touch of the revving chain in the dirt and it’s gone blunt.
Note the wear in the tie straps compared to the new chain at top
Setting chain in the sprocket.
Assembly and tensioning
Fit the bar and chain. Make sure the chain is on the sprocket and connected.
Turn it so you know it’s in the sprocket, then it will sit comfortably. Put the bar in, grab the front of the chain and fit it in the bar.
Fit the clutch cover and finger-tighten the bar nuts. Make sure the chain is turning freely by hand. Hold the bar up while tensioning the chain. To get the correct tension, lift the chain up with your thumb and forefinger until you see half the drive-link sitting above the groove. You should be able to turn the chain with two fingers.
Always turn the chain clockwise. If you turn it the other way, your hand could slip off the chain under pressure and you would slice your fingers. Lift up the saw from the front bar. Adjust the bar tang – tension the chain up and tighten with a spanner. Check the chain-catcher at front of machine. Chains can fly off the bar, and the chain-catcher is there o stop the chain hitting your knee or leg, or the $400 tank on the chainsaw.
If you use the saw for a day, loosen the chain after use as this takes the pressure off the bearing. If the chain is too loose, it can come off and chances are it will come into your leg.
Checking the chain is on the sprockets and turning freely
The correct chain tension
Spark arrester
Chainsaws have a spark arrester. Take off the spark arrester and make sure there is no carbon in it.
In the smaller saws, they block up often. You can hear the different noise in the saw if it’s blocked because it is quiet on idle. You need a nice clean filter in the spark arrester. Guys in the bush need a spark arrester because if a spark comes out of the saw, the whole bush goes up.
The spark arrester
Replacing the spark arrester mesh
Sharpening
Put the bar in the vice and use a file guide to position the file for sharpening the chain.
A file guide will give you the right measurement and angles. Only the tip of the cutter does the cutting. The rest of the angle shoves the chip out.
The depth gauge in front of the cutter guides it into the wood so it is important that this is not higher than the cutter tip. A proper guide is required to set this; if you take too much off it will bog out in the cut.
Most modern chainsaws have a line on the top of the cutter plate showing the correct angle for the cutter. On the file guide, we use one section to get the right line and keep the file at the right angle. Lean over the top of the saw with a round file at a 10-degree angle.
Holding the file, pull back up into the cutter. Keep an even stroke. Always start with the bluntest cutter. The main thing is to keep the angle straight. The file handle has two angles. We would normally use 25˚ or 30˚ angle. Reduce the angle to 25˚ for cutting hardwood. Once you’ve done one side, spin the saw round to the other side.
Of course, if you take it to a professional shop for cutting, it is likely to stay sharper longer and cut better.
Sharpening the chain. The file handle has angles of 30º and 25º for convenience
This file guide does a similar job…
…but it also includes a guide for setting the depth
Filing the depth gauge
Tightening the bar in place. Note the elevation of the machine to apply upward pressure to the bar
Tuning
You can play with the idle screw as much as you like, but don’t play with the mixture – leave that to the professionals.
If it’s too lean it could blow up. Go to the shop for tuning your chainsaw.
Chain brake
While rotating the chain by hand, push the chain brake lever down to check that the brake band is functioning properly and is intact. Has the chain stopped? Keep the whole cover clean. If you get dirt behind the brake bar it will not come right back when you disengage it, causing the brake band to rub on the clutch and wear it out.
Checking the chain brake
Starting
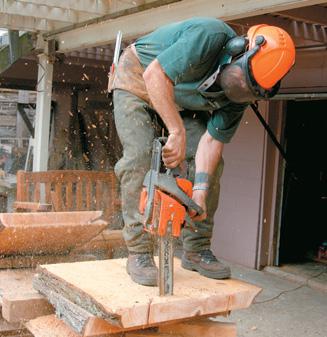
Don’t hold the chainsaw in the air and drop-start it as this is dangerous.
The chainsaw could leap and cut your leg. Any logger or bushman found doing this would be stood down and lose a day’s pay. Start the chainsaw with the machine sitting on the ground.
Have your thumb under the handlebar (you can have a leather mitt which ensures your hand or thumb is in the correct position). Put your boot on the handle. Don’t have the chain resting on anything.
The top corner of the chainsaw is the most dangerous. If you get the toe of the bar anywhere near the cutting zone, the cutter will grasp the wood at the toe and then the chainsaw will bounce up towards your face.
The chain brake is there to stop the chain rotating before it comes into contact with the user
If your boot is too big for the handle, put your leg over the saw and place your heel on the lower part of the handle.
Start with the choke out. Pull the starting cord hard till it fires. If you miss the fire, it could flood and make the saw very hard to start. Once it fires briefly, put the choke in and the saw will be on half throttle. Pull the starter cord once more and the saw will rev at half pace until the throttle is touched, causing the saw to go to idle. Then the hard work begins.
The correct starting position
Note the position of the thumb locked around the bar
Mitts make the correct grip compulsory
Old and new
Do not run an old chain on a new sprocket or a new chain on an old sprocket.
The four basic chainsaw rules:
Your chain must be correctly tensioned
Your chain must be well lubricated
Your chain must be sharp
Your chain’s depth gauges must be set correctly
Chainsaw races
When guys “race” their chainsaws, they build on big-ger carburettors and expansion pipes to give low-down torque.
They also make the chain as light as possible, even filing the rivets down on the chains, using square files rather than round files to sharpen. Some guys can spend 40 hours preparing their chains.
The quickest guys can cut three 12-inch (300mm) rings in a piece of timber in 4.8 seconds. There’s also a bar-and-chain competition. The record for taking the bar and chain off a chainsaw, turning the bar over and then re-assembling them is around 23 seconds.
My chainsaw won’t go
You would be surprised at some of the problems people come to us with when their chainsaw won’t go. The first thing we check is the brake. Sometimes the brake will be on and the person who bought chainsaw will wonder why the machine is not working.
We have found times when the chain has been put on the bar back to front. Then there was the person whose chainsaw was ruined and they didn’t know you were supposed to use two-stroke fuel and not diesel.
A professional chainsaw shop can give expert pre-delivery advice, but often you will find places selling chainsaws that simply give people the manual and no personal instructions. Who reads the manual?
Starting
Since most chainsaws are electronic ignition, they need about 3000 revs to get a spark.
To start a chainsaw you have to give the starting cord a really hard tug. There’s no half-way with electronic ignition – either you have it or you don’t. If you have problems starting the chainsaw, it’s possible you are not pulling the starting cord strongly enough.
In the old days, when chainsaws had a condenser, it might or might not be on, and you could keep trying to get a spark. But not with electronic ignition we have today.
Don’t ever use this section of the bar to start a cut. It can induce violent kickback