By Jude Woodside
Make a forge from an LPG gas bottle
I first considered building one of these when I saw the examples that Shane Minnear (Cutting Edge) and Kieran Gleeson (Yambuk Blacksmith) had in their sheds in an issue of the magazine (The Shed, April/May 2015 issue).
I happen to have a few old 9kg LPG bottles lying about that I considered would be fine for the job. When I came to select one, however, the most likely candidate proved to be full of gas. Far too much gas to vent so having committed to making the forge I opted for the second-best option and bought a new bottle. At only $45 it wasn’t a huge outlay although I know that many of you will be shaking your heads at my frivolous wastefulness.
Buying a new bottle has one very handy up side: there is no volatile gas in the bottle. If there was then certain precautions are absolutely essential. Greg Holster has outlined the safest methods for neutralising a used gas bottle in an article in The Shed (October/November 2012 issue) and they bear reiterating here.
Make sure that the bottle is empty and remove the valve. These valves are usually well set in so it will require some exertion and a long lever. To make this process easier, especially when handling a large, round, smooth bottle, you can tack the base of the bottle to the work table (assuming you have a metal table).
Unscrewing the valve.
The bottle tacked to the bench for stability.
Removing the safety cage for the valve
Inert gas
The simplest method is to fill the bottle with water, or you could fill it with inert gas such as argon or carbon dioxide. Greg prefers to inert the bottle by changing the air in the tank at least three times with inert gas and keeps the gas running while he is cutting.
Water filling is simplest but be careful using electric angle grinders— make sure the angle grinder is isolated through an RCD or use an air-powered grinder.
Marking out the door opening.
The cut-off wheel worked, but it really needed a thinner blade.
In the full expectation that I was working with a used bottle I had purchased an air-driven, cut-off wheel that I figured would be more accurate than working with an angle grinder. It would have been more accurate but it needed a somewhat thinner wheel than the 1.8 mm version it came with.
The wheel was taking a while to cut through the bottle. Fortunately we were in the well-equipped premises of Construction Engineering in Henderson and they had to hand a plasma cutter.
The plasma makes short work of the opening.
Removing the foot.
Measuring the opening in the front…
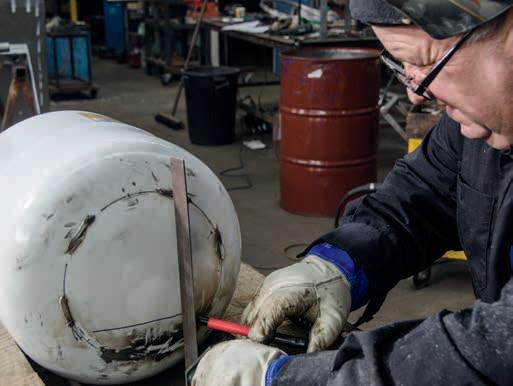
…and transferring it to the rear.
The plasma cutter made short work of the process of opening up the bottle for the door. Incidentally, had this been a used bottle the plasma cutter would have been perfectly happy to be used with the bottle filled with water while the top was cut but using water around a device that has low amperage and high voltage is always potentially risky.
First the various protrusions such as the safety cage that surrounds the valve and the ring at the foot of the bottle need to be removed. But it’s a good idea to use the safety cage ring as a template for marking the door of the bottle first as it’s roughly the right size and shape. Draw a straight edge across the opening and this can be the base of the door.
Using a straight edge to cut the rear opening.
The rear slot cut.
Now, making sure the bottle is neutralised, cut the door out of the top of the bottle. As noted we used the plasma cutter but other tools that would be useful include an airpowered reciprocating saw or the aforementioned cut-off wheel with a 1 mm wheel. An angle grinder could also be used with care.
Making a registration mark prior to cutting the end off. The rear slot cut.
Cutting the hole for the burner.
Burner fitting
With the door cut, lay the bottle on the table and brace it so the base of the door is level. It pays to check the level with a square to ensure that it is parallel. Next transfer the height of the floor to the rear of the bottle and mark a slot roughly 100 mm x 25 mm on the rear with the base corresponding to the floor of the door. This opening will allow air to circulate and gases to exit the forge.
Now it is necessary to cut a hole for the fitting of the burner. In this case I purchased a burner from Gameco in Masterton. In fact the whole idea for the project was fired (excuse the pun) by the availability of good-quality, professionally made burners such as those I had seen Shane Minnear use on his forge. These have been difficult to obtain locally and many people simply make their own. I was not that confident that I had the knowledge to make my own and the consequences of failure could be dramatic.
Marking the cut line.
Cutting the end off the bottle.
I purchased the BKIT1 which comes with everything, including a pressure gauge, for $AU239. There are cheaper alternatives from Gameco which start at only $AU99—it’s worth calling them to get a quote. The burner can be welded into the side of the forge but I wanted the option to remove it in the event I decided to upsize the forge, so I found a galvanised flange connector fitting to fit the burner, which is threaded, and thread the other end into the forge.
Use the rear piece to cut a disc of wool to fit. Cut another for the front, too.
Cutting the wool for the interior.
With the interior lined, place the rear lid back on and tack it in place.
Once tacked in place the lid can be welded.
Kaolin wool
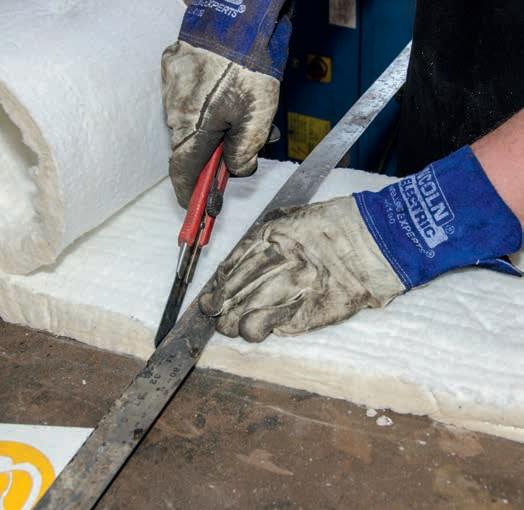
The hole is cut roughly midway and to one side. It may be possible to run it vertically and I have seen that done but I preferred it offset a little for ease of storage. The next stage is to remove the rear of the bottle entirely to allow the interior to be packed with kaolin wool, or Ceramic Fibre Blanket to give it its correct name. This is a material made from kaolin clay which is melted at 2000°C and spun in a continuous stream. The resultant wool-like material is made into mats and rolls for lining kilns, refractories and foundries.
It needs to be handled with some care as the material is mainly silica and the dust from its use can lodge in the lungs and possibly cause silicosis eventually. Silicosis is one of those silent killers that take many years to manifest; short of a lung transplant it’s incurable. So wear some sort of breathing protection when cutting the stuff and working with it. Make a mark somewhere on the bottle to aid in realigning the pieces and draw a line around the base as evenly as possible.
Now cut the rear off with a grinder and a cutting disc (it’s faster than the plasma). Unroll the kaolin wool—make sure you are wearing a mask for this process. Next cut two discs to fit both the front and rear of the bottle. Place one disc into the front of the bottle and measure the depth remaining. I then cut an amount equivalent to the circumference of the bottle. This was of course too much; I forgot to account for the interior measure and the depth of the wool itself. But it was easy enough to trim the excess once rolled and laid in the bottle.
Hardening the wool at the burner site.
Burner attachment
Now the rear of the bottle needs to be reattached. This is just a case of fitting the lid back on and tacking it before carefully re-welding the two pieces. I was fortunate to have the services of an accomplished welder like Greg Holster to do this so it looks like a bought one, but looks don’t matter: it’s performance that counts. Now it’s time to fix the burner attachment. To do this it is useful to harden the ceramic blanket and there is a hardener specifically for this job.
Once dry you can start to carefully cut the hole for the burner.
The pipe fitting welded to the bottle. The fitting was heavily galvanised which explains the sparks.
Wait until the hardener has rigidised the wool enough that it can be cut without tearing. Once we had a hole of sufficient diameter we applied some hardener to the inside, which meant cutting through the wool in the door opening. The idea of hardening the area around the burner is to prevent the wool being blown into the burner stream or the burner flow disturbing the wool in general. With the hole established it was possible to fit the pipe fitting to the opening and weld it in place.
The basics are completed and it only remained to add legs to keep the forge level and a handle to make it portable. One more refinement is to lay a floor in the forge—a flat surface to work on. This is made with another refractory product called Refractory Castable.
Adding a handle for portability.
Attaching the feet to keep the forge level.
Preparing the castable for the floor.
The castable floor – the mix was bit too wet.
Firing up
Castable is a heatproof, cement-like product often used in foundry linings. It is mixed with water and can be cast into specific shapes or used as a lining. It’s easy to mix—similar to concrete. Don’t get it too wet so add water in stages. It is laid on the floor of the forge and smoothed out and left to set. It will take a day or two to set. Don’t be tempted to dry it with the burner either, except in short bursts. Use gloves if you are handling the material as it contains glass and cement.
Connecting the burner is a simple enough matter. Wrap the end of the burner tube in Teflon thread tape before screwing on the burner assembly. Attach the hose to the shutoff valve and the regulator to the gas bottle. Check all the fittings with soapy water and briefly run the gas in a well-ventilated environment to ensure there are no leaks.
The forge set up.
The pressure valve with gauge.
LPG is a pernicious gas. It is heavier than air and can travel long distances to pool in crevices, drains and gulleys. Where possible, use it in a well-ventilated environment, open all doors in your shed or work outdoors. With the castable set and dry it’s time to fire up. Lighting the flame is easiest with a taper. Once the flame is established the intensity of the flame can be adjusted with the valve on the burner.
The burner valve.
There are few things more thrilling than firing up the forge and heating up a piece of metal to bright red for the first time. It helps too if it happens to be a freezing cold night so you can experience the other benefit of these forges: they are very good gas heaters.
Remember if you are heating up metal you will need somewhere to place the metal after you take it out of the forge and you will need tools to handle the hot metal. I used oven gloves but with hindsight that’s not the best material for handling hot steel. Be careful where you place the metal. Don’t place it on a concrete floor, for example. I’m going to have to get a few blacksmith tongs and some better gloves, not to mention the anvil, oil bath…oh dear I can sense another obsession coming on.
Testing the heat.
Final touches.