From simple moulds and mortar, you can create a white stonelike sculpture
By Greg Holster
A number of years ago, my wife and I were looking for a garden sculpture or ornament.
At the time, there didn’t seem a great deal to choose from. Anything half-decent was expensive, considering most of what we saw was made just from concrete poured into moulds and often not unique. We wanted an attractive sculpture, but on a garden gnome budget. I remembered reading an article in a garden magazine about artists putting a mix of sand and cement into a large box or wooden crate and, the following day, carving it into a sculptural form while the mortar was still soft.
I thought I would try the same thing on a smaller scale. I bought a bag of builder’s mortar, mixed it up and poured it into an old fish bin. The following day, using everything from screwdrivers and putty knives to rasps, I created my first masterpiece. At least I liked it (photos not shown here!).
Mixtures
From there I have progressed after experimenting with a few different mixtures.
I now use Premium White Masonry Mortar Mix. This is basically white cement and sand – the finer the sand the better. It is only a bit more expensive than plain grey, but it is convenient, far easier to work with and well worth the extra as far as appearance goes.
Additives such as marble dust and coloured pigments are also available, which are great for something different once you have mastered the basics. If white mortar isn’t available, try white cement and light coloured fine sand (not river sand). Mix one (1) part white cement to five (5) parts light sand and you are ready to go.
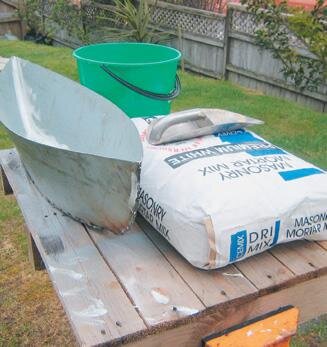

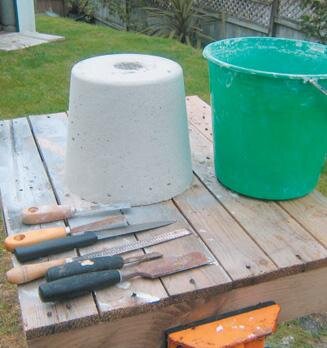
Moulds
Finding something to use as a basic shape for a mould isn’t hard. Most of the time I knock up a box out fence palings or odds and ends of plywood.
The materials are cheap and reusable. Otherwise plastic buckets, bowls, fish bins, rubbish bins or similar are also great. Here I have created a simple water feature to use with a solar-powered pump. It’s also a simple example of what can be created from one 30kg bag of mortar.
My moulds were a bucket for the plinth and an old boat-shaped flower holder borrowed from my sister in-law’s flower shop. Never to be returned. I welded up the base join of the tin shape which is normally soldered. The pressure of the mortar block can cause the seams to split, which I know has happened.
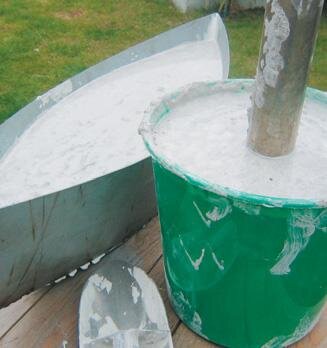
To make this feature, mix the dry mortar well into a smooth, but not-too-wet, consistency. Pour into moulds and leave for approximately 24 hours (or less in warmer weather). I put a fairly large pole into the middle of the bucket to create a hole for the hose to come through up the plinth. You could make a small hole and widen it out when you know the diameter of the hose. But as people don’t see the hole under the boat, it was easy to make large provision in the beginning.
The technical way of testing the mortar set is to give it a poke with your finger. I did once make a large whale tail in a plywood mould, left it to harden for three days and it was fine. Depending on the mould, a releasing agent may be needed to help get the basic block out. Most times I use a smear of clean engine oil or olive oil.
Shape and carve
Carefully roll the hardened concrete out of the mould.
Basically what you now have is a firmer sandcastle. Mark your shape or design with a sharp object. Start slowly scraping away the excess mixture. Do the bulky shapes first. There is no rush as the mixture will stay soft for a few hours. Even a day or two later is OK.
For fine or relatively intricate carving, leave such sections for a few more days. The harder the concrete, the easier it is to do the sharper detail. Even an angle grinder has its place. I used a screwdriver to put shadow in the curves. You could use the grinder here, but it would be too fast – if you make a mistake it’s all over, Rover.
With a screwdriver, you can move on and make the same mistake in every pattern. So many different options are available for patterns that the list is only as long as your imagination. Don’t panic about using your expensive rasp and clogging it up with mortar – I get mine from the $2 shop and if it turns to custard, can throw it away.
First cut
Plinth shaped
Boat, plinth
Once I had the mortar out of the bucket and the boat-shaped mould, I already had shapes close to my desired finish.
All that was needed was an idea on how to shape and form the plinth (bucket), and to reshape and finish the boat. As I finished it to near enough the final form, I used 40-grit garnet paper to round off the rough edges. It is surprising how much soft concrete can be removed and shaped with one sheet. This gives you the opportunity to see what needs to be changed or altered if anything.
At this stage, your sculpture will have a sandstone/ concrete appearance, which is fine. But if you leave it a few more days until it hardens a bit further, a good rub with wet and dry sandpaper from 80 down to 400 grit will give it a nicer feel and appearance, especially when you are using white mortar. I’ve seen some concrete garden ornaments finished but they can look really grainy with that concrete finish.
Rasp smoothing boat
Hollowing boat
Planning cuts. Note dark safety glasses
White stone
However, to finish off, I mix up a paste of white cement and brush it on. It fills the gaps like putty primer. When it’s dry, work with a rasp and a good sanding with wet and dry, right down to 800 and 1200 grit, will take the top off and give you the best white stone-like finish. Good finishing is important– an artist who used Oamaru stone for her sculptures once told me she spent three days sanding with wet and dry to get the stone smooth.
You can add marble dust to the white cement – it’s very fine and can go everywhere, but it also produces a lovely finish. I end with another good sand with 1200 grit wet and dry. To complete things, I emptied a can of silicon over the surface – when you run your hand over it, it is fabulous, just like stone. A silicon coating also keeps the mould out when the water feature is sitting in the garden.
Relaxing
There are a few sites on the Internet with some really good ideas. If you are going to try this out for the first time, keep things simple.
The classic Koru is a favourite of mine, simple, yet very satisfying. Maori bone jewelry sites have some great yet simple ideas for shapes, too. As far as Do-It-Yourself art goes, I believe this is probably the best value for money, extremely satisfying, not to mention therapeutic, and it can last for years outside or can be passed down through the generations. I now enjoy doing this for its own sake, too. When you come home tired from work, it can be very relaxing to pour a mould of mortar in a box, or using one you prepared previously, to just start shaping and sculpting.
Drilling insert pipe hole
Applying white cement
Glue for spout