Anodise those aluminium alloyed objects at home to protect them from corrosion.
By Len Gale
Dye takes on anodised spoon.
Aluminium alloys have one critical failing, for all their good qualities of lightness, conductivity and strength. They corrode. The reason for this can be seen in the makeup of many aluminium alloys and there’s a list of 25 different types in my 1956 copy of Machinery’s Handbook. A good example is the first on the scene and the most common, Duralium (Dural), made up of a minimum of 92 percent pure aluminium, but also 4.5 percent copper, and small amounts of manganese, nickel and magnesium. Therein lies the problem.
Alloys contain small grains of elements that can form local galvanic cells; hence the corrosion. For example, the small pits that can be seen inside aluminium cooking pots are caused by acids in the food reacting with the alloying elements. Pure aluminium may lack the strength of aluminium alloys such as Duralium, but those alloys lack pure aluminium’s resistance to corrosion.
One way to combine both properties is by cladding. A block of Duralium with a sheet of pure aluminium above and below is hot rolled to make a composite sheet called Alclad.
Another way to guard against corrosion is to create a hard oxide film on an aluminium alloy by anodising.
Anodising
The alloyed item becomes the anode or positively charged electrode by which the current enters, and is suspended in a bath of dilute sulphuric acid. The process thickens the natural oxides that form on the surface. The oxygen bubbles set free on the surface of the metal produce a protective oxide film when an electrical current flows from the part to be anodised (+) to the cathode (–). This hard film, about 25 microns (0.001 inches) thick, may be coloured by immersing the object in a hot dye bath.
Vegetable dyes as used to dye cloth are suitable. Colours range from pale yellow to difficult to achieve, black. We may also give pure aluminium items a wear-resistant, coloured surface through anodising.
Anodising is the reverse of electro-plating where the article to be plated or coated with a protective metal is the cathode or negatively charged electrode and the metal to be deposited is usually used as the anode .
Variables
Anodising is not an exact science. Acid strength can vary. Water may be distilled, from the tap or rain water. Voltage can range from 5V to as high as 24V. Time in the bath can vary. Electrolyte strength canvary. Dye strength can vary. The dye will “take” from cold to boiling and the time required to fix the dye from ten minutes to half an hour or more. And then there is the human element.
I began with the idea of making two semi-circular clashing strips to protect the fly wire near the handles, on two outside flyscreen doors. They were to be 1mm-thick aluminium pieces with a 70mm radius, which would be pop-riveted to the door frame near the handles. But the anodising set-up I had at home was not powerful enough. Despite trial and error, I found the anodising and dye would not take. I discovered that for large parts one needs 10 to 40 amps per square foot (929 sq cms). This would mean buying a rectifier, so I substituted a small tea caddy spoon, which I had been making copies of and successfully anodised and dyeing.
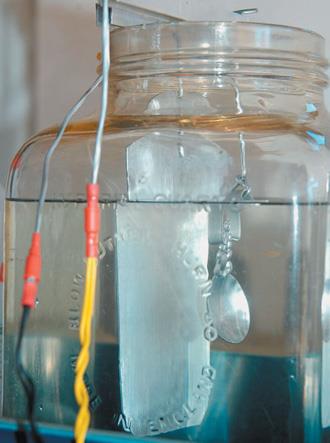
Anodising set-up with battery acid.
Equipment
You need a glass or plastic acid-proof container such as a large jar or food container of the Tupperware variety. The main thing is to have about 50mm clear around the item being anodised. The bath needs to be large enough to take the anode and cathode but not so big that there is too much electrolyte.
A certain amount of heat is generated. This will not cause problems for small runs but an outer cooling tank or tray with a flow of water is advisable if output is prolonged. Keep to 30° or below for the best results.
You will need a piece of thin sheet aluminium (it could even be foil) that hangs inside the tank. This is the cathode. It should be wider than the work and almost to the bottom of the tank. If you have a big enough piece of aluminium and a folder, the cathode could go down one side across the bottom and up the other side. This would ensure both sides of the part and underneath would be anodised. The cathode can be bent to hang over the edge of the bath and at that point a lead can be screwed on with a self-taper and washer.
The cathode is hooked up to the negative terminal of the power supply. It is a good idea to drill a few holes in the cathode to allow the solution to circulate freely.
You will need battery acid. I paid $10 for a litre. One litre of battery acid contains 447g of sulphuric acid and 553g of H2O. To make a 10 percent solution (to suit my jar) I added half a litre of battery acid slowly to 1.75 litres of water. Total brew, two and a quarter litres.
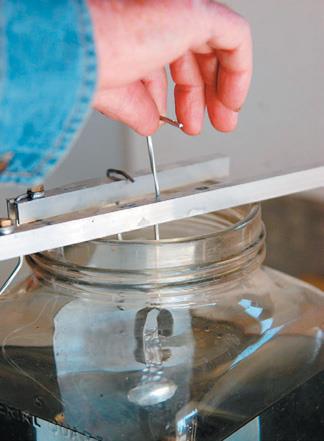
Above Suspend spoon from wire. Above Spoon in acid solution.
Always add acid
Remember the three As rule: Always Add Acid because if you do it the other way you are bound to create more burning splashes than you bargained for (See panel). When adding acid to water slowly and with care, be sure to wear rubber gloves and eye protection and put on one of those plastic BBQ aprons to protect against any small splashes.
For the power supply, the older style battery charger that delivers both six and 12 volts DC would be suitable. Start off on six volts for a few seconds then switch over to 12 volts. A five and 12 volt 10 amp unit from an old TV works well and was my choice.
I used a gas ring ($20 at my local BBQ store) connected to a gas bottle to heat the liquids needed to close up the spongy oxide film and to fix the dye.
For the suspension wire and bars, I chose 1/16” TIG wire and lengths of fly screen channel. Square is better than round, it is more stable and greater contact with the suspension wire is achieved. All work-supports inside the bath must be pure aluminium or aluminium alloy.
Spoon is suspended from positive terminal or bar.
Hydrogen bubbles from the cathode.
Degreasing
Give the part a good scrub with dishwasher liquid. A matt finish anodises better than a highly polished surface. You may prefer wire wool or 400 wet and dry (or finer). Rinse in clean water.
Assemble parts after anodising. Acid has a nasty habit of remaining between parts no matter how well you may wash an assembled unit.
My first attempt, for this article, the clashing strips, have two holes in each for the pop rivets. The 4mm clearance was too big for the wire to be jammed in firmly. A sharp back-bend and some work with a file allowed the wire to make a perfect electrical contact. (If there are small holes the wire can be hammered square and tapered to give good contact).
The tea-caddy spoon however, needs a clip that will hold it firm. At the point where contact is made the surface will not be anodised. For this reason I made the clip to grip on the side of the spoon handle. You will know that there is contact when the anode fizzes with small bubbles, as the surface oxidises. It is advisable to move the part in the bath from time to time; this also breaks any clusters of bubbles that may form.
Time to turn off the current and withdraw after 20 or 30 minutes. Do not touch the part with your fingers!
Use drip tray when lifting anodised spoon from acid.
Rinse
Rinse the anodised part under the tap and while it’s still wet hang it in boiling water for about ten minutes to seal the spongy oxide film. Then thoroughly rinse the part again in cold tap water, in this case the spoon, ready to immerse into the cold dye bath. Raise the temperature to boiling point and hold at that temperature for about ten minutes. I keep a tin can for each colour. In different tests to time how long the spoon should remain suspended in the dye, I found that 30 minutes works well and 25 minutes not quite as well.
Transfer the spoon from the dye and hang it in clear hot water for about 10 minutes, then take it and wash it under the tap.
Where the part to be anodised is flat it can be hung parallel to the cathode. Bent items need to be placed in a way that will average out the discharge otherwise ‘burns’ will occur.
Parts that are without a convenient hole may be held with a clip made from aluminium strip that has been hammered to work-harden the metal. The points where the clip grips will not anodise or take the dye. Should there be a threaded hole, match the thread on the suspension wire and get the best possible contact and there is less chance that the part may drop off.
It may be possible to scrape or file away the anodised surface on the suspension wire, but it is just as quick to replace the wire as it will no longer make contact with the next part to be anodised. I have heard that titanium wire lasts indefinitely but I have never tried it.
A vigorous rinse.
Hang spoon in boiling water to seal the oxide.
Transfer dye to burner.
Boil dye for ten minutes, suspend spoon in it for 30 minutes.
THREE “As”: ALWAYS ADD ACID
The subject of being meticulous in always adding acid to water is recorded in many humorous reminders among chemistry buffs. “Do like you oughta, Add acid to water” is a commonly shared message. “Here lies Gillian, / Still and placid. / She added water / To the acid. / Clever Jane / Did as she oughta. / She added acid / To the water” is another student doggerel with the same message.
And “Willy was a chemist, But Willy is no more, For what he thought was H2O, Was H2SO4.” Acid and water together create an exothermic reaction, in which heat is given out. Concentrated acid has a higher boiling point than water. If room-temperature acid is added correctly to room-temperature water slowly in small amounts, the heat generated from the small amounts of acid is dissipated by the large body of water. If water is incorrectly added to acid, the larger body of acid heats rapidly, boils the drops of water and keeps splashing them out as water is added.
* Tip: Cotton clothes protect from acid better than synthetics. Holes will form in the cotton but the skin will not burn, whereas acid on synthetics burns right through to the skin.