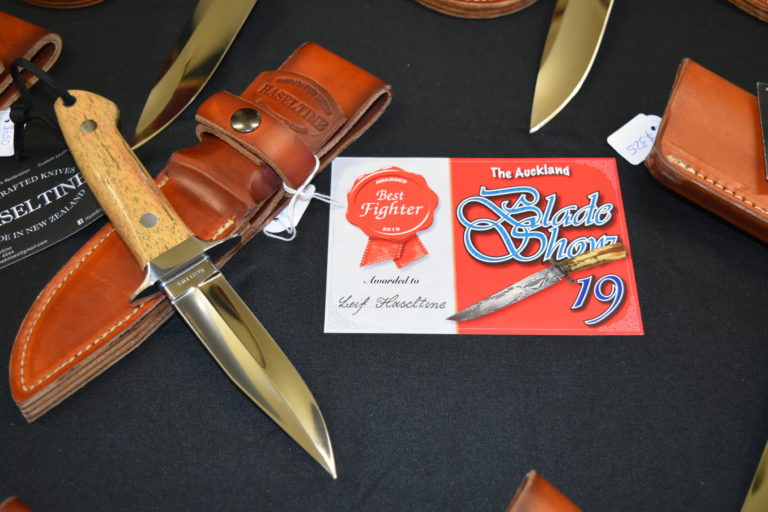
Follow the steps from damascus blank to folding knife with paua inlays
By Pete Caulfield
The balisong, also erroneously called the butterfly knife, has been around since approximately 1200 BC where it played a part in the Filipino martial art form Escrima.
Although some commercially available ones have been around for many years, they never really caught on until the 1970s. Then a few custom-blade makers produced a model or two bringing the fit and finish only a labour of love can achieve – pattern-welded blades, ivory, precious metal inlays, gemstones etc. Now they are probably the most popular one-handed openers going. I know one knife-maker in NZ who makes balisongs exclusively (Hi, Manny). The reason for the balisong’s popularity: four pins, two handles, one blade. No springs, screws, rivets.
The lockup open or closed is achieved with a simple latch. When locked open, the knife is virtually as solid as a fixed blade. When locked closed, it doesn’t open in your pocket leaving you trimming your fingernails while searching for change.
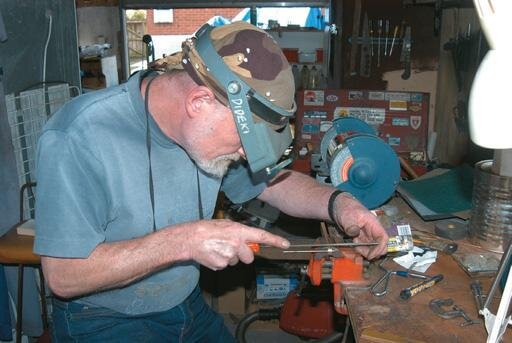
Hardboard model
To make a balisong, first make a hardboard model. If you are using a pattern-welded blank and don’t want to waste too much of it, make a working model that swivels and catches. After you have finished the real one, you can practice opening and closing at speed with the model without fear of a digitectomy. The first time I made a balisong, I built the model, including blade, entirely out of brass. It was spotted by a lady who wanted a fancy letter opener so I made the cost of the brass back.
The delicious damascus blank that I’ve acquired for my blade is a tightly twisted flamboyant blank that Matt James of Taupo sup-plied. Its original dimensions are 34 mm wide, 4 mm thick and 260 mm long. As I feel that carrying a pocket knife with a ten-inch blade might be a little ostentatious, not to mention uncomfortable, I’ll reduce the length to 125 mm overall.
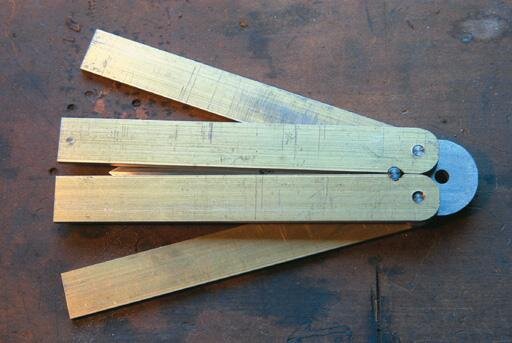
I buy my brass at 1/8 inch (3 mm) x 1 inch (25 mm), saw it to 17 mm then mill both edges to leave them flat, square and parallel to 16 mm. So the handle material becomes 1/8 inch by 5/8 inch (3 mm x 16 mm) brass strip 123 mm long x four pieces. As it’s usually sold by the metre, you can make the latch and spacers from the raw material. The brass, when assembled into a hilt, will become a frame for the blade it encloses. You have a beautiful picture – it deserves the nicest frame you can give it. Plain brass polishes easily and well and maybe engraved, inlaid, enameled and /or embellished.
First make a hardboard model.
Blade
First, I milled the edges of the 125 mm long blank to get them square and true.
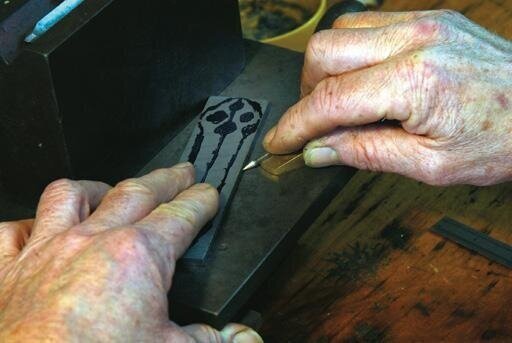
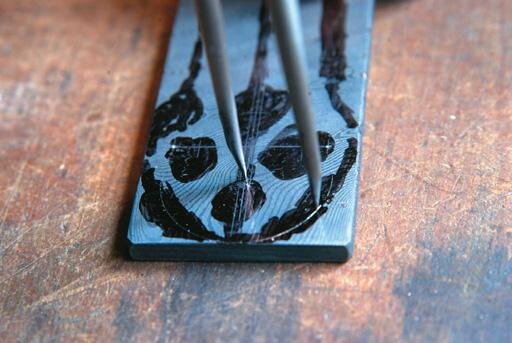
Then a pass across the butt to square it. No need to clean it completely as it just provides a datum for accurate mark out. The blank at 34 mm wide pretty much determines the handle width as 16 mm because the handle halves when together equal 32 mm. Using layout blue or a black felt tip, mark out the blade. Scribe the pro-file deeply.
Where the pin holes are going, try to keep the scribe lines within the area of the holes so that you have fewer scratches to polish out. Although the lock pins may be on a different radius to the pivot pins, they must share a common centre – 20 mm from the butt and perfect to the centreline. Saw out the profile – yep, you could mill to size but I can always find a use for “scrap” damascus from miniature blades to earrings.
File the profile to size accurately, leaving a tiny flat area where the 5 mm radius meets the 34 mm width. File the point radii as well. As I have a digital read out (DRO) on my mill, drilling and reaming accurate holes is a doddle. But if you don’t own one, you can check your accuracy by drilling a small hole in partially for the pivot pins. Use a Vernier caliper to check from the inside wall of the hole to the tiny flat on the width. If there is a discrepancy, you can fix it.
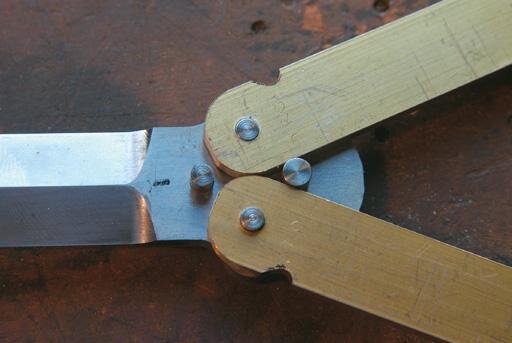
The pivot pinholes I drilled at 3.7 mm diameter then 3.9 mm diameter then used a number 21 drill (4.02 mm centre) which is a good sliding fit on a 4 mm silver steel. The two lock pin holes drill 3.7 mm then 3.9 mm and ream to press fit at 4 mm.
Damascus blank marked out
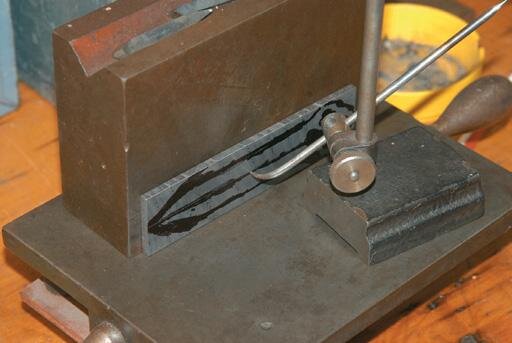
Blade facets
Grind, mill or file the blade facets. Keep them just off the blade and the edge centreline. You might find it easier, if filing, to file shallow to the blade centre then steep to the edge centre. Leave about 0.1 / 0.2 mm above the edge centre and less on the blade centreline.
By filing the resulting ridge between the two faces, you should be able to produce a flat, accurate facet. The same applies to the point, though you may want to keep a height gauge / scribing block set up for this line as your filing will constantly destroy it.
I don’t feel too guilty about admitting that I milled mine because there are lots of sheddies out there who own a drill mill or lathe/mill and know how to use them. If you started with my dimensions, trig it out. T = P over B or T = 2.15 over 10 = 0.215, just over 12 degrees. However, belt and braces – zero a dial test indicator (DTI or clock) on the blade and move it to the edge. Adjust the angle accordingly – the 2.15 is important.
When all four facets are cut, you will still have to cut the point curves. Some may grind. I file… carefully. If you decided to shape your hardboard blade to the double edge configuration, you may have already experienced the difficulty of maintaining a clean, sharply de-fined and straight ridge line, especially right to the point. When the filing has proceeded to a satisfactory conclusion, I would normally draw the file to remove deeper scratches at this point but I am lucky to be able to use some new diamond hones I bought cheaply.
Once the blade is finished to your satisfaction, it needs to be hardened and tempered. Matt James provides a pamphlet on this process with his billets. As I don’t own a harden-ing oven, I took the pamphlet and blade to a local place which I know from experience does good work.
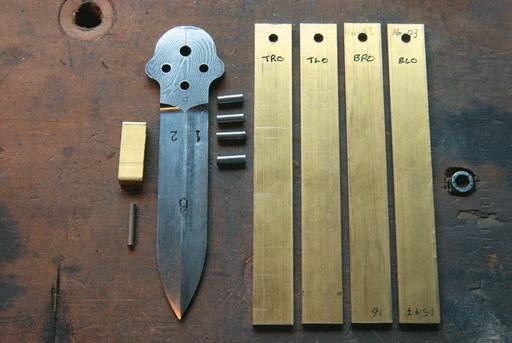
Pins, handles, latch
While waiting for the blade to come back, we can work on the pins, handles, and latch. The pins may be made from 4 mm silver steel and so left “soft.” As they are rotated in a hardened steel hole, they will wear but only your grandson may have to replace them. Hardened steel injection-mould ejector pins, for example, would work but hard steel to hard steel tends to seize. If you have a lathe you can turn them from whatever you please – even your “scrap” damascus.
A 4 mm diameter means 4 / 4.01 mm minimum clearance on blade pivot holes and push-fit on brass. My original stack equals 3.25 mm + 3.25 mm + 4.5 mm = 11 mm so I saw off my pin at 11.5 mm. There is sufficient for peening and fil-ing clean. Polish the pin ends (see polish pins section).

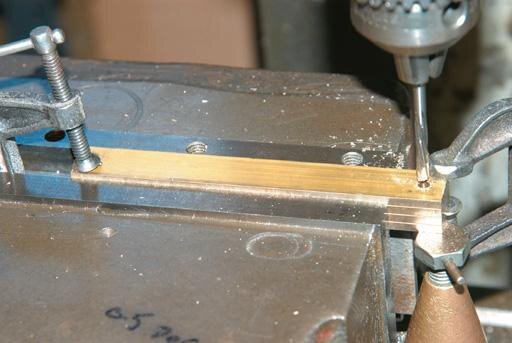
Drill handles
The four strips of 1/8 inch by 5/8 inch brass are now straightened ready for drilling. With the ends squared, drill and ream to 4 mm at 7 mm in from the end and exactly in the centre.
Follow the same procedure used in checking pivot holes. I did not tell you to scribe an 8 mm radius first as the drill would probably follow your punch mark. Take a piece of 4 mm silver steel al-most 50 mm long, chuck it in your drill press, spin it and run some wet and dry up and down it until it is a sliding fit in your handle hole. Mount it all through all the pieces and cut the radius using a radius gauge or half a 16 mm washer or even a bit of sticky tape cut to the correct radius and stuck on.
Cut your undersize piece of 4 mm in two to act as pivot pins between blade and handle. That way they slide on and off without destroying your press fit.
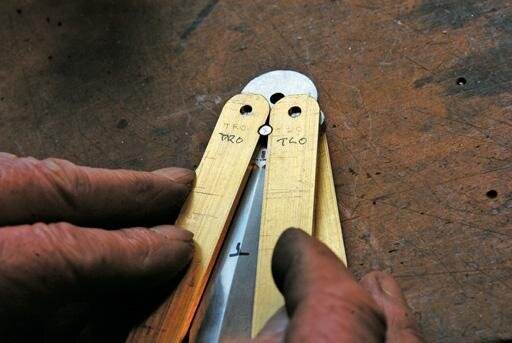
Blade marks
|Assuming you now have your hardened and tempered blade back safely, tape the blade on the facets and edges only. This is to prevent scratching the facets or yourself. Felt tip a “B” (Bottom) on one side of the blade and “T” (Top) on the other.
Then on the reamed ends of the brass strips shallowly scribe TRO (Top right open) TLO (Top left open) BRO (Bottom right open) and BLO (Bottom left open). The designation is arbitrary but once you have started on fitting, you will save a lot of confusion if you always keep the letters on the outside face.
When fitting to the “blade closed” pin, you will note that R becomes L. In the event of confusion, go back to the blade open configuration, point the blade towards you then pull the handles round and note where the pin touches the brass. This is approximately where the TOP of the pin will sit so cut a centreline 2 mm down from it. Remove TRO and TLO scribed faces outward, slide the under-sized pin through both the reamed holes, place in vice, edges parallel. With a round file 4 mm or less (chainsaw files come in quite a few diameters) take a few passes to establish the centreline and a bit of the 2 mm radius. Fit the pins and brass back to the blade and check.
Polish pins
The pin ends may be squared and polished by mounting them in a drill chuck, positioning a file on the table and trying to drill through the file with the pin. Check the pin in the chuck with a mirror to ensure you have removed any saw marks, replace the file with a 180 grit pad (by folding the sandpaper for a dome effect) then use wet and dry folded for the polish. Who needs a lathe?
Put the pins somewhere you can find them again.
Spring gap
At first you will appear to be missing the pin by 2 mm but take the radius deeper, filing straight and square until the unfiled ends of the handle miss by about 1 mm. When getting close, check every 3-5 file strokes. When you factor in the “cam follower” effect against the pin, you might end up with a hole that resembles half of a raindrop. When the rear of the handles are about 1.5 mm gapped, change to 320 wet and dry.
Note where the brass contacts the pin and polish the contact area until the gap is reduced to less than 1 mm but still discernible. This is crucial as the “spring” in the handle material locks the latch.
You are still wondering why I pitched the 4 mm hole only 7 mm from the handle end when it should have been 8 mm to make it symmetrical. Take your undersized pin and chuck it in the drill press. Clean the end with 1800 grit emery cloth by drilling into it. This will leave you a series of circles defining the centre. Pop it with a prick punch as centred as you can get it then place the pin in a vice with 1/8 inch showing above the jaws. Place one-half handle on the pin, set your dividers at 7 mm radius and scribe to the centreline of the 4 mm hole. Marry the ends of the radii to lines parallel to the handle edge, reducing the width to 14 mm.
Scribe deeply, then stick your undersized dowel through all four holes and re-profile. Once this has been done, you will note than 90 to 100 percent of the stuff-ups you made while achieving that 1 mm “spring” gap has disappeared. Breathe a sigh of relief and continue.
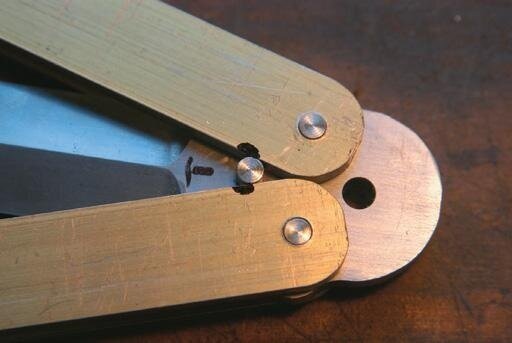
Latch
Latch and spacers come next and I did tell you that they could be made by leftovers from the original brass material. Well, the latch can if you have access to a shimstock. As my blade is 4.52 mm at the thickest part which is the blade end of the fulcrum, I need 0.67 mm shim ei-ther end of the latch to centralise it.
Cut the lathe material 10-plus mm wide by 36-plus mm long, then clean and square to those dimen-sions. Double-drill a 1/8 inch diam-eter hole at 5 mm in from one end, ensuring a push fit for a bit of 1/8 inch diameter brazing rod. Again, ensure the hole is centralised to the 10 dimension.
The next double-drilled hole will be 8 + 16 + 1.57 mm centred from this hole. If in doubt, drill the hole at 25.5 mm because you can file tiny flats on your latch bar to suit the spring of the handle. Re-assemble the knife on the loose dowels (par-don?) and check for fit.
File blade facets
Spacers
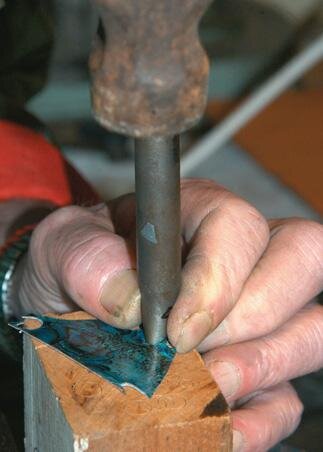
Make the spacers. For those without a lathe, cut a strip of your 1/8 inch left-over brass to wider than your blade thickness then file it clean and square to 0.03 mm wider than that dimension.
Cut six pieces 3 mm wide and drill through centrally at 1/16 inch diameter. The pins going through the scale and spacers will be 1/16 inch diameter brazing rod 11.5mm long. Now take your knife on the closed position and felt tip where the spacer possies will be.
I decided that 10 mm from the latch face, 10 mm from the lock pinhole and the last centralised between them would work. Use a square and scribe them lightly to-wards the outside edges with the scales clamped edge on as though they were latched.
Remove scales TLO and BRO. As this is a double-edged blade it could be the other two – suit yourself. With a dowel through the pivot holes, double-drill a 1/8 inch diameter hole at 5 mm in from the end dead centre of the scale. Lightly scribe a line 2 mm in from the edge to intersect your spacer lines. Now is a good time to make sure that the scribed BRO face is lying on the table and the scribed TLO face is looking at you. If they aren’t we have a problem.
Drill the spacer pin holes 1 /16 inch diameter through both scales while they are still dowelled and clamped. Mark out, scribe with dividers and cut 4 mm radii at the rear corners of the scales. Put the latch in position with a loose dowel and put the scales back on the blade.
Remove TRO and BLO and repeat the space and hole operation, not the latch hole operation. Assemble all components and check for fit. The dowels being slack can make this a little bit tedious but once you have your hand tightly around the handle you are effectively looking at the finished job.
Be sure to neutralise edge
Etching
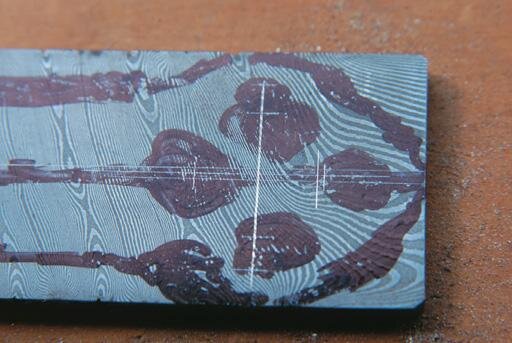
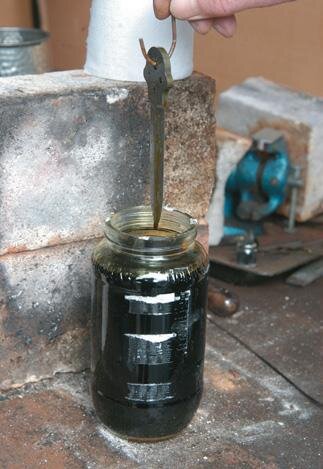
We need to etch the blade. Check the depth of glass jar you need for dipping, by hanging the blade from its rearmost hole on a piece of wire sitting on the rim of the jar. Dick Smith’s sells the etchant ferric chloride in liquid or crystal form. Follow the instructions and the safety rules on the label. Have a neutralising agent of a slurry of baking soda and water ready.
Polish each facet of the blade to a glass finish with 1000 grit and, holding the blade in toilet paper so your fingers cant’ touch it, pol-ish the butt profile. This opens the pores in the steel. Without touching, the etching surfaces, suspend the blade in etching compound for about 15 minutes. Tap off the excess etch and wipe with toilet paper. If you can just feel the pattern with a fingernail the etch is deep enough. Mine took 20 minutes.
Dab off all the etchant and wash it in clean water. Coat every surface including holes with the neutraliser, allow it to sit for ten minutes then wash with cold water again. Dry it out, wipe the black dust off and refinish with 1000 wet and dry.
Insert inlay
Jewellery
You could now simply assemble the parts with the correct-sized dowels, peen where necessary, run an edge on it and start peeling potatoes. However, my purpose was to produce a piece of serious macho jewelry, so I’m going to put seafood in it.
The new veneers of paua shell avoid the hazards of cutting or grinding shell, bone or stone which I had to do wet, outside, upwind, wearing a filter mask with the wet and dry vac running downwind. The 0.3 mm thick veneer on sticky tape backing can be cut with a fine-toothed jeweler’s piercing saw or punched out with a wad punch for simple shapes.
I alternated paua with black lip pearl inlays.
Cut the insert pockets in the handle 0.3 mm deep to achieve a flush sur-face then remove the centre pip in the holes with a “hobby tool.” No-body calls them dremels anymore. Polish the four cut faces with 600 wet and dry, clean then use 1000 grit to semi-polish. Dust out all the pockets with a cotton bud or air-line and clamp the peeled inserts in, giving them ten minutes to set. The glue that seeps up around the insert is a royal pain. If you find an easy way of losing it, please let me know.
Insert spacers. Drop pins in
Polish
We’ve reached the last leg – polish.
Scrape out any deep scratches on the brass with a sharp scraper then finish to 1000 wet and dry. Obviously, the knife will be more comfortable to use if you put a radius on the outside edges of the open position handles. Maybe you want to do some fancy file work or engraving, or inlay a ruby into the latch – I’ve never finished a knife yet. “There’s never enough time to do a job but always enough time to do it twice” is not a creed for someone who takes pride in their work. Perfectionism requires no excuses.
Once you are (sort-of) satisfied that you are finished on the handle parts, wash your hands and begin assembly. I mention washing because making and polishing cutlery automatically enroll you in the “black hand” gang. On assembly, make sure the clearances and interferences are correct. The two lock pins must be tight in the blade and the swivel pins loose, but with no play. Same with the latch pin – tight on the handles, loose on the latch. Position the spacers, slide 1/16 inch diameter pins through them and gently peen. Don’t miss a peen or you will have more scraping and filing to do making new pins.
Run an edge onto the blade and you are ready to start flipping. Happy hacking.
Red paua inlay in latch